
A blown fuse can stop a car, a home device, or a small project from working at all. The good news is that you do not need special training to check one. With a simple multimeter and a few safe steps, you can find out if a fuse is still good or if it has failed.
If you have ever wondered how to test a fuse with a multimeter, this guide will walk you through it in a clear and practical way. You will learn how to prepare, how to use the meter, how to read the result, and how to avoid common mistakes that lead to wrong answers.
We will also cover a few details beginners often miss, such as when a fuse can look fine but still be bad, and why testing a fuse in place is not always enough. By the end, you should feel confident checking most common fuses safely and correctly.
What a fuse does and why testing matters
A fuse is a small safety part. It protects a circuit from too much current. When too much electricity flows, the fuse breaks on purpose. This stops heat, damage, and sometimes fire.
Because a fuse is designed to fail, it is one of the first things to check when a device stops working. Many people replace parts without testing the fuse first. That can waste time and money. A quick test can tell you if the problem is simply a blown fuse.
One important point many beginners miss is this: a fuse can look normal and still be broken inside. The metal strip may be hard to see, especially in some glass or ceramic fuses. That is why a multimeter is better than guesswork.
When to test a fuse
Test a fuse when a device does not turn on, a circuit has no power, or an appliance suddenly stops working. In cars, this may happen when lights, radios, fans, or power windows fail. In homes, it may happen with power strips, small appliances, or control boards.
If a fuse blows more than once, do not keep replacing it without checking the cause. A new fuse can fail again right away if the real issue is still there.
Tools and safety steps you need first
You only need a few basic tools for this job. The most important one is a multimeter with continuity or resistance mode. A digital multimeter is easiest for most people.
Here is what helps:
- Digital multimeter with continuity or ohms setting
- Safety glasses if you are working near electrical panels or car batteries
- Needle-nose pliers or a fuse puller, if the fuse is hard to remove
- Replacement fuse with the same rating, if the fuse is blown
Before you begin, make sure the power is off when possible. For household circuits, switch off the breaker. For cars, turn the ignition off. If a fuse is in a live circuit, be careful not to touch metal parts with your fingers or tools.
Another small but useful tip: check the fuse rating before removing it. The amperage number is usually printed on the fuse body. Replacing it with the wrong rating can create a safety problem.
About continuity mode
Continuity mode is the easiest setting for testing a fuse. Many meters beep when the circuit is closed. If the fuse is good, the meter usually beeps or shows a very low resistance. If the fuse is blown, it shows no beep, no movement, or a very high reading.
If your meter does not have continuity mode, you can use the resistance setting instead. The result should be near zero ohms for a good fuse.
How to test a fuse with a multimeter step by step
The process is simple, but each step matters. Take your time and follow the order below.
-
Turn off the power.
Shut off the device, car, or circuit if you can. This is the safest way to test. If you are checking a car fuse, remove the key from the ignition.
-
Remove the fuse.
Pull the fuse out carefully. Use a fuse puller, small pliers, or your fingers if the fuse is easy to reach. Be gentle so you do not damage the fuse or the socket.
-
Set the multimeter.
Turn the dial to continuity mode. If there is no continuity setting, choose the lowest resistance range. Make sure the meter leads are plugged into the correct ports. Usually, the black lead goes into COM and the red lead goes into the voltage, ohm, or continuity port.
-
Test the meter first.
Touch the two probes together. You should hear a beep in continuity mode or see a reading close to zero ohms. This confirms the meter is working before you test the fuse.
-
Place one probe on each fuse end.
Touch the metal parts at both ends of the fuse. The order does not matter. Hold the probes steady so the contact is clean.
-
Read the result.
If the fuse is good, the meter should beep or show a very low resistance. If the fuse is blown, the meter will stay silent or show no continuity and a much higher resistance.
-
Check again if needed.
Move the probes slightly and test again. Sometimes poor contact can give a false reading. A second test helps confirm the result.
This is the basic method most people need. If you want to be extra sure, you can also check the fuse while it is still in the circuit, but that method has limits. More on that below.
How to know if the fuse is good or blown
A good fuse acts like a closed path. A blown fuse acts like an open path. The meter tells you which one you have.
| Meter result | What it usually means | What to do next |
|---|---|---|
| Beep / continuity | Fuse is likely good | Look for the real problem elsewhere if the device still does not work |
| Near 0 ohms | Fuse is likely good | Check the circuit, power source, or switches |
| No beep / open line | Fuse is blown | Replace it with the same type and rating |
| High resistance or unstable reading | Poor contact or damaged fuse | Test again and clean the probe contact points |
A small but important insight: a fuse that tests good outside the circuit may still not solve your problem. If the device is still dead after the fuse test, the issue may be a bad socket, broken wire, relay, switch, or power supply.
Also, some fuses fail in a way that makes contact only part of the time. If you get a strange reading, move the probes and test again. Do not trust a single shaky result.
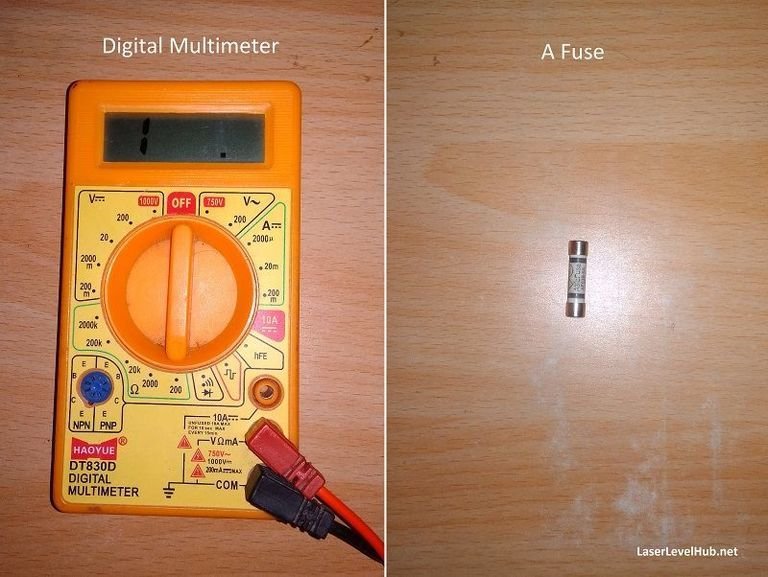
Credit: laserlevelhub.net
Testing a fuse without removing it
Sometimes you can test a fuse while it is still in place. This is faster, but it is not always the best method. It works best when the fuse terminals are easy to reach and the circuit is not confusing.
To do this, turn on the multimeter and touch each side of the fuse with a probe. If you get continuity across the fuse, it may be good. If not, it may be blown.
But here is the catch: testing in place can sometimes give a false result because current can travel through other parts of the circuit. A fuse may seem fine even when it is not. For that reason, removing the fuse is usually the safer and more reliable test.
When in-place testing makes sense
- When the fuse is easy to access but hard to remove
- When you want a fast first check
- When you already know the circuit is fully powered off
If you are not sure, remove the fuse and test it outside the circuit. That gives a cleaner answer.
Common mistakes beginners make
Many wrong readings come from small mistakes, not bad tools. If you know these problems ahead of time, you can save yourself a lot of confusion.
Using the wrong multimeter setting
Some people set the meter to voltage instead of continuity or resistance. That will not tell you if the fuse is open or closed. Make sure you are on the correct setting before testing.
Not touching the metal ends properly
You must touch the metal contact points, not the plastic body. If the probe is on the wrong spot, the meter may not read correctly.
Forgetting to test the meter itself
If the probes are loose or the meter battery is weak, you may think the fuse is blown when the meter is actually the problem. Always test the meter on itself first by touching the probes together.
Replacing a fuse with the wrong rating
This is a big mistake. A fuse is not just a piece of wire. It is sized for a reason. Use the same amperage, voltage rating, and type if possible. Never use a higher fuse rating to “fix” repeated failures.
Ignoring the cause of repeated failure
If a fuse keeps blowing, it is warning you about another issue. That could be a short circuit, overloaded device, damaged wire, or faulty component. Changing the fuse alone will not solve the real problem.
How to test different types of fuses
Most fuses work the same way, but their shape can vary. The testing method stays almost identical.
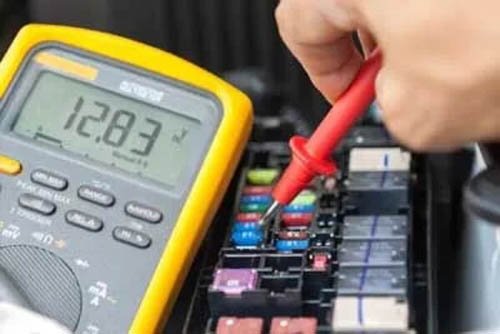
Credit: easycarelectrics.com
Blade fuses
These are common in cars. They have two metal legs. Touch one probe to each leg. A good blade fuse should show continuity or a very low resistance.
Glass tube fuses
These are often used in older electronics, small appliances, and some power supplies. Touch the probes to the metal caps on each end. Do not rely only on a visual check, because the inside strip can be hard to see.
Ceramic fuses
Ceramic fuses work like glass fuses but are harder to inspect by eye. Use the multimeter rather than trying to guess from the outside.
Cartridge fuses
These larger fuses may be used in high-current systems. Always make sure power is off before testing them. If the fuse is large or part of a main power line, be extra careful and follow the equipment’s safety instructions.
For a general reference on multimeter safety and use, a helpful resource is the Fluke guide to using a multimeter.
What to do after the fuse test
If the fuse is good, the next step is to look deeper into the circuit. The device may still fail because of another issue. Check switches, connectors, wiring, relays, batteries, or the device itself.
If the fuse is blown, replace it with one that matches the original rating. Then test the device again. If the new fuse blows quickly, stop and investigate the cause before trying another one.
Here is a smart habit many beginners skip: write down which fuse you tested and what you found. If several fuses are in the same panel, notes can help you avoid confusion later.
When a fuse keeps blowing
A repeated blown fuse usually means the circuit is drawing too much current. Common reasons include:
- Shorted wiring
- Faulty motor or fan
- Water damage
- Wrong replacement part
- Overloaded accessory or device
Do not solve this by installing a bigger fuse. That can damage the circuit and create a fire risk.
Extra tips that make fuse testing more accurate
Small habits can improve your results a lot. These tips are simple, but they matter.
- Clean dirty contacts. Oxidation or dirt on the fuse ends can cause a weak probe connection.
- Hold the probes still. A steady touch gives a better reading than a quick tap.
- Use good light. Better visibility helps you place the probes correctly and inspect the fuse holder.
- Compare with a known good fuse. If you are unsure, test a fuse you know is working to see what your meter should show.
- Check the fuse holder too. A good fuse will not fix a bent, corroded, or loose socket.
Another useful detail: a fuse can test good on the bench, but the holder may still be bad. Corrosion or loose clips can block power even when the fuse itself is fine. If the device still does not work, test the socket contacts next.
Quick reading guide for most multimeters
Different meters look slightly different, but the meaning is usually the same. This simple guide helps you read most digital multimeters.
- Beep sound: Continuity is present, so the fuse is likely good.
- 0.0 to 0.5 ohms: Usually a good fuse.
- OL, 1, or no display change: Open circuit, so the fuse is likely blown.
- Jumping numbers: Poor contact, weak meter battery, or dirty fuse ends.
If your meter shows a very small resistance, that is normal for a good fuse. The exact number may vary a little from meter to meter.
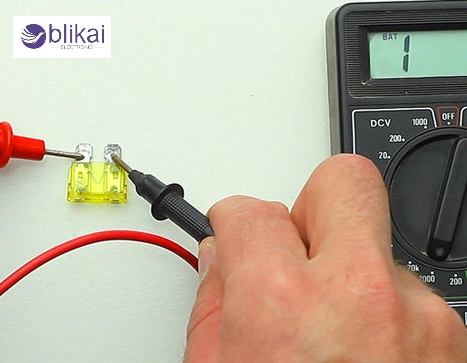
Credit: blikai.com
Safe replacement after testing
Once you confirm a fuse is blown, replace it carefully. Match the amperage, voltage, and style. If you are not sure, use the old fuse as a reference and check the device label or manual.
Insert the fuse firmly into the holder. Make sure it sits straight and snug. A loose fuse can cause intermittent power problems, which may look like a bigger electrical fault.
After replacing it, turn the power back on and test the device. If it works normally, the problem may have been a simple overload or a one-time fault. If it fails again, stop and look for the deeper cause.
Final thoughts
Learning how to test a fuse with a multimeter is one of the easiest electrical skills you can learn. It saves time, avoids guesswork, and helps you find the real problem faster. The key is simple: use the right meter setting, make solid probe contact, and read the result carefully.
Just remember that a fuse is only one part of the system. If the fuse is good, the fault may be somewhere else. If the fuse is blown, replace it with the correct type and ask why it failed. That habit will help you fix problems more safely and more effectively.
FAQs
1. Can I test a fuse without removing it?
Yes, you can sometimes test a fuse in place with a multimeter. But removing it is usually more accurate. In-place testing can give false results because current may travel through other parts of the circuit.
2. What setting should I use on my multimeter?
Use continuity mode if your meter has it. If not, use the lowest ohms setting. A good fuse should beep or show a very low resistance.
3. Does a blown fuse always look broken?
No. Some blown fuses look normal from the outside. The metal strip inside may be hard to see, which is why testing with a multimeter is better than guessing by eye.
4. What does OL mean on a multimeter?
OL usually means open line or open circuit. For a fuse, that normally means the fuse is blown and electricity cannot pass through it.
5. What should I do if a new fuse blows right away?
Stop replacing it and look for the cause. A repeated blown fuse often means a short circuit, overload, damaged wire, or faulty part in the circuit.
