
If your sink faucet is leaking, loose, or hard to remove, a basin wrench can save you a lot of time and frustration. It is a simple tool, but many people do not know how to use a basin wrench correctly. That is a problem, because the space under a sink is tight, dark, and awkward. A normal wrench often cannot reach the faucet nuts at all.
Learning how to use a basin wrench is useful for small plumbing repairs at home. It helps you tighten or loosen mounting nuts behind the sink, especially on faucet installations. With the right steps, you can work more safely, avoid damage to pipes, and finish the job faster.
In this guide, you will learn what the tool does, when to use it, and how to handle it step by step. You will also see common mistakes, practical tips, and a few details beginners often miss. If you are planning a faucet repair, this will make the work much easier.
What a Basin Wrench Actually Does
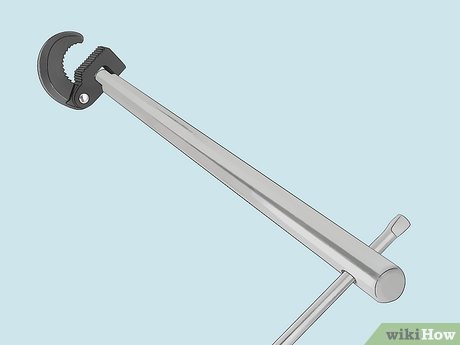
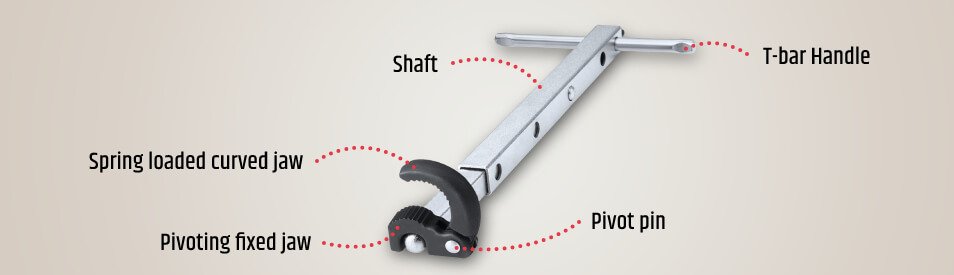
A basin wrench is made for one job: reaching faucet nuts in tight spaces under a sink. Its long handle lets you work from below, while the spring-loaded jaw grips the nut. The head is set at an angle, so it can catch nuts that are hard to see and even harder to reach.
Most people use it for faucet mounting nuts, but it can also help with some supply line fittings. Still, its best use is on sink faucets, where space is very limited. If you have ever tried to use a standard wrench under a bathroom sink, you already know why this tool exists.
One thing beginners often miss is that a basin wrench is not about force alone. It is about angle and reach. If you place it correctly, even a stubborn nut can come loose with surprisingly little effort.
When this tool is the right choice
Use a basin wrench when the nut is:
- Behind a sink bowl or basin
- Hard to reach with your hand
- Mounted on a faucet shank
- Too close to pipes or a wall for a regular wrench
If the nut is easy to reach, another wrench may be faster. But for sink faucet repairs, the basin wrench is often the best tool to have ready.
What to Prepare Before You Start
Good preparation makes the job much smoother. Before you learn how to use a basin wrench, gather the right tools and make the area safe to work in.
You will usually need:
- A basin wrench
- A bucket or small bowl
- A towel or rag
- Adjustable pliers
- A flashlight or headlamp
- Plumber’s tape, if you are reinstalling parts
First, turn off the water supply under the sink. Then open the faucet to release any remaining water pressure. This simple step prevents small sprays and surprise drips while you work.
It also helps to clear the cabinet under the sink completely. The more room you have, the easier it is to move your hands and the wrench. A flashlight is more important than many people think. Under-sink plumbing is dark, and being able to see the nut clearly helps you place the tool in the right position.
For more general safety and plumbing repair advice, the U.S. EPA WaterSense program is a helpful source for water-saving and fixture-related guidance.
How to Use a Basin Wrench Step by Step
This is the part where the tool starts to make sense. The process is simple, but each step matters. If you skip the setup, the wrench may slip or fail to grip the nut.
1. Find the nut you need to reach
Look under the sink and locate the faucet mounting nut. It is usually above the sink basin and below the faucet body. Depending on the faucet design, there may be one or two nuts.
If you are removing an old faucet, take a moment to study how it is connected. Some sinks have extra clips, washers, or supply lines in the way. Knowing the shape of the space helps you plan the angle before you start turning.
2. Adjust your position before inserting the wrench
Do not rush this part. The basin wrench is easier to use when your body is positioned comfortably. Kneel or sit in a way that lets you look upward into the cabinet without twisting too much.
One useful detail beginners often overlook is hand stability. Because the tool is long, even a small body movement can shift the jaw off the nut. Try to keep your arm steady and support your wrist when possible.
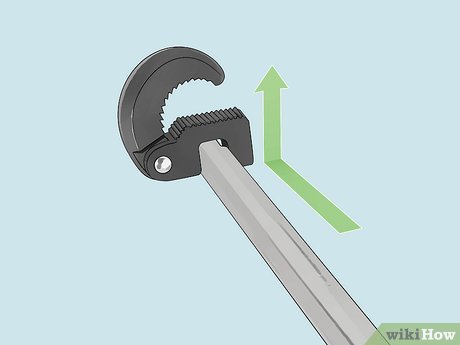
3. Open the spring-loaded jaw and place it on the nut
Push the tool head onto the nut so the jaw grips one of its flat sides. The spring-loaded head is designed to tighten its hold as you apply pressure in the turning direction. If the jaw lands at the wrong angle, remove it and try again instead of forcing it.
The best grip happens when the wrench head fully seats on the nut. You should feel it catch, not just touch. If it only half-grabs the nut, it may slip when you turn the handle.
4. Turn the handle in the correct direction
Once the jaw is set, pull or push the handle in the direction needed to loosen or tighten the nut. On most faucet mounting nuts, turning counterclockwise loosens, and clockwise tightens. But always double-check the setup of your specific faucet before applying force.
Use steady pressure instead of quick jerks. A basin wrench works best with controlled movement. If the nut is stuck, move the handle a little at a time and reset the jaw as needed. Do not twist wildly, because that can damage the faucet stem or nearby plumbing.
5. Reposition the wrench after each turn
This is one of the most important parts of the job. A basin wrench usually cannot make a full turn in one motion because the handle hits nearby pipes, wood, or the sink base. After each small turn, pull the wrench off, reset the jaw, and continue.
This step may feel slow, but it is normal. In tight spaces, small turns are how the job gets done. Patience matters more than speed.
6. Remove the nut and finish the repair
Once the nut is loose enough, you can usually remove it by hand or with pliers if space allows. Then continue with the faucet repair, replacement, or tightening job.
If you are reinstalling the faucet, thread the nut by hand first whenever possible. This helps prevent cross-threading, which is a common mistake and can make the repair harder to finish later.
How to Tighten or Loosen Without Damaging Parts
The basin wrench is built for leverage, but too much force can still cause trouble. The goal is not to muscle the nut. The goal is to control it.
For a loose faucet mounting nut, tighten it just enough to secure the faucet firmly. If you overtighten it, you may crack plastic parts, distort washers, or make future repairs difficult. A faucet should feel stable, but not crushed into place.
For stuck nuts, apply steady pressure and let the wrench work. If the nut does not move, check whether corrosion or mineral buildup is holding it in place. Sometimes a small amount of penetrating lubricant helps, but keep it away from rubber seals when possible.
A second detail beginners often miss: not every nut moves in the direction you expect from above. When working from below a sink, the angle can confuse you. If the nut is not moving, stop and confirm the direction before forcing it harder.
Credit: wikihow.com
Common Mistakes to Avoid
Many basin wrench problems are really setup problems. If the tool feels awkward, one of these mistakes may be the reason.
- Not shutting off the water first – This is the fastest way to turn a small repair into a wet mess.
- Poor lighting – If you cannot see the nut clearly, the jaw may miss it.
- Using too much force – A basin wrench works by leverage, not brute strength.
- Gripping the nut at the wrong angle – A bad grip can slip and round off the nut.
- Skipping hand tightening on reassembly – This can lead to cross-threading or uneven pressure.
Another mistake is using the wrench on the wrong size nut without checking the fit. A poor fit makes the tool slip more often. If your wrench head does not grab well, stop and inspect the nut size and the jaw position.
Credit: megadepot.com
How to Make the Job Easier in Tight Sink Spaces
Under-sink repairs are rarely comfortable. Small changes can make a big difference.
Use the right light
A headlamp is better than a flashlight held in your hand. It keeps the light pointed where you are looking, which leaves both hands free for the wrench and the nut.
Remove obstacles first
If there are cleaning bottles, drain trays, or stored items under the sink, take them out before starting. Even a small item can limit your movement and make the wrench harder to position.
Work in short movements
Do not expect a full turn. Most basin wrench jobs are done in small bites. Resetting the wrench is part of the process, not a sign that you are doing it wrong.
Check the faucet style before you begin
Some faucets have unusual mounting hardware. If your faucet is old, unusual, or heavily corroded, the nut may not look like the examples you have seen online. A quick look at the faucet design before starting helps you avoid surprise delays.
When a Basin Wrench May Not Be Enough
A basin wrench is very useful, but it is not perfect for every job. If a nut is badly rusted, stripped, or blocked by other plumbing parts, you may need another tool.
In some cases, adjustable pliers, a socket wrench, or a specialty faucet tool may work better. If the nut is damaged and keeps slipping, forcing it can make the problem worse. At that point, it may be smarter to stop and reassess the repair.
Also, if the faucet is very old, the mounting hardware may be corroded to the point where removal becomes difficult. A small amount of patience helps, but there is a point where replacement parts or a plumber may save time.
| Situation | Basin Wrench? | Why |
|---|---|---|
| Tight faucet nut under a sink | Yes | Built for hard-to-reach mounting nuts |
| Open and easy-to-reach nut | Maybe not | A regular wrench may be faster |
| Rusty or stripped nut | Sometimes | May need extra tools or replacement |
| Blocked by pipes | Yes | Long handle helps reach around obstacles |
| Very small or unusual fitting | Maybe not | Another specialty tool may fit better |
Simple Maintenance Tips for the Tool Itself
A basin wrench does not need much care, but a little maintenance keeps it ready for the next repair. After use, wipe off water, dirt, and grease. If the spring head feels sticky, clean it carefully so it can move freely.
Store it in a dry place. Rust can reduce the grip of the jaw and make the tool harder to use. If your wrench has adjustable parts, check that they still move smoothly before the next job.
One small habit that helps a lot: keep the wrench with your plumbing tools, not mixed with general hardware. That way, you can find it quickly when a sink starts leaking and you need it fast.
Credit: wikihow.com
Why This Skill Is Worth Learning
Knowing how to use a basin wrench is not just about one repair. It gives you confidence for future plumbing work too. Once you understand how to reach hidden nuts, you will feel less intimidated by sink faucet repairs.
It also saves money on simple jobs. Many faucet problems are not serious, but the under-sink space makes them seem difficult. With this tool and a calm approach, you can handle a lot of small repairs yourself.
The biggest lesson is this: the basin wrench rewards patience. If you use the right angle, the right light, and short controlled turns, the tool does most of the hard work for you.
Frequently Asked Questions
1. What is a basin wrench used for?
A basin wrench is used to reach and turn nuts in tight spaces under sinks. It is most common for faucet mounting nuts and other hard-to-reach sink fittings.
2. Which way do I turn a basin wrench to loosen a faucet nut?
In most cases, you turn it counterclockwise to loosen the nut. Still, check the faucet setup first, because your working angle under the sink can make the direction feel confusing.
3. Can I use a basin wrench on plastic nuts?
Yes, but use extra care. Plastic nuts can crack if you apply too much force. Turn slowly and stop as soon as the nut is loose enough.
4. Why does my basin wrench keep slipping?
It may be the wrong angle, the wrong size, or not fully seated on the nut. Try repositioning the jaw and make sure the nut surface is not too damaged or rounded.
5. Do I need to turn off the water before using a basin wrench?
Yes. Always turn off the water before starting a faucet repair. This prevents leaks, splashes, and surprise water flow while you work under the sink.
