
If your circular saw starts leaving rough edges, burning wood, or pulling off the cut line, the blade may be dull. Many people think the tool is the problem, but very often the real issue is the teeth. Knowing how to sharpen a circular saw blade can save money, improve cut quality, and make the saw safer to use.
A sharp blade cuts faster with less force. That means less strain on the motor, less heat, and less kickback risk. It also gives you cleaner edges, which matters a lot in furniture work, trim work, and finish carpentry. The good news is that sharpening is possible at home if you work slowly and follow the right steps.
This guide explains when to sharpen, what tools you need, and how to do the job safely. You will also learn common mistakes to avoid, because a bad sharpening job can make a blade worse, not better.
When a circular saw blade needs sharpening
Not every cutting problem means the blade is dull, so it helps to check the signs carefully. A truly dull blade usually shows a pattern, not just one bad cut. If you notice several of the signs below, it is time to sharpen.
- The saw cuts slower than usual.
- You need to push harder through the wood.
- The blade leaves burn marks on the edge.
- The cut feels rough instead of smooth.
- The saw makes more noise or vibration.
- The motor seems to work harder.
- The blade drifts away from the cut line.
Burn marks are one of the most useful clues. They often mean the teeth are rubbing more than slicing. Another clue beginners miss is dust quality. A sharp blade makes cleaner chips or fine sawdust depending on the material. A dull blade often makes hot, uneven dust and leaves fuzzy edges.
Also check the blade itself. If the teeth are chipped, bent, or missing, sharpening may not be enough. In that case, replacement is usually the safer choice.
What you need before you start
Before learning how to sharpen a circular saw blade, gather the right tools. Good preparation makes the job safer and more accurate. You do not need expensive equipment for a basic hand-sharpening job, but you do need steady hands and patience.
| Tool | Why it matters |
|---|---|
| Safety glasses | Protects your eyes from metal dust and tiny filings |
| Work gloves | Helps prevent cuts while handling the blade |
| Marker | Helps you track the first tooth and keep your place |
| Bench vise or blade clamp | Keeps the blade steady while you work |
| Diamond file or sharpening file | Used to sharpen the carbide tips or steel teeth |
| Cleaning brush | Removes pitch, sap, and sawdust |
| Degreaser or blade cleaner | Helps expose the true edge before sharpening |
Some carbide-tipped blades can be sharpened by hand only a limited number of times. If the carbide is very small or damaged, a professional grinder may be better. For many woodworkers, hand sharpening works well for a few maintenance rounds between deeper services.
One non-obvious point: a dirty blade can feel dull even when the edge is still usable. Pitch buildup adds drag and heat. Always clean first. It is a small step, but it often improves cutting right away.
Safety first: prepare the blade correctly
Safety matters more than speed here. A circular saw blade is sharp, heavy, and unforgiving. Before you touch the teeth, disconnect the saw from power and remove the blade from the tool.
- Unplug the saw or remove the battery.
- Let the blade cool fully if it has just been used.
- Remove the blade using the correct wrench.
- Inspect it for cracks, bent teeth, or missing tips.
- Clean the blade with a brush and degreaser.
- Clamp the blade securely in a vise or blade holder.
Do not try to sharpen the blade while it is still mounted on the saw. That is unsafe and usually gives poor results. A blade that shifts even a little can lead to uneven teeth and a weak cut.
If you are unsure whether a blade is repairable, hold it up to light and look closely at the teeth. If you see cracks near the carbide tips, stop and replace the blade. Sharpening cannot fix structural damage.
How to sharpen a circular saw blade step by step
The process is simple in theory, but accuracy matters. The goal is to shape each tooth evenly so the blade cuts in a balanced way. Work slowly and keep your strokes consistent.
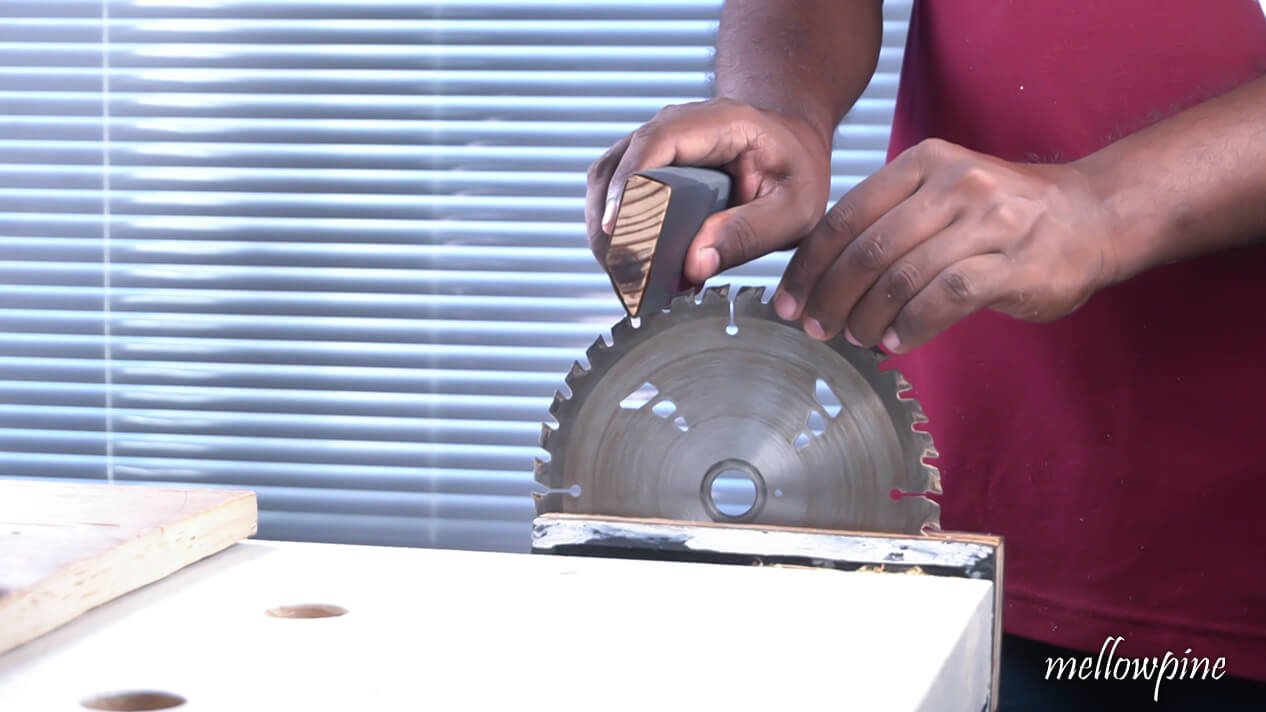
Credit: mellowpine.com
1. Mark the starting tooth
Use a marker to mark one tooth. This is your reference point. It helps you know where the sharpening cycle begins and ends. Without a mark, it is easy to lose track and miss one tooth or sharpen one twice.
2. Study the tooth shape
Look carefully at the blade before filing anything. Circular saw blades are not all shaped the same. Some have flat-top teeth. Others have alternate top bevel or special carbide geometry. You must follow the existing shape, not force every tooth into the same angle.
This is one of the biggest beginner mistakes. People often think sharper is always better, so they file too much metal or change the angle. That can ruin the blade. The correct approach is to copy the original bevel as closely as possible.
3. Secure the blade tightly
Clamp the blade in a vise with one tooth exposed. The blade should not wobble at all. If it moves, your filing angle will change from tooth to tooth. That creates uneven cutting and vibration.
Keep the tooth you are sharpening at a comfortable height. You should be able to file in a smooth, controlled motion without forcing your wrist into a bad position.
4. File the front face or cutting edge
Use a diamond file or a fine sharpening file that matches the tooth material. Place the file against the tooth at the same angle as the original bevel. Make a few light strokes in one direction only. Do not saw back and forth like you are cutting wood. Filing should be controlled and steady.
Usually, a few strokes are enough. You are not trying to remove a lot of metal. You are restoring the edge, not reshaping the whole tooth.
5. Match the angle on every tooth
Repeat the same motion on each tooth, keeping the pressure and angle consistent. The goal is balance. If one tooth is sharper or taller than the rest, it will do more work than the others. That causes rough cuts and faster wear.
Turn the blade carefully as you move from tooth to tooth. Keep checking your marker so you do not skip any teeth. A small flashlight helps when the teeth are tiny or the blade has been cleaned and is shiny.
6. Check for burrs
After sharpening, lightly inspect each tooth. A tiny burr may form on the edge. You can remove it with a very light pass of the file or a fine stone if needed. Do not overwork it. Too much filing reduces tooth life.
7. Sharpen the alternate teeth
Many blades have teeth that alternate left and right. That pattern helps make cleaner cuts. Be careful to keep the original direction intact. If you accidentally file one side more than the other, the blade may pull during use.
A useful trick is to sharpen every other tooth first, then rotate and do the remaining teeth. This makes the pattern easier to follow. It also reduces the chance of missing a tooth in the sequence.
8. Clean and test the blade
Once all teeth are sharpened, wipe the blade clean. Check the edge under good light. Every tooth should look even and consistent. Reinstall the blade carefully and test it on scrap wood first, not your final project.
The test cut should feel smoother, require less force, and leave a cleaner edge. If the saw still burns or wanders, the issue may be blade damage, wrong tooth geometry, or a problem with the saw setup itself.
Hand sharpening versus professional sharpening
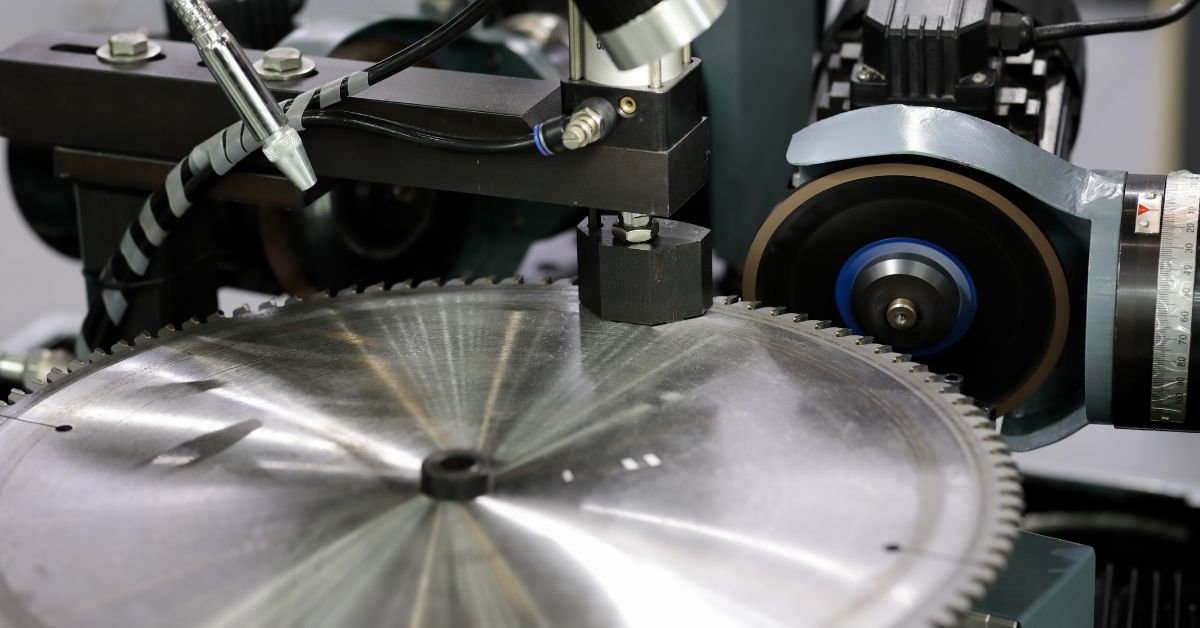
Not every blade is a good candidate for home sharpening. Some blades are easy to refresh by hand. Others are better handled by a sharpening service with a grinder and proper gauges.
Here is a simple way to decide:
| Situation | Best choice |
|---|---|
| Light dullness, no damage | Hand sharpening |
| Dirty blade with pitch buildup | Cleaning first, then light sharpening |
| Small chips in a few teeth | Professional sharpening if the damage is minor |
| Missing carbide tips | Replace the blade |
| Very expensive precision blade | Professional service |
Professional sharpening gives very accurate results, especially for premium blades. That said, hand sharpening is useful for maintenance and can extend blade life if you are careful. The right choice depends on blade value, condition, and how precise your cuts need to be.
Credit: coldsawshop.com
Common mistakes that ruin a blade
Most problems after sharpening come from small errors, not big ones. If you avoid these mistakes, your results will be much better.
- Using the wrong file — A file that is too coarse can remove too much material and weaken the tooth.
- Changing the original angle — Each blade design has its own geometry. Copy it instead of guessing.
- Sharpening unevenly — If one tooth is different from the others, the blade will cut badly.
- Skipping cleaning — Pitch and resin can hide the real cutting edge.
- Trying to fix damaged carbide — Deep chips and cracks are not a simple sharpening job.
- Removing too much metal — A blade can only be sharpened so many times.
Another mistake many beginners miss is forgetting to inspect the blade body, not just the teeth. If the plate is warped, the blade may still cut badly even after sharpening. In that case, no file can solve the problem.
How often should you sharpen a circular saw blade?
There is no fixed number of cuts or hours. It depends on the material you cut and how hard the blade works. Soft pine is easier on a blade than plywood with glue lines or hardwood with knots. Dirty wood also wears the edge faster.
A practical rule is to sharpen when you see a clear drop in cut quality. If you wait too long, the teeth can overheat and wear unevenly. Then sharpening becomes less effective.
For contractors and frequent users, checking the blade every few jobs is smart. For occasional DIY use, inspect it whenever cuts start to feel rough. It is better to clean and sharpen early than to force a badly dull blade through one more project.
Best habits for longer blade life
- Clean the blade after heavy use.
- Use the right blade for the material.
- Do not force the saw through the cut.
- Let the blade reach full speed before cutting.
- Store blades in a dry place.
These habits matter because most blade wear comes from heat, resin, and misuse. A sharp blade that is treated well can last much longer than a blade used aggressively.
Signs that sharpening is no longer enough
Sometimes the honest answer is replacement. Not every blade should be sharpened again. If you keep using a damaged blade, you may get worse results and put more stress on the saw.
Replace the blade if you find any of these problems:
- Cracks in the body or near the teeth
- Missing carbide tips
- Severe warping
- Teeth worn too short to restore
- Heavy heat damage or discoloration
One helpful detail: if a blade has already been sharpened many times, the tooth profile may be too small for another safe round. In that case, replacement is cheaper than risking poor cuts or unsafe operation.
Credit: coldsawshop.com
Better cuts start with a better edge
Learning how to sharpen a circular saw blade is one of the most useful maintenance skills for any woodworker or DIY user. It improves cut quality, reduces strain on the saw, and helps you work more safely. You do not need special talent. You need a clean blade, the right file, and steady attention to detail.
Start by cleaning and inspecting the blade. Then sharpen each tooth with the same angle and light pressure. Check your work, test on scrap, and stop if the blade is damaged beyond repair. That simple process will keep your saw performing better for longer.
If you want a trustworthy source for tool safety basics, the Occupational Safety and Health Administration offers general safety guidance that can support safe workshop habits.
FAQs
1. Can I sharpen any circular saw blade at home?
Not always. Many standard blades can be sharpened by hand, but some carbide-tipped blades are better handled by a professional. If the teeth are chipped, cracked, or missing, replacement is often the safer choice.
2. How do I know if my blade is dull or just dirty?
A dirty blade often has resin buildup and may cut better after cleaning. A dull blade usually keeps cutting poorly even after cleaning. If you see burning, rough cuts, and extra resistance, the edge likely needs sharpening.
3. What file should I use to sharpen a circular saw blade?
Use a fine diamond file or sharpening file that matches the tooth material and size. Avoid coarse files that remove too much metal. The file should follow the original tooth angle.
4. Is it safe to sharpen the blade while it is still on the saw?
No. Always remove the blade and disconnect power first. Sharpening on the saw is unsafe and makes it harder to keep the blade steady and accurate.
5. How many times can a circular saw blade be sharpened?
That depends on the blade quality, tooth size, and how much metal is removed each time. A good blade can often be sharpened several times, but once the teeth become too small or damaged, it should be replaced.
