
If your water heater is not producing enough hot water, the heating element may be the problem. This is a common issue in electric water heaters. The good news is that you can check the element yourself with a multimeter before calling a plumber or buying new parts.
Learning how to test water heater element with multimeter is not hard. You only need a basic tool, a little care, and a few simple steps. In many cases, one bad element is enough to cause weak heat, lukewarm water, or no hot water at all.
This guide will show you how to test the element safely, how to read the results, and what the numbers mean. You will also learn a few common mistakes people make, so you can avoid wasting time or replacing the wrong part.
What you should know before you start
A water heater element is the part inside an electric water heater that heats the water. Most electric tanks have two elements: one at the top and one at the bottom. If one fails, the heater may still work a little, but not well.
Before you test anything, it helps to understand one important point: a bad heating element is not the only possible cause of hot water problems. A faulty thermostat, loose wire, burned terminal, or tripped breaker can create similar symptoms. That is why a simple test with a multimeter is useful. It helps you narrow down the real cause.
Also, do not assume the lower element is always the problem. In many homes, the upper element fails first because it has a heavier load during heating. This is one of those details beginners often miss.
Tools and safety gear
You do not need many tools for this job, but the ones you use should be reliable.
- Multimeter with resistance or ohms setting
- Screwdriver to remove access panels
- Voltage tester if you want extra safety
- Insulated gloves for basic protection
- Flashlight to see inside the panel area
If you are not sure how to read a multimeter, check the manual first. The exact buttons and settings may differ by model. For a trusted overview of electrical safety basics, you can also review guidance from the Occupational Safety and Health Administration.
Safety steps you should never skip
Electric water heaters use high voltage. That means safety must come first. Do not touch wires until the power is off and fully confirmed.
- Turn off the water heater breaker at the main panel.
- Use a voltage tester if available to confirm power is off.
- Remove the access panel carefully.
- Take a photo of the wire positions before disconnecting anything.
- Keep the area dry and stand on a dry floor.
One mistake many beginners make is turning off the wrong breaker. If you are not certain, test the wires before touching them. Another common mistake is forgetting that both upper and lower elements can still hold a charge for a short time after power is shut off. Be patient and verify safety.
How a multimeter helps you find a bad element
A multimeter measures electrical resistance. In this test, you check whether the heating element has the right resistance value or whether it is open or shorted. A healthy element usually shows a resistance reading within a normal range, depending on the wattage and voltage of the unit.
For most residential water heaters, a common element reading is somewhere around 10 to 30 ohms. The exact number depends on the element size. A 4500-watt, 240-volt element often reads about 12 to 13 ohms. That is why the best result is not always one exact number. You are looking for a sensible reading, not zero or infinite resistance.
What the readings usually mean
| Multimeter reading | What it usually means | What to do |
|---|---|---|
| 0 to 1 ohm | Possible shorted element | Replace the element |
| 10 to 30 ohms | Often normal for many household elements | Check other parts if the heater still fails |
| OL, infinite, or no movement | Open circuit, element likely failed | Replace the element |
| Very unstable reading | Loose connection or damaged element | Retest after checking terminals |
Here is a small but important insight: a reading that looks “close enough” may still be wrong if the element is tested while still connected to other wires. That is why isolating the element matters. If you skip that step, the meter can give a false reading through another circuit path.
Step-by-step: how to test the element
Now let’s get into the practical part. The process is simple if you move slowly and carefully. The same basic method works for top and bottom elements.
Credit: wikihow.com
1. Turn off power completely
Go to the breaker panel and switch off the breaker for the water heater. If your home has labels, use them, but still confirm. Labels are not always accurate.
If you want an extra check, use a non-contact voltage tester near the heater wires. Do not rely on guesswork. Safety is more important than speed.
2. Remove the access cover
Most electric water heaters have a metal cover over the thermostat and element area. Remove the screws and set the cover aside. Under it, you may also find insulation or a plastic shield. Pull these back gently.
Be careful not to damage the wire insulation. If the insulation is brittle or burned, note that as a possible sign of heat damage.
3. Take a clear photo of the wiring
Before disconnecting any wires, take a photo with your phone. This simple step can save you from confusion later. Even experienced DIY users sometimes mix up wire positions during reassembly.
This is another detail beginners often overlook: the wire positions may look similar, but mixing them can cause more damage or create a safety risk. A quick photo removes the guesswork.
4. Disconnect the wires from the element
Use a screwdriver to remove the two wires attached to the heating element terminals. Move them aside so they do not touch anything metal or each other.
At this stage, the element should be isolated from the circuit. That gives you a more accurate resistance reading.
5. Set your multimeter to ohms
Turn the dial to the resistance setting, usually marked with the omega symbol Ω. If your meter has multiple ranges, choose the lowest range above zero or use auto-range if available.
If the screen still shows “OL” with the probes touching nothing, that is normal. It means there is no completed circuit yet.
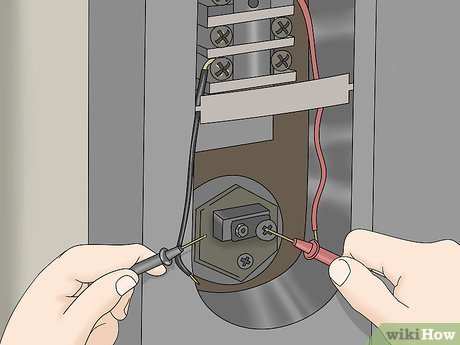
6. Test across the two element terminals
Place one probe on each terminal screw of the element. Hold them firmly so they make good contact. Watch the reading on the screen.
A good element often gives a stable reading in the expected range. If the meter shows OL or infinite resistance, the element is likely open and should be replaced. If it shows almost zero, the element may be shorted.
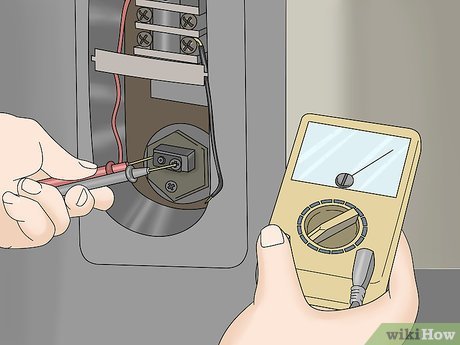
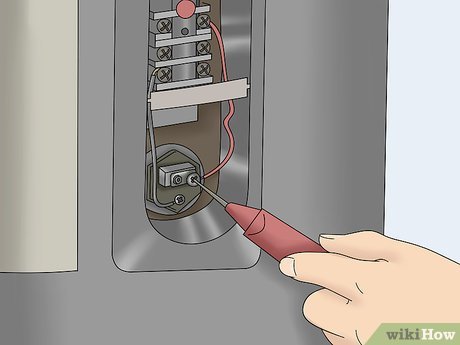
7. Test each terminal against the metal base
This second test is just as important. Put one probe on a terminal and the other probe on the metal body or flange of the element. Repeat for the other terminal.
A healthy element should show no continuity between either terminal and the metal body. If the meter shows continuity or a very low reading, the element is grounded and defective.
This is one of the most useful checks in the whole process. Some elements may still show a resistance value across the terminals, but fail this ground test. In that case, the element is still bad.
8. Compare your results
If both terminals-to-terminal reading and terminal-to-body reading make sense, the element is probably fine. If not, the element is likely the source of the problem.
Do not rush to replace parts until you compare both tests. A heater that is not working can have more than one issue. For example, a top element may test fine, but a lower thermostat may still prevent normal heating.
How to know if the element is bad
A bad heating element usually shows one of these signs during testing:
- No reading at all between the terminals
- Very low resistance, near zero
- Continuity from a terminal to the metal body
- Burn marks, cracks, or visible damage on the element
If the element shows normal resistance and no continuity to the body, it is usually not the problem. In that case, the thermostat, wiring, or breaker may need attention.
One non-obvious point many homeowners miss: an element can fail only under heat and still look okay when cold. That means the meter test is very helpful, but it is not the only clue. If your heater works sometimes and fails later, the thermostat may be cycling badly or the element may be weak and aging.
Signs the problem may be elsewhere
If the element tests okay, look at these other causes:
- Tripped breaker: The heater may not be getting full power.
- Faulty thermostat: The element may not be told to turn on.
- Loose wiring: A weak connection can stop heating.
- Sediment buildup: The element may be surrounded by minerals and heat poorly.
- Damaged high-limit switch: The heater may shut off for safety.
Do not ignore sediment buildup, especially in older tanks. A layer of scale can make a good element feel weak because heat transfer becomes less efficient. In hard-water areas, this is a frequent cause of poor performance.
How to replace a failed element after testing
If your test shows a failed element, replacement is usually the next step. The good news is that many water heater elements are inexpensive and easy to change with the right wrench. Still, you must work carefully.
Credit: wikihow.com
Before you remove the old element
Shut off power again and confirm it is off. Then drain the tank below the element level if needed. Some heaters have enough water above the lower element to make removal messy if you skip draining.
Use the correct water heater element wrench or socket. A standard tool that does not fit well can damage the element or tank opening.
Install the new element the right way
Clean the opening if there is scale or debris. Fit the new element tightly, but do not over-tighten it. Reconnect the wires exactly as they were before. Then refill the tank fully before restoring power.
This last point is critical: never turn the power back on until the tank is full of water. If the element heats in dry air, it can burn out very fast.
Common mistakes that lead to wrong results
Many testing errors happen before the meter even touches the element. If you know these mistakes, you can avoid false results and wasted parts.
- Testing with power on: This is dangerous and can damage the meter.
- Forgetting to disconnect wires: The reading may be affected by other parts of the circuit.
- Using the wrong meter setting: If you test voltage instead of resistance, the result will not help.
- Touching probes loosely: Weak contact can create unstable readings.
- Replacing parts without testing both elements: You may fix the wrong one.
Another subtle mistake is assuming both elements are identical in function even though they are not always working the same way. The upper element often has a different job from the lower one. If the top one fails, you may get no hot water at all. If the bottom one fails, water may be hot at first and then run out too soon.
Practical examples of what you may see
Here are a few common situations to make the process easier to understand.
Example 1: No hot water at all
You test the top element and get OL. That means the element is open. The heater likely cannot heat the water properly, so replacing the top element is a smart first step.
Example 2: Water is warm but not hot enough
The top element tests fine, but the lower element shows continuity to the body. In this case, the lower element is shorted or grounded and likely needs replacement. This can cause weak heating or shorter hot water supply.
Example 3: Meter shows a strange number
You see an unstable reading that jumps around. First, check that the wires are fully disconnected and the probes are touching the metal terminals firmly. If the number still jumps, the element may be damaged or the terminals may be corroded.
Simple maintenance tips to protect the new element
After you replace a bad element, a few simple habits can help it last longer.
- Drain sediment from the tank once or twice a year if your water is hard.
- Check for leaks around the element flange.
- Keep the thermostat set to a safe, moderate temperature.
- Inspect wires for heat damage during regular maintenance.
- Do not run the heater when the tank is empty.
These steps may sound small, but they matter. Sediment and overheating are two of the biggest reasons elements fail early. Preventing those problems can save money over time.
Credit: wikihow.com
When to call a professional
DIY testing is useful, but not every problem should be handled alone. Call a licensed electrician or plumber if you see burnt wiring, melted insulation, repeated breaker trips, water leaking from the tank, or if the meter results are confusing and unsafe to interpret.
If your home wiring is old or the breaker keeps tripping, the heater may not be the real issue. That can become a larger electrical problem, so it is better to stop and get help.
In short, learning how to test water heater element with multimeter gives you a fast way to diagnose one of the most common electric water heater failures. With a careful approach, you can save time, avoid guesswork, and know whether the element truly needs replacement.
FAQs
1. What setting should I use on the multimeter?
Use the resistance or ohms setting, marked with the Ω symbol. For many multimeters, the lowest suitable ohms range or auto-range works best when testing a water heater element.
2. What reading means the element is bad?
If the meter shows OL, infinite resistance, or a very low reading near zero, the element is likely bad. Also, if either terminal shows continuity to the metal body, the element should usually be replaced.
3. Do I need to remove the element to test it?
No, not usually. You only need to disconnect the wires from the element terminals first. That isolates the part and gives you a more accurate reading.
4. Can a water heater still fail if the element tests good?
Yes. A good element does not rule out other problems. A faulty thermostat, loose wiring, tripped breaker, or sediment buildup can still stop the heater from working well.
5. Is it safe to test a water heater element myself?
Yes, if you turn off power, verify that it is off, and work carefully. If you are unsure about electrical safety, or if you see damaged wires or leaks, stop and call a professional.
