
If you work with wood, you already know this feeling: a router starts cutting clean, then one day it begins to burn the edge, leave rough lines, or make more noise than usual. In many cases, the problem is not the router. It is the bit. Learning how to sharpen router bits can save money, improve cut quality, and reduce frustration in the workshop.
Sharp router bits do more than make pretty edges. They cut safer, run cooler, and place less stress on the tool and the wood. But sharpening them is not always simple. Router bits are small, hard, and often have coated or carbide edges. That means you need the right method, a steady hand, and a clear idea of when sharpening makes sense and when replacement is the smarter choice.
This guide walks you through the full process in a practical way. You will learn how to inspect a bit, what tools to use, how to sharpen different cutting edges, and how to avoid common mistakes that ruin the bit. If you want cleaner cuts and longer tool life, this is the place to start.
What makes a router bit dull
Before you learn how to sharpen router bits, it helps to understand why they lose their edge in the first place. Dullness is not always about heavy use. Sometimes it comes from the wrong feed speed, resin buildup, or cutting the wrong material.
Router bits usually lose sharpness in one of these ways:
- Edge wear: The cutting edge slowly becomes rounded from normal use.
- Burning: Excess heat weakens the edge and makes it dull faster.
- Pitch and resin buildup: Sticky wood residue covers the cutting edge and reduces performance.
- Chipping: A small piece of the carbide breaks off, often from hitting a nail, staple, or very hard knot.
- Improper storage: Bits rubbing against each other can damage the cutting edge.
A dull bit often gives warning signs. You may see tear-out, rough edges, dark burn marks, or a router that feels like it is working harder than usual. Sometimes the cut still looks “okay,” but you need more force to push the tool. That is a clue the edge is no longer doing its job well.
Non-obvious insight: A bit can feel dull even when the edge still looks sharp under casual inspection. Tiny edge rounding is enough to reduce cut quality, especially on hardwood and plywood veneer. Do not wait until the bit looks obviously damaged.
Can all router bits be sharpened?
Not every router bit should be sharpened at home. Some can be cleaned and honed safely. Others are better left to a professional service. This is one of the most important parts of the process because the wrong choice can ruin a costly bit.
In general, these bits are more suitable for sharpening:
- Straight bits
- Flush trim bits
- Core box bits
- Roundover bits
- Beading bits
- Chamfer bits
But there is a catch. Many router bits use very small carbide cutters brazed onto a steel body. Carbide is hard, but it is also brittle. If the geometry is complex, or if the bit has a special profile, manual sharpening may change the shape and affect the cut.
It is often best to avoid home sharpening when the bit has:
- Very complex profile geometry
- Special decorative shapes
- Severe chip damage
- Loose carbide inserts
- Visible cracks in the cutting edge
If you want to learn more about carbide tool materials and cutting edge wear, a reliable reference is the Kennametal technical resources page. It helps explain why carbide tools behave differently from steel tools.
Tools and materials you need
You do not need a large machine shop to sharpen router bits. For basic maintenance and light sharpening, a small set of tools is enough. Still, the quality of those tools matters more than quantity.
Here is a simple setup that works well for many woodworkers:
| Tool | Why it matters |
|---|---|
| Magnifying glass or jeweler’s loupe | Helps you inspect tiny chips and edge wear |
| Fine diamond paddle or small diamond file | Main sharpening tool for carbide edges |
| Cleaning solvent | Removes pitch, resin, and dust before sharpening |
| Soft brush or toothbrush | Helps clean grooves and cutting surfaces |
| Vise or bit holder | Keeps the bit steady during work |
| Marker | Helps you track the existing bevel and contact area |
| Safety glasses | Protects your eyes from metal dust and grit |
For most router bits, a diamond sharpening tool is the best choice. Carbide is too hard for many common files. A regular steel file may slide over the surface without doing much. Diamond abrasive works better because it can wear the cutting edge evenly.
Non-obvious insight: A very fine diamond surface is better than an aggressive one. Router bit edges are small, and it is easy to remove too much material fast. Fine grit gives you more control and helps preserve the original cutting geometry.
How to sharpen router bits step by step
Now we get to the core process. The goal is not to reshape the whole bit. The goal is to restore the cutting edge while keeping the original profile as intact as possible. That is the secret to cleaner cuts after sharpening.
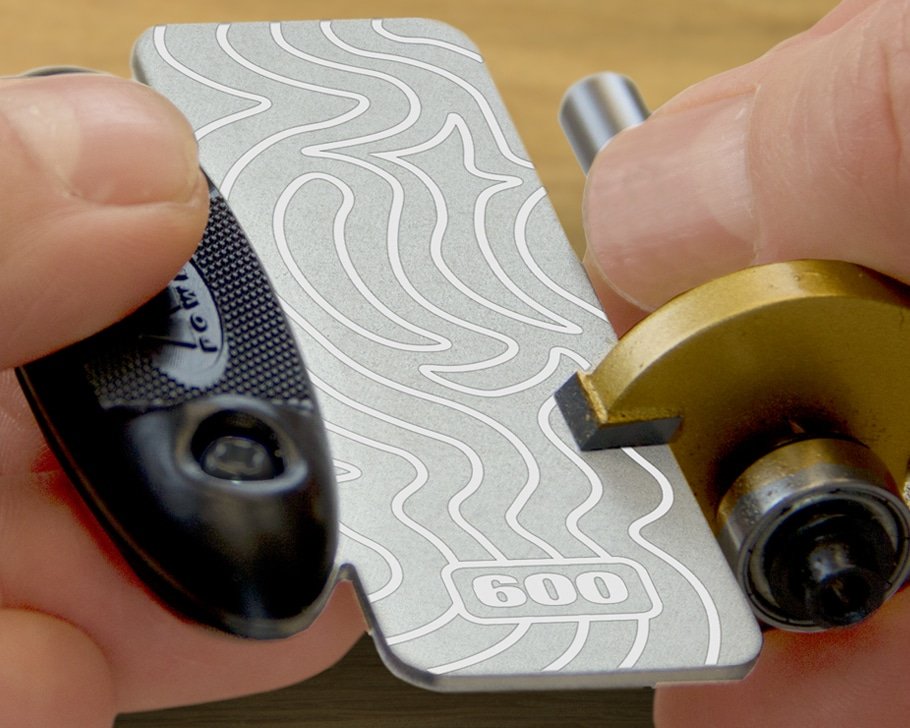
Credit: mpower-tools.com
1. Clean the bit first
Never sharpen a dirty bit. Pitch, dust, and resin can hide the real edge and make you remove material from the wrong place.
Wipe the bit with a cleaning solvent and a cloth. Use a soft brush or toothbrush to get into grooves and corners. Let the bit dry fully before you move on.
If resin is heavy, repeat the cleaning step. A clean edge is easier to inspect and much easier to sharpen correctly.
2. Inspect the cutting edges under bright light
Hold the bit up to strong light and rotate it slowly. Look for rounded edges, shiny worn spots, chips, and cracks. A sharp edge often reflects very little light. A dull edge usually shows a bright line where the corner has worn down.
Check both the cutting face and the relief area behind the edge. The relief angle helps the bit cut cleanly. If you sharpen only the front and ignore the rest, you may create a blunt edge that still does not cut well.
3. Mark the edge lightly
Use a marker to darken the cutting edge. This simple step helps you see exactly where your sharpening tool is touching. After a few passes, the marker will disappear from the correct contact area. If it disappears in the wrong place, you know your angle is off.
This trick is especially useful for beginners. It prevents guesswork and reduces the risk of changing the bit profile too much.
4. Secure the bit firmly
Place the bit in a vise or holder so it does not move. The bit must be steady, but do not crush it. If it shifts while you sharpen, your angle will change and the edge may become uneven.
Work with the edge facing you and keep your hands well supported. Good control matters more than speed. A small mistake on a router bit can affect every cut you make later.
5. Match the original bevel angle
Use the existing bevel as your guide. This is one of the most important parts of how to sharpen router bits. If you change the angle too much, the bit may cut poorly or wear out faster.
Make light strokes with the diamond file or paddle, following the edge angle. Do not press hard. Let the abrasive do the work. Use short, even passes and check the edge often.
For carbide bits, the sharpening action should feel more like refining than grinding. You are removing only a very small amount of material.
6. Sharpen each cutter equally
If the bit has more than one cutting edge, sharpen each one the same amount. Uneven sharpening can cause vibration, poor balance, and rough cuts. This matters a lot on bits with two or more cutters.
Count your strokes if needed. For example, give each cutting edge five light passes, then inspect them all before continuing. Consistency is more important than force.
7. Hone the back edge only if needed
Some router bits can benefit from a very light hone on the back side of the cutting edge. This is not about creating a new bevel. It is about removing tiny burrs left by sharpening.
Use only the lightest touch. If you overwork the back edge, you may round it over and reduce cutting performance. In most cases, just a few gentle passes are enough.
8. Remove burrs and inspect again
After sharpening, look closely at the edge again. Feel for burrs with care. A small burr can make the bit feel sharp at first but create poor cutting results in use.
Clean the bit once more and inspect the symmetry. If one cutter looks brighter, flatter, or more worn than the others, even it out with very light passes.
9. Test the bit on scrap wood
Never go straight to your project piece. Test the bit on scrap wood of the same species if possible. Look at the cut surface, the amount of force needed, and the sound of the router.
A properly sharpened bit should cut smoothly, with less heat and less resistance. The edge should look cleaner and feel more controlled. If the cut still burns or tears, stop and inspect again before using it on real work.
How to sharpen different router bit styles
Router bits are not all the same. The shape of the cutter changes the sharpening method slightly. The goal is always the same, but the way you reach that goal depends on the bit style.
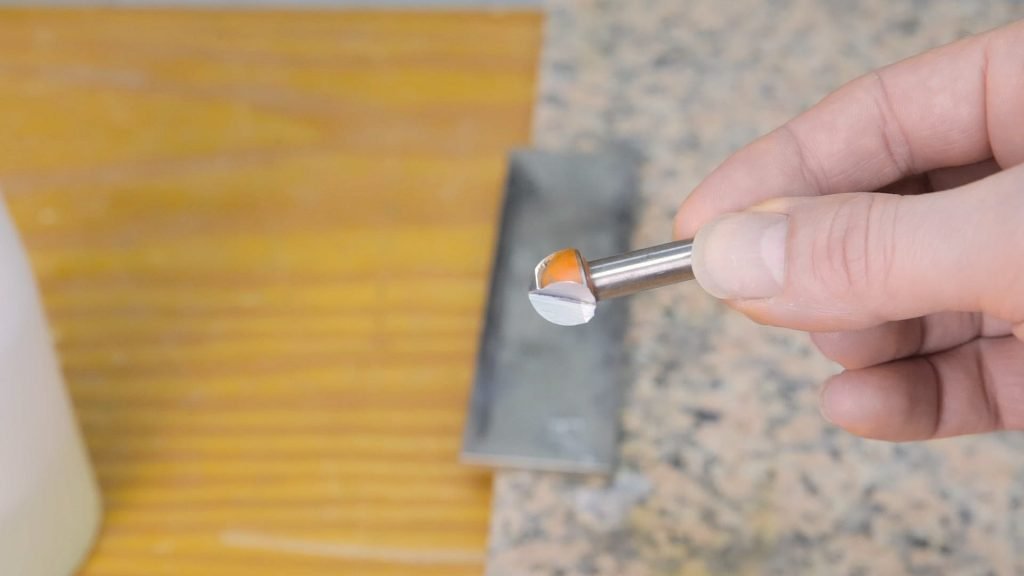
Credit: paoson.com
Straight bits
Straight bits are the easiest to sharpen because the cutting edges are simpler. Focus on restoring the flat cutting face and keeping the edge straight. Use light, even strokes and check that both cutters match.
Flush trim bits
Flush trim bits often have a bearing and two cutting surfaces. Clean the bit carefully, then sharpen only the cutting edges. Do not touch the bearing. The cutter must stay balanced, so treat both edges the same.
Roundover and ogee bits
These bits need extra care because their profile is decorative. Do not try to change the overall shape. Only hone the actual cutting edge. Use a very fine diamond file and keep the contact area tiny.
Chamfer bits
Chamfer bits are also fairly manageable. Follow the flat bevel and avoid rounding the corner. If the chamfer edge becomes soft or rounded, the finished edge will lose crispness.
Core box and cove bits
These profiles can be tricky because the cutting edge curves inward. Sharpen slowly and only where the actual cutting lip is worn. For complex shapes, it may be safer to send the bit to a professional sharpener.
Common mistakes to avoid
Many first-time sharpeners make the same errors. These mistakes are easy to avoid once you know what to watch for.
- Using too much pressure: This removes too much material and shortens the bit life.
- Changing the original angle: A different bevel can alter the cut and cause burning.
- Sharpening without cleaning: Dirt hides the edge and makes the job less accurate.
- Touching the profile instead of the edge: This can ruin the shape of decorative bits.
- Ignoring balance: Uneven sharpening can cause vibration and poor results.
- Waiting too long: Severe wear is harder to fix and often impossible to restore well at home.
Non-obvious insight: The most expensive mistake is often not a ruined bit. It is a bad sharpened bit that still looks usable. That kind of bit may produce inconsistent cuts, and the problem can be hard to trace until you waste time on a project.
When to sharpen and when to replace
This is where practical judgment matters. Not every dull bit is worth saving. A bit with light wear is a good candidate for sharpening. A bit with broken carbide, cracked brazing, or badly altered geometry is usually not.
Sharpen the bit if:
- The edge is dull but intact
- The profile is still clean and even
- The wear is light to moderate
- The bit is a quality tool worth preserving
Replace the bit if:
- The carbide is chipped badly
- The cutter is cracked
- The profile is too complex for safe home sharpening
- The bit has already been sharpened many times and lost its original size
It is worth remembering that every sharpening removes a small amount of material. Over time, the bit changes. That is normal. But if the cutting diameter gets too small or the profile becomes inaccurate, replacement may give better results than another sharpening attempt.
How to keep router bits sharp longer
Good maintenance can delay sharpening and improve performance between sharpening sessions. This is where many woodworkers gain the most. A bit that stays clean and cool lasts much longer.
Use the right feed rate
Feed too slowly and you can burn the edge. Feed too fast and you can overload the cutter. The best rate depends on the wood and bit size, but the main point is simple: let the bit cut instead of rubbing.
Clean the bit after use
Pitch and resin build up over time, especially in softwoods. Clean the bit before storage so residue does not harden on the edge.
Store bits carefully
Keep router bits separated so they do not touch each other. A foam tray, bit case, or individual slot holder works well. The edge is tiny, so even light contact can damage it.
Match the bit to the material
Some materials are harder on bits than others. MDF, laminate, and resin-heavy woods can wear edges faster than clean hardwood cuts. If possible, use the right bit design and cutting speed for the job.
Use sharp bits early, not late
Do not keep forcing a dull bit because “it still works.” That habit creates heat, poor cut quality, and more wear. A bit is easiest to sharpen when the edge is still mostly intact.
A simple sharpening routine for regular workshop use
If you use router bits often, you do not need to inspect them in a complicated way every time. A short routine can keep things under control and prevent problems before they grow.
- Clean the bit after each major session.
- Check for resin buildup and edge shine.
- Test the bit on scrap if the cut quality drops.
- Sharpen lightly at the first sign of wear.
- Retire the bit if chips or cracks appear.
This routine works because it prevents deep wear. It also makes sharpening faster. A bit that is maintained regularly takes only a light touch to restore. A neglected bit often needs more aggressive work, and that is where mistakes happen.
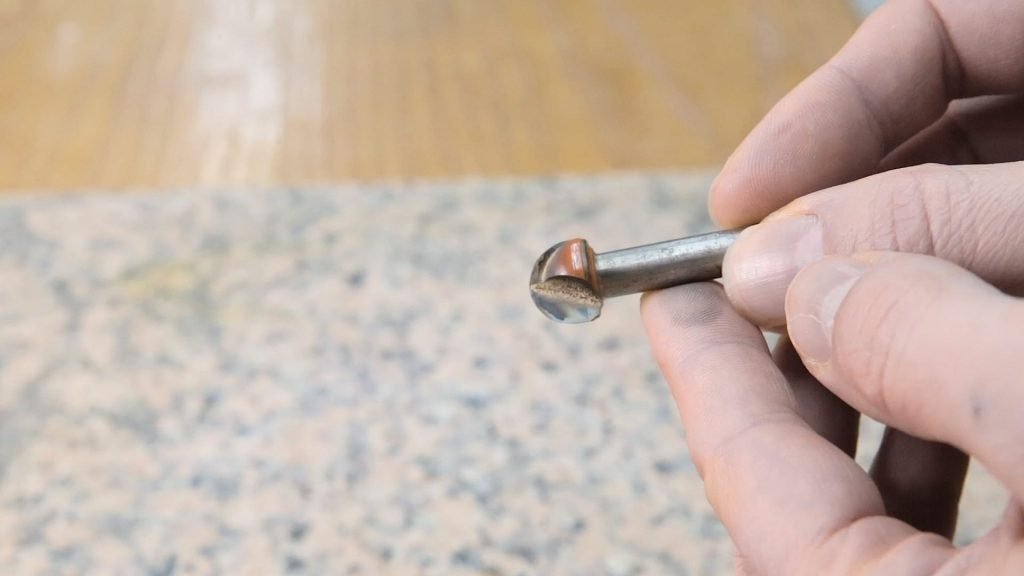
Credit: paoson.com
Why sharper bits give better results
A sharp router bit does more than cut wood. It improves the whole process. You get less tear-out, smoother edges, lower heat, and a cleaner finish that needs less sanding. The router also feels easier to control.
There is another benefit that beginners often miss: a sharp bit gives better accuracy. When the cutter is dull, you may push harder and the router may drift slightly. That small movement can throw off joinery, trim work, and edge profiles.
If your goal is professional-looking work, sharp bits are not optional. They are part of the setup, just like correct speed, solid router support, and clean workholding.
Final thoughts
Learning how to sharpen router bits is a valuable skill for anyone who wants cleaner cuts and longer tool life. The process is not hard, but it does require patience, light pressure, and respect for the original bit geometry. Clean first, inspect carefully, sharpen gently, and test on scrap before real work.
Just as important, know when to stop. Some bits are worth sharpening at home. Others are better replaced or sent to a professional. When you make that choice well, your router performs better, your cuts look cleaner, and your tools last longer.
FAQs
1. Can I sharpen router bits with a regular file?
In most cases, no. Carbide router bits are too hard for a normal steel file to work well. A fine diamond file or diamond paddle is a much better choice for safe, controlled sharpening.
2. How do I know if my router bit is dull?
Common signs include burn marks, rough edges, extra noise, more cutting resistance, and tear-out in the wood. If the bit needs more force to cut cleanly, it is probably dull or dirty.
3. How often should I sharpen router bits?
There is no fixed schedule. It depends on how often you use them and what materials you cut. Check the edges regularly and sharpen as soon as cut quality begins to drop.
4. Is it safe to sharpen decorative router bits at home?
Only if the profile is simple and you can keep the original shape. Decorative bits with complex curves are easy to damage, so many woodworkers prefer professional sharpening for those tools.
5. Will sharpening change the size of my router bit?
Yes, slightly. Every sharpening removes a small amount of material. Over many sharpenings, the cutting diameter and profile can change, which is why light maintenance is better than waiting too long.
