
If you want cleaner cuts, smoother surfaces, and less tear-out, learning how to sharpen a hand plane blade is one of the best woodworking skills you can build. A sharp blade does not just make planing easier. It also makes the whole tool feel more controlled, more accurate, and far less tiring.
Many beginners think the problem is the plane itself. But very often, the real problem is a dull edge, a rough bevel, or a poor back polish. The good news is that you do not need expensive machines to fix it. With a few simple tools and the right process, you can create a razor-sharp edge that works beautifully on wood.
In this guide, you will learn a practical step-by-step method for sharpening a hand plane blade. You will also learn how to check your progress, avoid common mistakes, and keep the edge sharp for longer. By the end, you should feel much more confident at the sharpening bench.
What a truly sharp hand plane blade looks like
A hand plane blade does not need to look shiny to be sharp. What matters is the edge geometry and the quality of the very tip of the blade. A proper sharpening job creates a flat back, a clean bevel, and a tiny, even cutting edge.
There are two main parts that must work together:
- The back must be flat and polished near the edge.
- The bevel must be set at the correct angle and refined to a fine finish.
When these two surfaces meet cleanly, the edge becomes strong and keen. If either side is rough, rounded, or uneven, the blade may still cut, but it will not cut well for long.
One thing beginners often miss is that a blade can feel “sharp enough” after coarse grinding, yet still fail on wood. That is because real sharpness comes from refining the edge, not just reaching a point. The last few steps matter the most.
Tools you need before you start
You can sharpen a hand plane blade with a simple setup. The exact tools are less important than using them consistently.
| Tool | Why it matters |
|---|---|
| Sharpening stones or abrasive sheets | Used to grind and refine the bevel and back |
| Honing guide | Helps keep a steady bevel angle, especially for beginners |
| Marker | Shows where the stone is touching the blade |
| Flattening plate or flat surface | Keeps your stones flat so they work correctly |
| Leather strop or fine finishing surface | Removes the last wire edge and improves polish |
| Rag and water or oil | Clears slurry and keeps the work area clean |
You do not need every fancy accessory. But you do need flat stones, a stable angle, and a way to inspect the edge. A cheap loupe or bright light can help, but even your eyes can tell you a lot once you know what to look for.
Choosing the right grit range
If the blade is only slightly dull, you may start around 1000 grit or equivalent. If it is chipped, rusty, or very dull, begin with a coarse stone or abrasive around 220 to 400 grit. Then move through medium and fine grits before finishing.
A common mistake is starting too fine. That wastes time and never removes the damaged metal near the edge. Another mistake is staying too long on coarse grit. That can leave deep scratches that make later polishing harder.
Inspect the blade before sharpening
Before you touch a stone, look closely at the blade. This saves time and helps you choose the right approach.
Check these areas:
- The cutting edge for chips, dents, or uneven wear.
- The bevel for grinding marks, pitting, or rounding.
- The back for rust, scratches, and flatness near the edge.
- The corners for small nicks that may leave tracks in wood.
If the edge has small chips, you must remove enough metal to get past them. Do not try to “sharpen around” damage. That only leaves a weak edge behind. If the blade is badly pitted or bent, more work may be needed before normal sharpening can begin.
This is one of the less obvious points beginners miss: not every dull blade should be sharpened the same way. A quick touch-up and a full restoration are different jobs. Knowing the difference helps you avoid overworking the blade.
Flatten the back near the edge
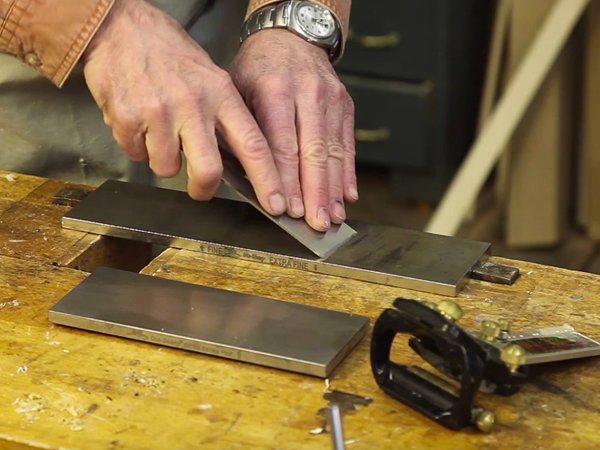
The back of the blade is just as important as the bevel. For a hand plane, you usually do not need to polish the entire back. You only need the area near the cutting edge to be flat and smooth.
Credit: woodworkersjournal.com
How to do it
- Place the back flat on a coarse or medium stone.
- Move it forward in straight strokes.
- Keep steady pressure near the front of the blade.
- Check the scratch pattern after a few passes.
- Continue until the first inch or so near the edge is flat and evenly scratched.
Once the area near the edge is flat, move to finer grits and repeat. You are aiming for a polished strip at the back edge, not mirror shine across the whole blade.
Do not rock the blade. Even small movement can round the back and weaken the cutting edge. The back should lie flat on the stone the whole time.
A small but important detail
Keep the very edge of the back clean. If you leave a tiny burr or roughness on the back, the plane may feel dull even after careful bevel work. A clean back edge helps the blade slice cleanly instead of dragging.
Set the bevel angle correctly
For most bench planes, a bevel angle around 25 degrees is common, with a final cutting angle often around 30 degrees after honing and bedding in the plane. The exact angle depends on the plane type and the wood you cut.
For general use, a standard bevel is a good starting point. If you cut difficult grain, a slightly steeper micro-bevel can help. If you are unsure, match the existing bevel before making changes.
Use a honing guide if you want repeatable results. Freehand sharpening is fine too, but it takes more practice. A guide makes it much easier to keep the angle steady, especially when you are learning how to sharpen a hand plane blade.
How to know your angle is right
Use a marker to color the bevel. Then make a few light passes on the stone. If the marker disappears evenly across the bevel, your angle is close. If only the heel or the very tip is touched, adjust the angle.
This simple marker trick saves a lot of guesswork. It also stops you from grinding the wrong area for too long.
Work through the sharpening grits step by step
Now the real sharpening begins. Your goal is to remove scratches from the previous grit and gradually refine the edge until it is clean and keen.
1. Start with the coarse grit only if needed
Use coarse grit when the blade is damaged, very dull, or badly out of shape. Press the bevel onto the stone and move it in smooth, controlled strokes. Keep the pressure even and avoid twisting the blade.
Stop when you can see a full scratch pattern from the grit across the bevel. If chips are present, keep going until they are gone. Do not rush this stage.
2. Move to medium grit
Once the bevel shape is correct, move to a medium grit. This stage removes the deeper scratches left by the coarse stone. The blade should already feel better, but it is not finished.
Use lighter pressure now. Heavy pressure at this point can slow progress and create a rough edge that is harder to polish later.
3. Finish with a fine grit
The fine stone does the final refinement. This is where the edge starts to feel truly sharp. Focus on clean, even strokes and consistent contact.
At this stage, many woodworkers use a small micro-bevel. That means you slightly raise the angle for the last few passes. This creates a tiny bevel at the very edge, which can be quicker to sharpen and easier to maintain later.
4. Refine the back again if needed
After the bevel work, check the back one more time on fine grit. A few light passes can remove any tiny burr and improve the final edge. You do not need to grind hard. Light pressure is enough.
A second helpful insight: many sharpening problems are not really “stone problems.” They come from an invisible burr left on the edge. If you skip the back refinement, the blade may seem sharp for one or two cuts, then quickly fail.
Remove the burr the right way
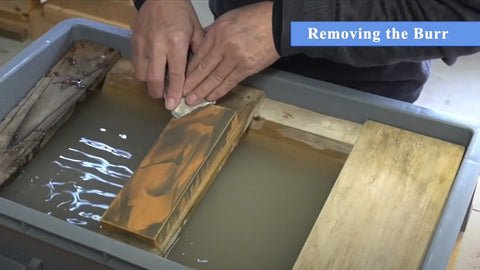
The burr is a thin curl of metal that forms at the edge when you sharpen. It is normal, but it must be removed. If you leave it in place, it can fold over during use and make the plane feel dull.
To remove it:
- Make a few light passes on the back side.
- Use very little pressure.
- Finish with a strop or very fine abrasive.
Do not overdo the stropping. Too much stropping can round the edge. You want to polish the edge, not soften it.
Why burr control matters
A clean edge lasts longer and cuts more evenly. A hidden burr may give you a false sense of success because the blade can shave paper or hair, yet still perform poorly on wood. Real test results matter more than quick tricks.
Strop the blade for a cleaner edge
A leather strop or very fine finishing surface can make the edge smoother and more polished. It is especially useful if you want that extra level of sharpness for fine finish work.
Use the same bevel angle or slightly lower, depending on your method. Pull the blade backward on the strop so you do not cut into the leather. Make only a few passes.
Stropping can help remove tiny remnants of the burr and improve the feel of the cut. But it is not a substitute for proper stone work. Think of it as the final polish, not the main sharpening stage.
Credit: hntgordon.com.au
Test the edge before reinstalling it
A good test tells you more than looks alone. If the edge is truly ready, it should behave in a controlled and clean way.
Try one or more of these simple checks:
- Paper test: The blade should slice cleanly through paper without snagging.
- End grain test: It should shave end grain smoothly with low effort.
- Light reflection check: A sharp edge usually reflects very little light.
- Wood shaving test: On soft or medium wood, it should produce thin, even shavings.
Do not depend on only one test. Paper can be misleading. A blade might cut paper well but still leave rough cuts in wood. The real goal is smooth shavings and a clean surface.
Install the blade and set the plane correctly
A sharpened blade will not perform well if the plane is set badly. Reinstall it carefully and make sure the plane is adjusted properly.
- Seat the blade firmly in the plane.
- Set the chipbreaker if your plane has one.
- Adjust the depth of cut very lightly at first.
- Check the blade alignment so one side is not cutting deeper than the other.
- Take a test pass on scrap wood.
If the plane chatters, cuts unevenly, or tears the wood, the problem may not be the sharpening. It could be depth, alignment, mouth opening, or the wood grain direction. Many beginners blame the blade when setup is the real issue.
Common mistakes when sharpening a hand plane blade
Most sharpening problems come from a few repeat mistakes. If you avoid these, your results will improve fast.
1. Not flattening the back
If the back is not flat near the edge, the blade cannot cut cleanly. This is one of the most common reasons a sharpened blade still performs badly.
2. Using too much pressure
Heavy pressure can round the bevel, wear stones too fast, and make the edge less consistent. Light, steady pressure works better for finishing.
3. Skipping grit progression
Jumping from very coarse to very fine grit leaves deep scratches behind. Those scratches slow sharpening and weaken the final polish.
4. Changing the angle by accident
If your angle keeps shifting, you will never create a clean bevel. This is why a honing guide can help a lot at the start.
5. Leaving the burr on the edge
The burr can make a blade seem sharp for a moment, then fail quickly. Always finish by removing it carefully.
How often should you sharpen the blade?
You do not need a full sharpening session every time the plane feels less lively. In many cases, a quick touch-up is enough.
If the blade still has a good edge, a few passes on the fine stone or strop may restore it. If performance drops more clearly, then go back through the full process.
A practical rule is this: sharpen lightly and often, instead of waiting until the blade is badly dull. This saves time and keeps the edge geometry in better shape. It also reduces how much metal you remove over the life of the blade.
Another useful habit is to note how the blade behaves in different woods. Soft pine dulls an edge differently from hardwood. Once you know your materials, you can sharpen before the plane starts failing.
Special tip for bevel-down and bevel-up planes
Not all hand planes use the blade the same way. In bevel-down planes, the bevel angle mainly affects edge strength and cutting feel. In bevel-up planes, the bevel angle can influence the final cutting angle more directly.
That means the “best” sharpening angle depends on the plane type. If you use a bevel-up plane, a lower bevel can give a lower cutting angle, which may help on difficult grain. If you use a bevel-down plane, you often focus more on a strong, well-honed edge.
This is a small detail, but it matters. A blade that works beautifully in one plane may behave differently in another.
Keep your stones flat and clean
Even a perfect sharpening technique will fail if your stones are not flat. A hollow or rounded stone changes the bevel angle and creates poor contact.
Flatten your stones regularly, especially the coarse ones. Clean away metal slurry so the stone keeps cutting well. If the stone feels slick and slow, it may need maintenance more than the blade does.
This is another non-obvious lesson many beginners learn late: sometimes the sharpening problem is not the blade, but the abrasive surface underneath it.
Credit: kakuritools.com
Final thoughts on getting a razor-sharp edge
Learning how to sharpen a hand plane blade is not about memorizing fancy terms. It is about building a simple, careful process that you can repeat every time. Flatten the back, set the bevel, move through the grits, remove the burr, and test the edge on real wood.
Once you understand the logic behind the steps, sharpening becomes much easier. It stops feeling like a mystery and starts feeling like a skill you can trust. For a deeper look at tool geometry and plane performance, this guide from WOOD Magazine is a useful reference.
With practice, your plane will take thinner shavings, cut cleaner surfaces, and feel far more enjoyable to use. A sharp blade changes everything.
FAQs
1. What angle should I use when sharpening a hand plane blade?
For many hand plane blades, a bevel angle around 25 degrees is a common starting point. Some planes and jobs need a slightly different angle. If you are unsure, match the existing bevel and refine from there.
2. Do I need a honing guide to sharpen a hand plane blade?
No, but a honing guide helps a lot, especially for beginners. It keeps the angle steady and makes results more repeatable. Freehand sharpening works too if you have enough practice.
3. How do I know when the blade is sharp enough?
The blade should cut paper cleanly, but more importantly, it should make thin, smooth shavings in wood. If it tears grain, chatters, or needs too much force, it still needs work.
4. Can I sharpen a hand plane blade without removing the chip?
You can sometimes touch up a blade without full disassembly, but a proper sharpening job is easier and more accurate with the blade removed. If you want the best edge, take it out and sharpen it carefully.
5. Why does my plane still cut badly after sharpening?
The blade may be sharp, but the plane may be set incorrectly. Check blade depth, alignment, chipbreaker position, mouth opening, and grain direction. The problem is not always the edge itself.
