
If you are new to welding, the first time you open a TIG machine can feel confusing. There are gas hoses, torch parts, pedals, cups, tungsten sizes, and machine settings. It is easy to wonder what connects where and what should be set first. The good news is that once you learn the order, the process becomes much simpler.
This guide explains how to set up a TIG welder in a clear, beginner-friendly way. You will learn the main parts of the machine, the correct setup steps, and the small checks that help you avoid mistakes. You will also see the most common setup problems, so you can fix them before you strike your first arc.
TIG welding rewards careful setup. A clean machine, the right gas flow, correct polarity, and the proper tungsten size can make a big difference in weld quality. If your setup is wrong, even a skilled hand will struggle. If your setup is correct, the job becomes much easier.
What you need before you begin
Before you touch the controls, gather everything you need. A TIG welder is only one part of the system. The rest of the setup matters just as much.
- TIG welding machine
- TIG torch with the correct consumables
- Argon gas cylinder
- Argon regulator and flow meter
- Ground clamp
- Tungsten electrode
- Filler rod, if your job needs one
- Safety gear: welding helmet, gloves, jacket, and safety shoes
- Wire brush and clean cloth for surface cleaning
Do not skip surface cleaning. TIG welding does not like rust, oil, paint, or dirt. A clean metal surface helps prevent contamination, weak welds, and unstable arcs.
One detail beginners often miss is that your machine setup depends on the metal you are welding. Aluminum, steel, and stainless steel do not always use the same tungsten type, polarity, or amperage range. So before setting up, know the material and thickness of your workpiece.
Understand the main TIG welding parts
If you want to know how to set up a TIG welder the right way, you need to understand the key parts first. This helps you connect everything with confidence instead of guessing.
The power source
The power source is the main machine. It controls amperage, polarity, and other functions like AC or DC output. Some machines are simple, while others have many buttons and digital menus.
The TIG torch
The torch holds the tungsten and sends shielding gas to the weld area. It may be air-cooled or water-cooled. Beginners usually start with an air-cooled torch because it is simpler.
The tungsten electrode
The tungsten creates the arc. It does not melt into the weld like filler rod. The size and type of tungsten matter a lot, because they affect arc stability.
The shielding gas system
TIG welding usually uses argon gas. The gas protects the hot weld pool from air, which can cause weak or dirty welds.
The work clamp
The work clamp connects the welding circuit to the metal piece. A poor ground can cause weak arc starts and unstable welding.
Foot pedal or hand control
Many TIG machines use a foot pedal. It lets you control heat while welding. This is useful because TIG often needs fine control, especially on thin metal.
Set the machine in a safe place
Before connecting anything, place the machine in a dry, open, and stable area. Good airflow matters because the welder can heat up during use. Keep the machine away from water, oil, and flammable materials.
Make sure the gas cylinder is secured upright with a chain or strap. A gas cylinder should never be left loose. If it falls, it can become dangerous very fast.
Also check your power supply. Use the correct outlet and voltage for your machine. If the power source is wrong, the welder may not run properly or may trip the breaker.
Connect the ground clamp first
The ground clamp is one of the most important parts of the setup. Attach it to clean bare metal on the workpiece or welding table. Do not clip it onto painted, rusty, or dirty surfaces.
A weak ground can cause strange behavior. The arc may start poorly, the machine may feel unstable, or the weld may look inconsistent. Good contact here saves a lot of trouble later.
If possible, clamp as close to the weld area as practical. A short, direct path helps current flow better.
Choose the right tungsten and torch parts
The tungsten must match the job. This is a step beginners often rush, but it affects the arc more than many people expect.
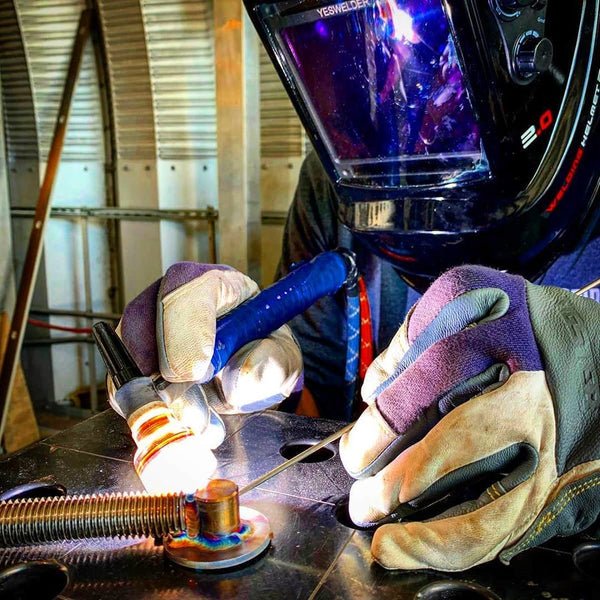
For general beginner use, many welders start with a 1/16 inch or 3/32 inch tungsten. The exact choice depends on metal thickness and amperage. Thinner material usually needs a smaller tungsten and lower amperage.
Also check the cup size, collet, and back cap. These parts must fit the tungsten and torch body correctly. If they are loose or mismatched, gas flow and arc quality can suffer.
Credit: yeswelder.com
A simple guide for tungsten selection
| Work type | Common tungsten size | Typical use |
|---|---|---|
| Very thin sheet metal | 1/16 in | Low amperage, fine control |
| General light work | 3/32 in | Good all-around beginner choice |
| Heavier material | 1/8 in | Higher amperage and stronger arc |
Another beginner mistake is using a tungsten that is too large for the job. A large tungsten can make low-amperage work harder to control. Choose the smallest size that still suits the heat you need.
Set up the torch and consumables
Now install the tungsten into the torch. First, make sure the tungsten is clean and properly prepared. If it was used before, regrind it if needed. The tip should be clean and smooth, not dirty or cracked.
Insert the tungsten into the collet and tighten it firmly, but do not overtighten. Then install the collet body, cup, and back cap. Check that the tungsten sticks out the correct amount from the cup.
For many beginner jobs, a tungsten stick-out of about 1/8 inch to 1/4 inch is a practical starting point. Too much stick-out can reduce gas coverage. Too little can make it hard to see the weld puddle.
If your torch has a gas lens, it can improve gas coverage and make the arc easier to control. That is especially helpful when learning.
Connect the shielding gas
Shielding gas keeps oxygen away from the hot weld pool. For most beginner TIG welding, pure argon is the standard choice.
Attach the gas hose from the TIG torch to the machine if needed, then connect the regulator to the argon cylinder. Make sure all fittings are tight, but do not force them.
Open the cylinder valve slowly. A sudden open can damage the regulator. After that, check the pressure reading.
Set the gas flow correctly
A common starting point is 15 to 20 CFH for many small TIG jobs. This is not a fixed rule, but it is a useful beginner range. Too little gas can cause contamination. Too much gas can create turbulence and pull air into the shielding area.
One non-obvious point many beginners miss is that more gas is not always better. If the cup is too small, or if the torch is too far from the workpiece, turning the flow up too high may make the weld worse, not better.
Use the lowest gas flow that still gives stable coverage for your setup, cup size, and welding position.
Choose the correct polarity and mode
This step is critical. Wrong polarity can give poor results or damage your setup.
For DC TIG welding on steel or stainless steel, use DCEN or direct current electrode negative. This is the common setting for most steel TIG work.
For aluminum, many machines use AC mode. AC helps clean the oxide layer on aluminum and allows proper welding.
If your machine offers AC balance and frequency settings, do not change them randomly. Start with the machine’s basic beginner settings or manufacturer recommendations, then adjust slowly later.
If you are unsure, check the machine manual. You can also find reliable TIG setup basics from industry sources such as the Lincoln Electric education center.
Set the amperage range
Amperage controls heat. This is one of the first settings beginners want to get right, and for good reason. Too little heat gives weak fusion. Too much heat can burn through thin metal.
A rough starting point for many TIG jobs is about 1 amp per 0.001 inch of material thickness. This is only a guide, not a rule. Different metals and joint types need different heat.
For example, thin sheet metal may need very low amperage, while thicker plate needs much more. If you are using a foot pedal, you can set a higher maximum amperage and then control heat with the pedal during the weld.
Beginner tip for heat control
Many new welders set the machine too low because they fear burning through the work. This often leads to a slow, cold weld that piles up instead of flowing. It is better to have enough amperage available and then control the heat carefully with your pedal or hand control.
Check pre-flow and post-flow settings
Pre-flow and post-flow are often ignored by beginners, but they matter a lot in TIG welding.
Pre-flow sends shielding gas before the arc starts. It helps protect the tungsten and weld area right from the beginning.
Post-flow keeps gas flowing after the arc stops. This protects the hot tungsten and cooling weld from contamination.
If your machine allows adjustment, a small pre-flow and a longer post-flow are useful starting points. Thicker tungsten and higher amperage usually need longer post-flow.
One useful habit is to watch the tungsten after stopping the arc. If it turns blue or dirty quickly, your post-flow may be too short or your gas coverage may be poor.
Credit: yeswelder.com
Prepare the metal before welding
Even a perfect machine setup cannot overcome dirty metal. Clean the weld area well before you begin.
- Remove oil and grease with a clean solvent if needed
- Use a stainless steel wire brush for aluminum
- Remove paint, rust, and scale from steel
- Make sure the joint fits tightly
Joint fit-up matters more than many beginners realize. If the gap is too large, you may need more filler and more heat. That makes the weld harder to control. A snug joint is easier to weld and usually looks better.
Do a quick test before welding the real part
Before starting on your actual project, test the setup on scrap metal of the same type and thickness. This is one of the smartest habits you can build.
During the test, check these points:
- Does the arc start easily?
- Is the gas coverage steady?
- Does the tungsten stay clean?
- Does the puddle form at a reasonable heat level?
- Are you getting smooth, even fusion?
If the arc feels unstable, stop and inspect the setup. The problem is often simple: loose gas fittings, wrong polarity, dirty tungsten, bad ground contact, or a gas flow setting that is too low.
Common setup mistakes beginners make
These mistakes are very common when learning how to set up a TIG welder. The good news is that they are usually easy to fix.
Wrong polarity
This is a major error. DCEN is used for many steels, while aluminum often needs AC. If polarity is wrong, the weld may not form correctly.
Dirty tungsten
If the tungsten touches the filler rod or the weld puddle, it can become contaminated. A dirty tungsten causes arc wandering and weak weld quality.
Poor gas coverage
Gas leaks, loose cups, or bad flow settings can leave the weld open to air. This creates dull, dirty, or porous welds.
Bad ground connection
A weak clamp or dirty contact point can make the machine act unpredictable. Always check this first if the machine seems to misbehave.
Too much stick-out
If the tungsten sticks out too far, shielding gas may not protect it well. Keep the stick-out sensible, especially when learning.
Skipping scrap tests
Going straight to the real part without testing is risky. A few minutes of practice can save a costly mistake.
How to know your setup is correct
A good setup usually shows clear signs. The arc starts smoothly. The tungsten stays sharp and clean. The weld puddle forms in a controlled way. The gas sound is steady, not noisy or uneven.
The weld bead should look consistent. If the puddle is hard to control, the problem may be heat, gas flow, torch angle, or contamination. Small changes can make a big difference.
One subtle but important clue is tungsten color. A clean tungsten after welding often means your gas coverage and post-flow are working well. If the tungsten keeps oxidizing fast, do not ignore it. Fix the setup before welding more.
Credit: ssimder.com
Safety habits that matter every time
TIG welding is precise, but safety still comes first. The arc is bright enough to damage your eyes and skin. Hot metal can burn you even after welding stops.
- Wear a proper welding helmet with the correct shade
- Use dry gloves and protective clothing
- Keep the area free from flammable items
- Ventilate the workspace well
- Never touch the tungsten or metal right after welding
Also, remember that argon is an asphyxiation hazard in enclosed spaces. Use good ventilation and never weld in a poorly ventilated area without proper safety planning.
Final setup checklist before striking an arc
Use this quick review before you start welding:
- Machine is on a stable, dry surface
- Ground clamp is attached to clean metal
- Correct tungsten is installed
- Torch consumables are tight and matched
- Argon cylinder is secured and open
- Gas flow is set to a sensible range
- Polarity is correct for the metal
- Amperage is set for the material thickness
- Pre-flow and post-flow are checked
- Workpiece is clean and ready
If all of these points are in place, you are ready for a safer and smoother first weld.
Frequently asked questions
What is the best gas for TIG welding?
For most beginner TIG welding jobs, pure argon is the best choice. It gives stable shielding and works well on common metals like steel, stainless steel, and aluminum.
Do I need a foot pedal to set up a TIG welder?
No, but a foot pedal helps a lot because it lets you control heat while welding. Many beginners find it easier to use than a fixed amperage setting.
What polarity should I use for steel?
For most steel TIG welding, use DCEN, which means direct current electrode negative. This is the standard setting for many steel projects.
Why does my tungsten keep getting dirty?
Dirty tungsten usually means contamination, poor gas coverage, incorrect post-flow, or touching the weld puddle. Check your setup, clean the tungsten, and test again on scrap metal.
Can I TIG weld without shielding gas?
No. TIG welding needs shielding gas to protect the weld from air. Without gas, the weld quality will be poor and the tungsten can be damaged quickly.
