
If you own a chainsaw, knowing the right bar size is not just a small detail. It affects safety, cutting speed, chain fit, and the life of your tool. Many people guess the size or read the wrong number on the saw, and that often leads to buying the wrong chain or bar replacement.
The good news is that how to measure a chainsaw bar is simple once you know the right method. You do not need special skills. You only need a tape measure, a little care, and the correct way to measure. In this guide, you will learn the exact steps, the common mistakes to avoid, and a few useful tips that can save time and money.
By the end, you will know how to find the true bar length, how to understand the number that stores and websites use, and how to check whether your bar is still in good condition.
Start with the right idea of bar length
Before you measure anything, it helps to understand one important point: the listed chainsaw bar size is not always the same as the actual metal length. This confuses many beginners.
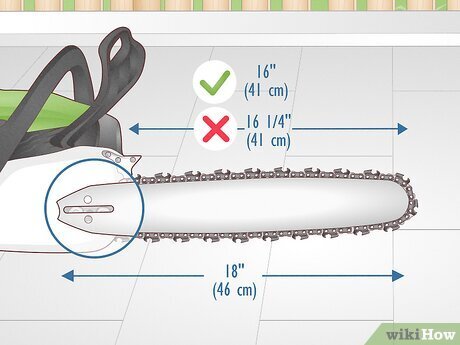
For example, a chainsaw may be sold as a 16-inch model, but the bar itself may measure a little more or a little less depending on how the brand counts it. Most companies use the effective cutting length, not the full physical length of the bar. That means the number you see on the product box is often a rounded number.
This is why measuring the bar the right way matters. If you only look at the label, you may order the wrong chain. If you measure it correctly, you get a better fit and fewer problems during cutting.
What you need before measuring
You do not need many tools. In most cases, these are enough:
- A tape measure or ruler
- Your chainsaw
- A clean cloth
- Work gloves, if the chain is still attached
If the saw is dirty, wipe away sawdust and oil first. A dirty bar can hide the tip, the nose, or the end of the cutting area. That can lead to a wrong reading.
The easiest way to measure a chainsaw bar
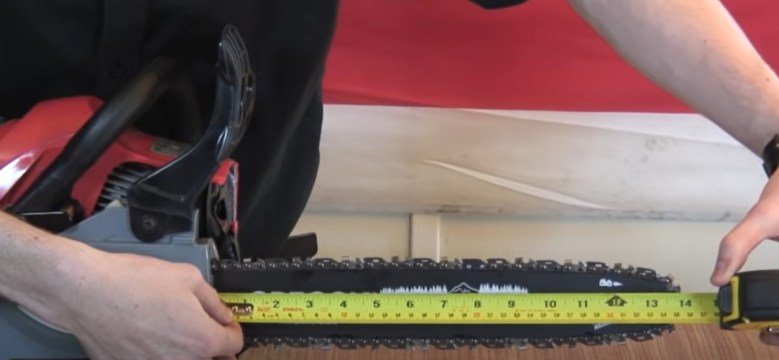
The simplest method is to measure the bar from the tip to the point where it enters the chainsaw body. But there is a small detail that matters: you should not measure the entire metal bar from end to end unless you want the physical bar length. For buying the right chain, the cutting length is usually what matters most.
Here is the basic process:
- Turn off the chainsaw and remove the spark plug wire or battery.
- Place the saw on a flat surface.
- Find the tip of the bar.
- Measure from the tip back to where the bar meets the saw body.
- Round the result to the nearest even inch, which is often the listed bar size.
This gives you a close and useful measurement. Still, for best results, you should also check the number stamped on the bar itself.
Step 1: Make the saw safe
Safety comes first. A chainsaw can injure you even when it is not running if you touch the chain or handle it carelessly. Make sure the power source is off. For a gas saw, remove the spark plug wire. For a battery saw, remove the battery pack.
If the chain is sharp and still mounted, wear gloves. This is a small step, but it prevents cuts while you handle the bar.
Step 2: Clean the bar
Use a cloth to clear away oil, dirt, and sawdust. Pay attention to the tip area and the lower groove. Dirt can make it hard to see the true end of the cutting length.
This is one of the beginner mistakes people often miss. They measure over a layer of dirt and then wonder why the chain does not fit well. A clean bar gives a more accurate result.
Step 3: Find the usable cutting length
The easiest reference point is the spot where the bar first leaves the saw body. From there, measure to the farthest point of the bar tip. This is the standard way most people estimate the bar size for replacement chains.
Do not measure the entire bar from the very back end of the mounting area unless you are trying to find the physical metal length. That number is not always the one you need for chain sizing.
Step 4: Measure from tip to mounting point
Stretch the tape measure straight along the bar. Keep it flat and aligned with the bar body. Do not bend the tape around the tip or angle it upward. A small tilt can change the result.
Read the number where the bar meets the saw body. This will usually give you a length that matches the size sold by the manufacturer, such as 14, 16, 18, 20, or 24 inches.
Step 5: Round to the nearest standard size
Chainsaw bars are usually sold in standard sizes, not exact fractions. If your measurement is close to 15.5 inches, the bar may be sold as a 16-inch bar. If it is near 17.5 inches, it may be a 18-inch bar.
This is normal. What matters is matching the chain and bar system correctly, not chasing a perfect decimal number.
How to read the numbers stamped on the bar
Measuring the bar is helpful, but the bar itself often gives you extra information. Most chainsaw bars have numbers stamped near the mounting area. These marks usually tell you the bar length, chain pitch, groove gauge, and sometimes part numbers from the brand.
If you can find these markings, they can confirm your measurement and help you buy the correct replacement chain.
| Marking | What it means | Why it matters |
|---|---|---|
| Bar length | The common size, such as 16″, 18″, or 20″ | Helps you buy the right replacement chain |
| Pitch | The distance between chain links, usually shown as 3/8″, .325″, or 1/4″ | The chain must match the bar and sprocket |
| Gauge | The thickness of the drive links, such as .050″ or .058″ | Wrong gauge means the chain will not fit correctly |
| Drive link count | The number of links that fit around the bar | Needed for exact chain replacement |
These markings are often small and hard to read. A flashlight can help. If the letters are covered with oil or dust, clean the area first.
Credit: a1sawing.com
Why the stamped number is not always enough
Sometimes the stamped size is missing, faded, or wrong. A bar may have been replaced before. In that case, the label may no longer match the actual setup on the saw. That is why it is smart to measure the bar yourself instead of trusting a single number.
Another useful point: two bars with the same length can still use different chains. The pitch and gauge must also match. Beginners often focus only on inches and ignore these details. That is a costly mistake.
How to measure the bar without removing the chain
You can measure the bar even if the chain is still installed. This is often the easiest way for most users.
Here is a simple method:
- Make sure the saw is off and safe.
- Set the saw on a flat surface.
- Locate the tip of the bar and the point where it enters the saw body.
- Measure the distance between those two points.
If the chain blocks your view, rotate the chain by hand only if the saw is fully off and safe to handle. Never do this while the engine is running.
This method works well for getting the standard size, but it does not tell you everything. You still need to know pitch, gauge, and drive link count when buying a new chain.
How to measure the bar when it is removed
If you have taken the bar off the saw, you can measure it more directly. This method is useful if you want to inspect wear, compare bars, or replace a damaged part.
Lay the bar on a flat surface and measure from one end to the other. This gives you the physical bar length. It may be slightly different from the marketed size, which is normal.
When measuring a removed bar, look for these signs of wear:
- Worn rails on the edges
- A bent bar body
- Dark grooves from heat
- Damage around the nose sprocket
If the bar is bent or badly worn, measuring alone will not solve the problem. In that case, replacement may be the better choice.
A simple way to check if the bar is still usable
Run your finger carefully along both rails, without touching the sharp chain. If one rail is lower than the other, the bar may be worn unevenly. Also, look at the groove where the chain rides. If the groove is wide, damaged, or full of burrs, the chain may not track well.
This is a small detail many people miss. A bar can still be the right length but not be in good shape. That affects cutting more than many beginners expect.
Common mistakes when measuring a chainsaw bar
Many wrong chain purchases happen because of a few simple mistakes. If you avoid these, your measurement will be much more reliable.
Credit: wikihow.com
1. Measuring the entire bar and calling it the bar size
The full metal length is not always the same as the size used in stores. The better method is to measure the effective cutting length or confirm the stamped size.
2. Forgetting about pitch and gauge
Even if you measure the bar length correctly, the chain can still be wrong if the pitch or gauge does not match. Think of it like shoes. The length matters, but so does the width and shape.
3. Measuring over dirt or oil
A dirty bar can hide the tip and change your reading slightly. Clean it first.
4. Guessing from the saw model alone
Two saws with the same model line may use different bar sizes, especially after repairs or upgrades. Always check the actual bar.
5. Buying a chain without counting drive links
This is one of the most common mistakes. The same bar length can still use chains with different drive link counts depending on the exact setup. If you want a perfect replacement, count the drive links on your current chain.
How to measure pitch, gauge, and drive link count
If your goal is to buy the correct replacement chain, bar length alone is not enough. You also need three more details: pitch, gauge, and drive link count. These sound technical, but they are easy once you know where to look.
Pitch
Pitch is the size pattern of the chain links. The most common pitches are 1/4″, .325″, and 3/8″. The correct pitch must match the bar and the sprocket.
You can often find the pitch stamped on the bar or in the saw manual. If not, the current chain may show it in the model name or packaging.
Gauge
Gauge is the thickness of the drive links that fit into the bar groove. Common sizes include .043″, .050″, .058″, and .063″. If the gauge is wrong, the chain may be loose or too tight.
This is a detail many beginners overlook. A chain can look close enough but still not work well if the gauge is off by a small amount.
Drive link count
Drive links are the small links that run inside the bar groove. The number of these links is very important when buying a replacement chain.
To count them, place the chain flat and count each drive link once around the loop. If counting by hand feels hard, mark the first link with a pen and count carefully. Some packaging lists the number already, but if you are unsure, count it yourself.
What to do if the bar size is not easy to find
Sometimes the bar is very worn, the markings are gone, or the saw has been changed over the years. If that happens, use more than one clue.
Start by measuring the bar. Then check the pitch and gauge markings. After that, count the drive links on the chain. When all three match, you have the best chance of getting the correct replacement.
If you still cannot confirm the size, you can search the saw’s model number in the manufacturer’s manual or on the brand’s support page. A reliable source like the Oregon Products website can also help you understand chain and bar size details, since Oregon is a major name in chainsaw chains and guide bars.
How to tell when the bar should be replaced
Measuring the bar is useful, but sometimes the real problem is wear, not size. A damaged bar can cause poor cutting, extra chain wear, and dangerous kickback behavior.
Replace the bar if you notice any of these problems:
- The bar is bent
- The groove is too wide or uneven
- The tip sprocket does not turn freely
- The rails are badly worn
- The chain keeps jumping off even when tension is correct
A chain that fits a damaged bar may still perform poorly. If your saw cuts to one side, that can also be a sign of uneven bar wear.
One useful test beginners often skip
Turn the bar over from time to time during normal use. This helps the wear stay more even on both sides. It is a simple habit, but it can extend bar life and improve cutting performance.
Also, keep the bar groove clean and make sure the oiler is working. A bar that does not get enough oil wears out much faster, even if the size is correct.
Quick reference for measuring a chainsaw bar
If you want a short memory aid, keep this order in mind:
- Make the saw safe.
- Clean the bar.
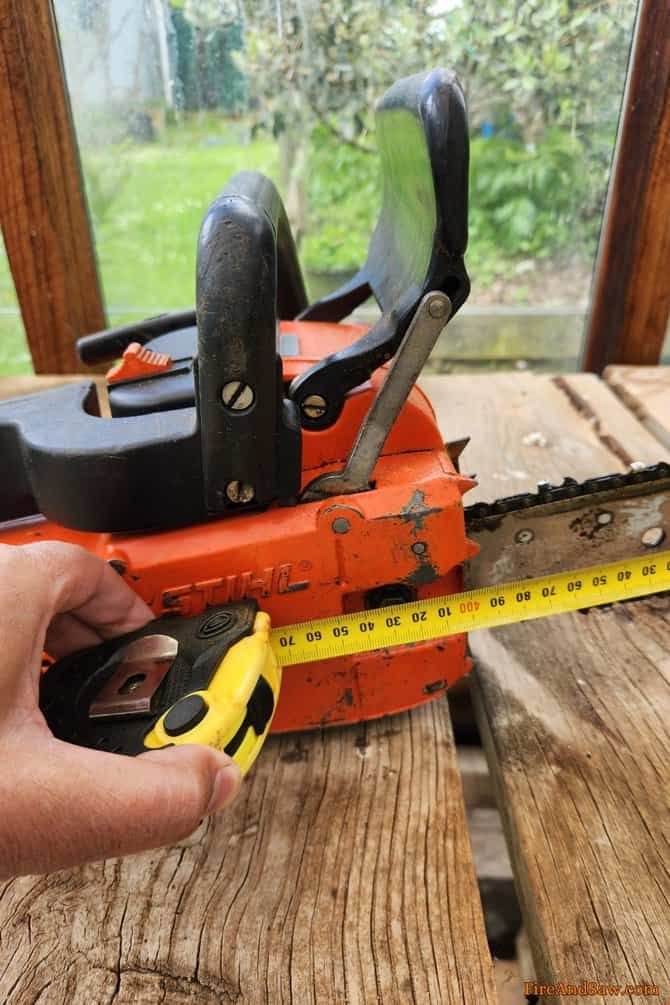
- Measure from the tip to the point where the bar enters the saw body.
- Round to the nearest standard size.
- Check pitch, gauge, and drive link count.
That is the simple path. If you follow these steps, you will avoid most sizing mistakes.
Credit: pinterest.com
Final thoughts
Learning how to measure a chainsaw bar is one of the easiest ways to avoid buying the wrong chain or bar. The process is simple, but the details matter. A clean bar, a careful measurement, and the right match for pitch and gauge can make a big difference in how your chainsaw performs.
The biggest lesson is this: do not rely on one number alone. Use the bar measurement, check the stamped markings, and confirm the chain details. That extra minute of checking can save you from wasted money and poor cutting results.
Once you know the correct size, your saw will work more smoothly, your cuts will be cleaner, and replacement parts will be much easier to buy with confidence.
FAQs
1. How do I measure a chainsaw bar correctly?
Turn off the saw, clean the bar, and measure from the tip to the point where the bar enters the saw body. This gives you the usual bar size used for chain selection.
2. Is the chainsaw bar size the same as the full metal length?
Not always. The listed size often means the effective cutting length, not the full physical length of the bar.
3. Can I buy a new chain just by knowing the bar length?
No. You also need the chain pitch, gauge, and drive link count. These must match the bar and sprocket.
4. Where can I find the bar size if I do not want to measure it?
Look for stamped numbers near the mounting area of the bar. You can also check the saw manual or the manufacturer’s model information.
5. What if my chainsaw bar is worn or bent?
If the bar is bent, badly worn, or damaged, replacement is usually the best option. A correct size bar that is in poor shape can still cause cutting problems.
