
If you know how to use a reciprocating saw, you already know it is one of the most useful cutting tools on a job site or in a home workshop. But the blade does not last forever. It becomes dull, bent, rusty, or simply wrong for the material you want to cut. That is why learning how to change blade on reciprocating saw is a basic skill every user should know.
The good news is that blade changes are usually quick. In many models, it takes less than a minute. Still, the exact process depends on the saw type, the blade clamp design, and a few safety steps that many beginners skip. Those small details matter. A blade that is not locked in properly can slip, wobble, or even come out while cutting.
This guide walks you through the full process in simple steps. You will also learn how to choose the right blade, avoid common mistakes, and check that the blade is installed the right way. If you want cleaner cuts and safer use, this is worth learning well.
What you should know before changing the blade
Before touching the blade, make sure the saw cannot start by accident. If your reciprocating saw is corded, unplug it. If it is battery-powered, remove the battery. This is not optional. A surprising number of injuries happen because the trigger gets bumped during blade changes.
It also helps to understand the blade clamp on your saw. Some models use a tool-free lever or collar. Others need a hex key or Allen wrench. Newer models often make the job much easier, but the basic idea is the same: release the old blade, insert the new one, and lock it firmly in place.
One detail beginners often miss is blade direction. A reciprocating saw blade can usually be installed with teeth facing up or down depending on the cut style and model. The correct direction is not only about preference. It affects control, chip removal, and how the saw feels in use.
Tools and items you may need
In many cases, you need nothing more than the saw and a replacement blade. Still, it helps to keep a few items nearby.
- Replacement reciprocating saw blade
- Gloves for better grip and basic hand protection
- Safety glasses
- Hex key or wrench if your saw uses a secured clamp
- Clean cloth to wipe dirt from the blade holder
If you are not sure which blade to buy, check the saw manual or the blade package. Blade length, tooth count, and material type all matter. A blade for wood will not behave the same way as a blade made for metal or demolition work.
How to change blade on reciprocating saw step by step
Here is the simple process. Follow these steps carefully, even if you have changed blades before. A small habit done the wrong way can damage the clamp or make the blade unstable.
-
Turn off the saw and disconnect power
Unplug the cord or remove the battery. Wait for the blade to stop moving fully if the saw was recently used. Never try to change a hot blade right after cutting metal because it can stay very warm.
-
Find the blade release system
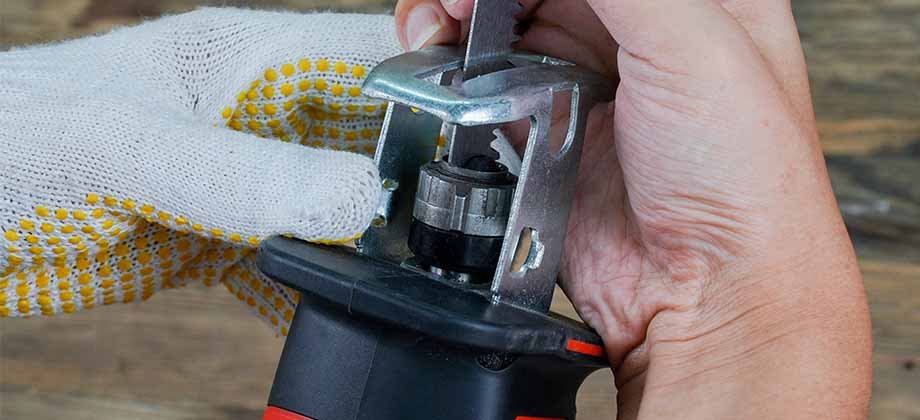
Look near the front of the saw where the blade enters the clamp. You will usually see a lever, collar, button, or screw mechanism. Some models have a front sleeve that slides or twists to unlock the blade holder.
-
Release the old blade
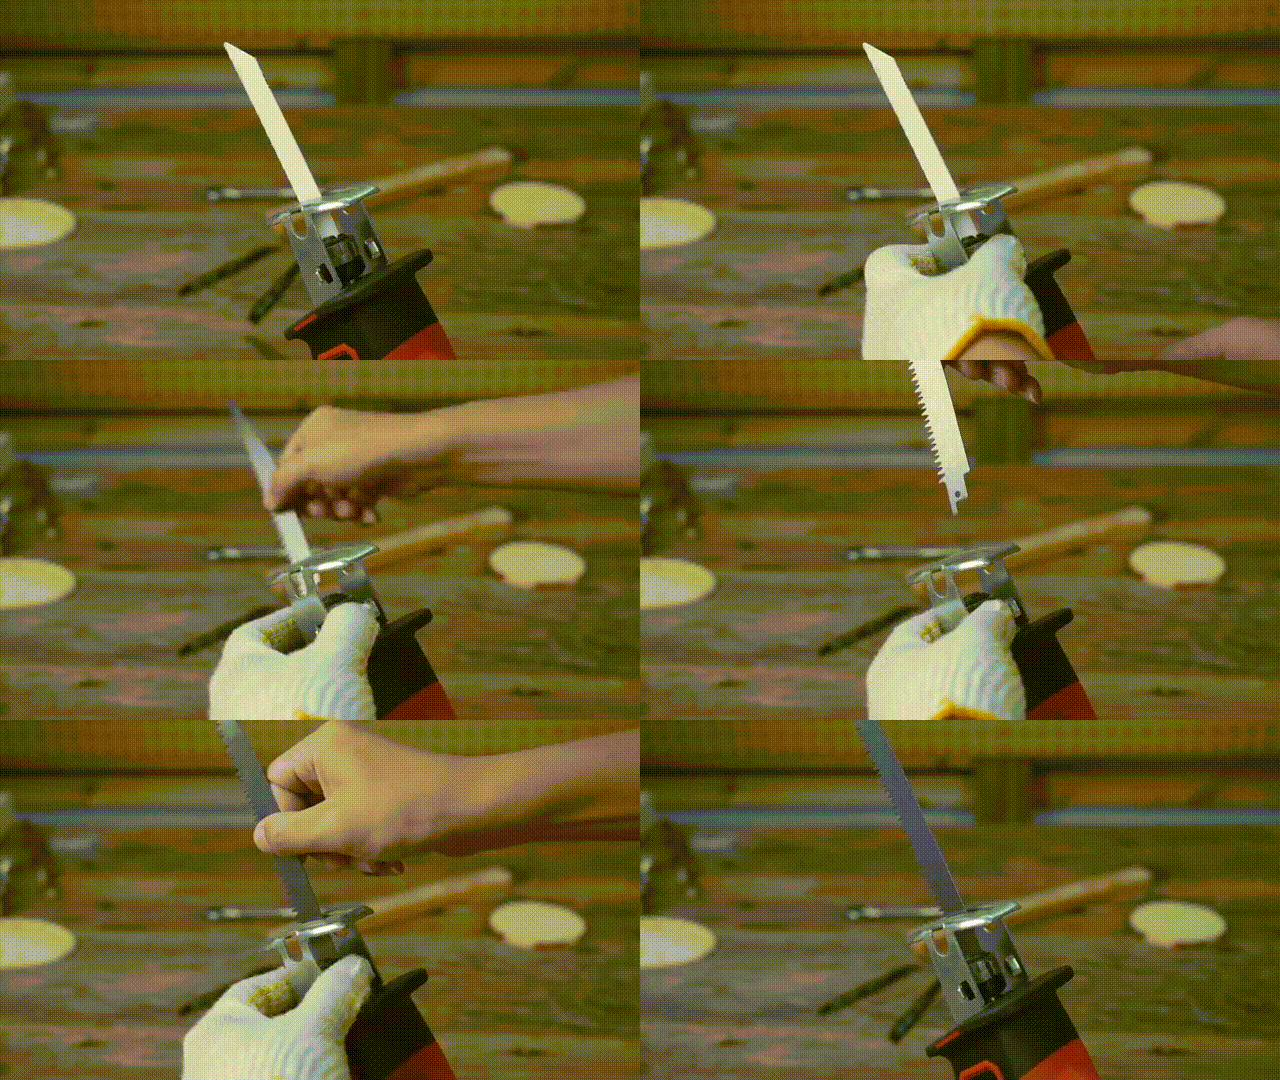
Operate the clamp as the manufacturer designed. On tool-free models, pull or rotate the release mechanism. On older models, loosen the screw with the correct wrench. Support the blade with your other hand so it does not drop suddenly.
-
Remove the blade carefully
Pull the blade straight out from the clamp. If it feels stuck, do not force it hard. Gently move it side to side while keeping your fingers away from the teeth. A stuck blade can mean dirt, rust, or a clamp that needs cleaning.
-
Inspect the blade holder
Before installing the new blade, look inside the clamp. Remove dust, saw chips, and any metal fragments. If the clamp is dirty, the new blade may not seat properly. This is one of those small steps beginners skip, but it helps the blade lock in more firmly.
-
Choose the right replacement blade
Select a blade that matches the job. Wood blades usually have fewer, larger teeth. Metal blades have finer teeth. Demolition blades are thicker and stronger. If you are cutting mixed material, such as nails in wood, choose a bi-metal blade made for that purpose.
-
Insert the new blade fully
Slide the blade shank into the clamp until it stops. Push it in straight. Do not angle it unless your saw design requires that. Make sure the blade is seated as far as it will go, because partial insertion can cause wobble and poor cutting.
-
Lock the blade in place
Close the release lever, tighten the screw, or return the collar to the locked position. You should feel or hear a clear lock. Tug the blade lightly by hand to confirm it is secure. If it moves out of the clamp, remove it and try again.
-
Check blade orientation
Look at the teeth. Make sure they face the direction you want for the cut. On most saws, the blade cuts on the forward stroke, but some blades and saws can be set differently. Follow the saw manual if you are unsure.
-
Test the saw briefly
Reconnect power and run the saw for one or two seconds without cutting anything. Watch for wobble, vibration, or strange noise. If the blade shakes more than usual, stop and check the clamp again.
That is the basic process for how to change blade on reciprocating saw. Most problems happen in steps 7 and 8, where the blade is not fully seated or not locked tightly enough. Take your time there.
Different blade clamp types and how they work
Not every saw uses the same system. Knowing your clamp type helps you change blades faster and with less frustration.
| Clamp type | How it works | Common note |
|---|---|---|
| Tool-free lever | A lever or latch opens the clamp without extra tools | Fastest and easiest for most users |
| Twist collar | The front collar rotates to release and lock the blade | Needs a firm twist, but not too much force |
| Screw clamp | A screw holds the blade in place using a hex key or wrench | Slower, but common on older or budget models |
| Quick-release button | A button pushes the blade holder open | Simple, but should still be checked for full lock |
Tool-free systems are popular because they save time. Still, they can collect sawdust inside the mechanism. If the release starts to feel stiff, do not ignore it. Clean the front of the saw and check the manual before using force.
Credit: hardell.com
Why blade type matters more than many beginners think
Choosing the wrong blade is not just a matter of cut speed. It also affects control, heat, and safety. A coarse wood blade may grab too much in thin metal. A fine metal blade may cut wood slowly and overheat. A blade that is too short can limit reach, while a blade that is too flexible can bend when cutting harder material.
Another detail people often miss is blade length versus material thickness. A longer blade is not always better. You want enough length for the cut, but not so much that the blade flexes too much. In thick demolition work, a stronger, thicker blade usually gives better control than a thin blade with more teeth.
How to tell if the blade is installed correctly
A blade may look fine from the outside and still be loose. That is why you should do a quick check every time.
- The blade does not slide out when pulled gently
- The clamp is fully closed or tightened
- The blade sits straight, not at an odd angle
- The saw runs without unusual wobble
- The blade does not rattle when the tool is shaken lightly
If the blade moves at all in the clamp, stop. A loose blade can damage the saw and make cuts unsafe. It may also leave rough edges or burn the material you are cutting.
Credit: hardell.com
Common mistakes to avoid
Many first-time users make the same errors. Avoiding them will save time and help your saw last longer.
- Forgetting to disconnect power before touching the blade
- Using the wrong blade type for the material
- Not inserting the blade fully into the clamp
- Forcing a stuck blade instead of checking for dirt or rust
- Ignoring the lock and assuming the blade is secure
- Using a worn blade that should have been replaced earlier
One less obvious mistake is changing blades while wearing loose gloves that reduce feel. Gloves can help with grip, but if they are too bulky, they can make it harder to feel whether the blade is seated correctly. Use gloves that fit well.
How to remove a stuck or damaged blade
Sometimes the blade does not come out easily. This can happen after heavy use, especially when the saw has cut metal or dirty wood. If the blade is jammed, stay calm and do not use brute force.
First, make sure the saw is disconnected from power. Then check the release mechanism again. Try opening and closing the clamp a few times. If that does not work, clean the blade holder area. Sawdust, rust, or metal chips may be blocking movement.
If the blade is bent, handle it with extra care. A bent blade can spring back when released. Pull it out slowly, keeping your fingers away from the teeth. If the blade is badly damaged, place it in a scrap bin or wrap it before disposal so it does not cut anyone later.
For more detailed safety guidance, it is smart to check the manufacturer’s manual or a trusted tool safety source such as OSHA.
When to replace the blade instead of reusing it
A reciprocating saw blade does not need to be replaced after every job. But some signs tell you it is time for a new one.
- The blade cuts slowly even after light pressure
- The teeth look rounded, broken, or missing
- The blade bends too easily
- You smell burning during normal cutting
- The cut starts wandering off the line
- The blade vibrates more than usual
Many users wait too long. A dull blade makes the saw work harder, which can heat the motor and reduce control. Replacing the blade on time gives cleaner cuts and less strain on the tool.
Simple maintenance that makes blade changes easier
A few small habits can make future blade changes much smoother.
- Wipe the blade and clamp area after each use
- Store blades in a dry place to reduce rust
- Keep blades separated so teeth do not damage each other
- Check the clamp for debris before every blade change
- Use the correct blade for each material
These habits may seem minor, but they reduce stuck blades and help the clamp last longer. A clean blade holder locks more reliably than a dirty one.
Tips for safer, cleaner cutting after the blade change
Once the new blade is installed, do a few things before cutting the real material. Clamp the workpiece if possible. Hold the saw with both hands. Let the blade reach full speed before entering the material. Do not force it through the cut.
Another useful tip is to let the blade do the work. Many beginners press too hard. That can bend the blade and make the cut rough. A light, steady feed usually works better. If the cut slows too much, it may be a sign that the blade is wrong or becoming dull.
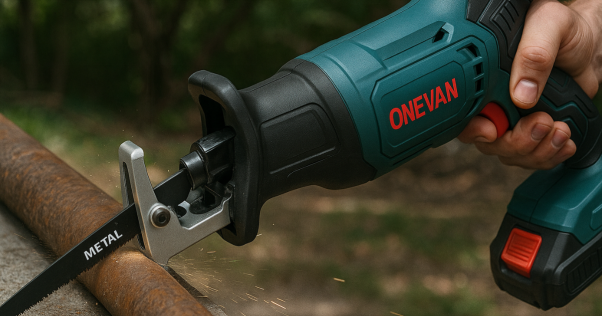
Also, match the blade stroke to the job. For pruning, demolition, plumbing work, and metal cutting, different blades and speeds may work better. The more you match the blade to the task, the less stress you place on the saw.
Credit: onevantool.com
Final thoughts
Learning how to change blade on reciprocating saw is simple once you understand the lock, the blade type, and the basic safety steps. Most of the work is about doing small things in the right order: disconnect power, release the clamp, clean the holder, insert the blade fully, and check that it locks firmly.
If you remember only one thing, make it this: a blade that is not seated correctly is not just annoying, it is unsafe. Take a few extra seconds to test the fit. That habit protects the saw, improves the cut, and gives you more control every time.
FAQs
1. How do I know which way the blade should face?
Look at the teeth and follow your saw manual. On many reciprocating saws, the blade cuts on the forward stroke, but some blades can be installed in different directions for better control or access. If you are unsure, test carefully on scrap material first.
2. Can I change the blade without tools?
Yes, many modern reciprocating saws use a tool-free blade release. These models let you change the blade with a lever, collar, or button. Older saws may still need a hex key or wrench.
3. Why is my new blade wobbling?
Most of the time, wobble means the blade was not fully inserted or locked. Turn the saw off, remove power, and reinstall the blade. Also check for dirt inside the clamp, because debris can stop the blade from seating properly.
4. How often should I replace a reciprocating saw blade?
Replace it when the blade becomes dull, bent, damaged, or slow to cut. The exact timing depends on the material and how often you use the saw. Heavy demolition work wears blades faster than light home use.
5. Is it safe to reuse old blades?
Yes, if the blade is still sharp, straight, and undamaged. But if the teeth are worn or the blade has bent, it is better to replace it. A worn blade makes cutting harder and can be less safe.
