
A leaf blower that starts hard, stalls, or loses power often has one simple problem: a dirty carburetor. Dust, old fuel, and sticky varnish can block the tiny parts inside it. When that happens, the engine cannot get the right fuel-air mix, so performance drops fast.
The good news is that how to clean a leaf blower carburetor is not as difficult as many people think. With the right tools, a clean work area, and a careful step-by-step method, you can restore smoother starts, better idle, and stronger airflow without replacing parts you do not need.
This guide walks you through the full process in a simple way. You will learn when cleaning makes sense, how to remove the carburetor, how to clean the small passages safely, and how to test everything before putting the blower back to work. You will also see common mistakes that can cause more trouble than the dirty carburetor itself.
When a Dirty Carburetor Is the Real Problem
Before opening the machine, it helps to confirm that the carburetor is actually the issue. Many leaf blower problems look similar at first. A bad spark plug, clogged air filter, old fuel, or loose fuel lines can also cause weak performance. But a dirty carburetor usually shows a few clear signs.
Common symptoms
- The engine starts, then dies after a few seconds.
- The blower only runs with the choke partly on.
- Idle speed is rough or unstable.
- The engine hesitates when you press the throttle.
- Fuel leaks, strong fuel smell, or black residue appear near the carburetor.
- The blower has been sitting for weeks or months with fuel inside.
Old gasoline is a major cause. Small engine fuel can break down fast, especially when mixed with oil. As it ages, it leaves sticky deposits inside the carburetor. These deposits block tiny openings that control fuel flow.
One important detail many beginners miss: a carburetor may be dirty even if the outside looks clean. The real problem is inside the jets, passages, and needle area. That is why spraying cleaner on the outside often does very little.
When cleaning may not be enough
If the carburetor body is cracked, the diaphragm is damaged, or the internal rubber parts are badly worn, cleaning alone may not solve the problem. In that case, a rebuild kit or full replacement may be the better choice. Still, cleaning is the right first step for most fuel-related issues.
Tools, Supplies, and Safety First
A careful setup makes the job easier and safer. You do not need advanced mechanical skills, but you do need the right materials. Using the wrong cleaner or forcing small parts can damage the carburetor fast.
What you will need
- Screwdrivers that fit your blower screws well
- Socket set or nut drivers, depending on the model
- Carburetor cleaner spray made for small engines
- Clean rags or shop towels
- Small brush, soft toothbrush, or nylon brush
- Compressed air, if available
- Needle-nose pliers
- Fuel line pinch tool or clamps, if useful
- Fresh fuel mix, if your blower uses a two-stroke engine
- Small container for screws and tiny parts
Safety steps that matter
Always work in a space with good air flow. Carburetor cleaner fumes are strong. Keep the blower away from flames, sparks, heaters, and anything hot. Wear gloves and eye protection because cleaner can splash back.
Another detail people overlook: take clear photos before removing parts. A few phone pictures can save you from guessing how hoses, springs, and linkages fit together later. This is especially useful if your carburetor has more than one fuel line or small throttle spring.
Check your fuel type
If your leaf blower uses a two-stroke engine, mix fresh fuel at the correct ratio listed by the maker. Do not use old fuel from last season. Even if it looks normal, stale fuel can undo your cleaning work quickly.
| Item | Why it helps | Common mistake to avoid |
|---|---|---|
| Carburetor cleaner | Breaks down varnish and dirt inside passages | Using brake cleaner or harsh spray not meant for carburetors |
| Compressed air | Blows debris from small openings | Using too much pressure and damaging seals |
| Fresh fuel | Prevents repeat clogging | Reusing old fuel after cleaning |
| Phone camera | Helps with reassembly | Trusting memory for hose and linkage placement |
How to Clean a Leaf Blower Carburetor Step by Step
Now let’s get into the main process. The exact layout can vary by brand, but the basic method is similar for most handheld and backpack leaf blowers. Work slowly and keep parts in order.
Credit: searspartsdirect.com
1. Drain the fuel and prepare the blower
Empty the fuel tank into an approved container. If the fuel is old, do not reuse it. Start the engine only if needed to burn off leftover fuel in the line, then shut it off and let it cool fully.
Remove the spark plug wire so the engine cannot start by accident. This is a small step, but it is one of the most important safety habits when working on small engines.
2. Remove the air filter cover and filter
Take off the air filter cover. Remove the filter and inspect it. A dirty filter can make a clean carburetor seem bad because it limits airflow. If the filter is clogged, clean or replace it before you test the blower again.
If you see heavy dirt in the air box, wipe it out gently. Do not let loose debris fall into the carburetor opening.
3. Access the carburetor
Remove the housing parts that block the carburetor. On many models, this means loosening the intake cover or engine shroud. Keep each screw grouped by location if they are different sizes.
Look at how the throttle cable, choke linkage, primer bulb lines, and fuel hoses are connected. Take a photo from more than one angle. This step can save a lot of time during reassembly.
4. Disconnect fuel lines and linkages carefully
Use needle-nose pliers or your fingers to remove the fuel lines. If the lines are stiff, twist them gently instead of pulling hard. Old hoses can crack, so avoid rough force.
Disconnect the throttle linkage and choke linkage with care. These small metal pieces can bend easily. If a spring flies off, place it in your parts container right away.
5. Remove the carburetor
Unbolt the carburetor from the engine. In many blowers, it sits between the air filter side and the engine intake. As you remove it, watch for gaskets or insulator plates. These parts must go back in the same order.
Do not scrape sealing surfaces with sharp tools. A damaged gasket area can cause air leaks, which lead to rough running even after cleaning.
6. Inspect the carburetor before spraying
Look at the outside first. Check for cracks, loose screws, damaged primer bulb parts, or fuel leaks. If the unit has a clear filter screen or visible inlet screen, inspect it for dirt.
Here is a useful beginner insight: if the carburetor has a cracked diaphragm or hardened rubber gasket, cleaning may improve it only briefly. The engine may run for a short time and fail again. In that case, a repair kit is smarter than repeated cleaning.
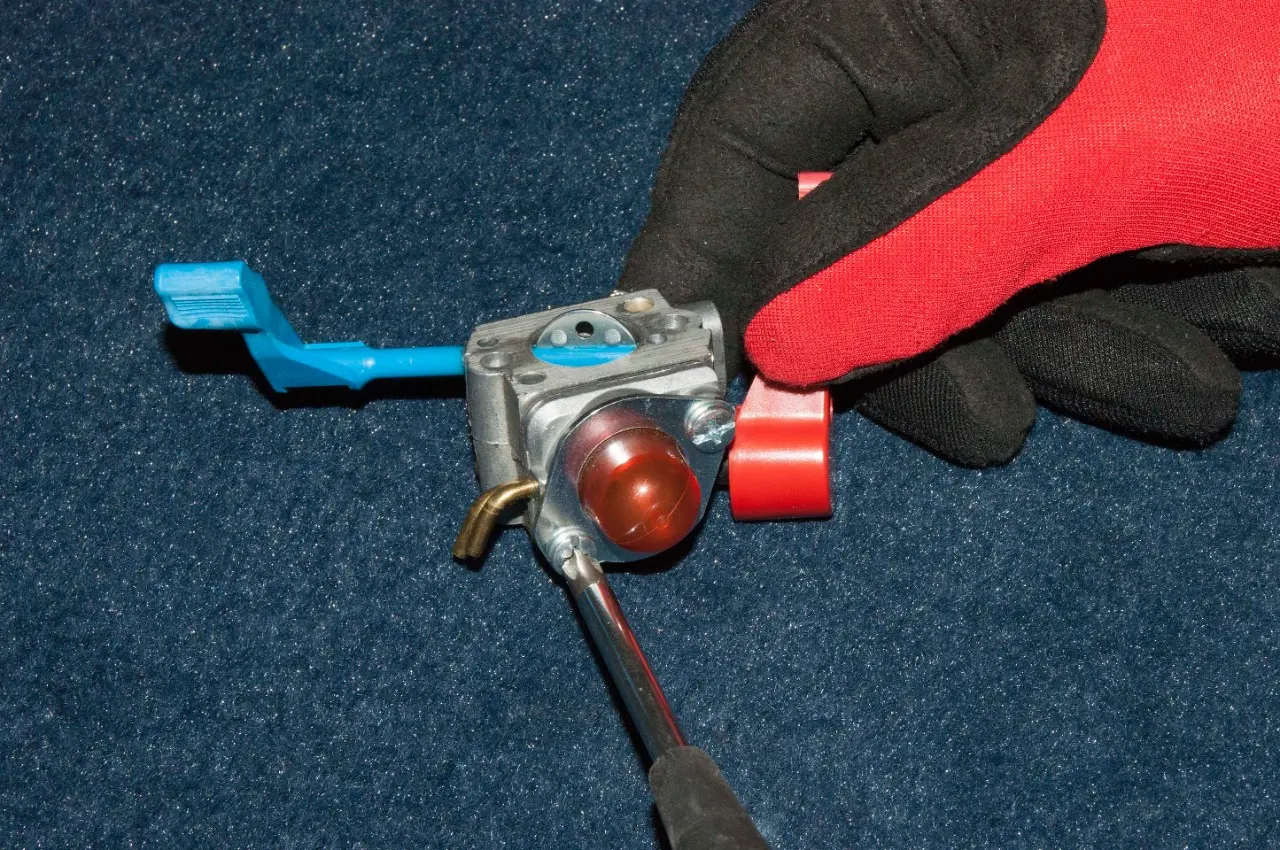
7. Remove the carburetor covers
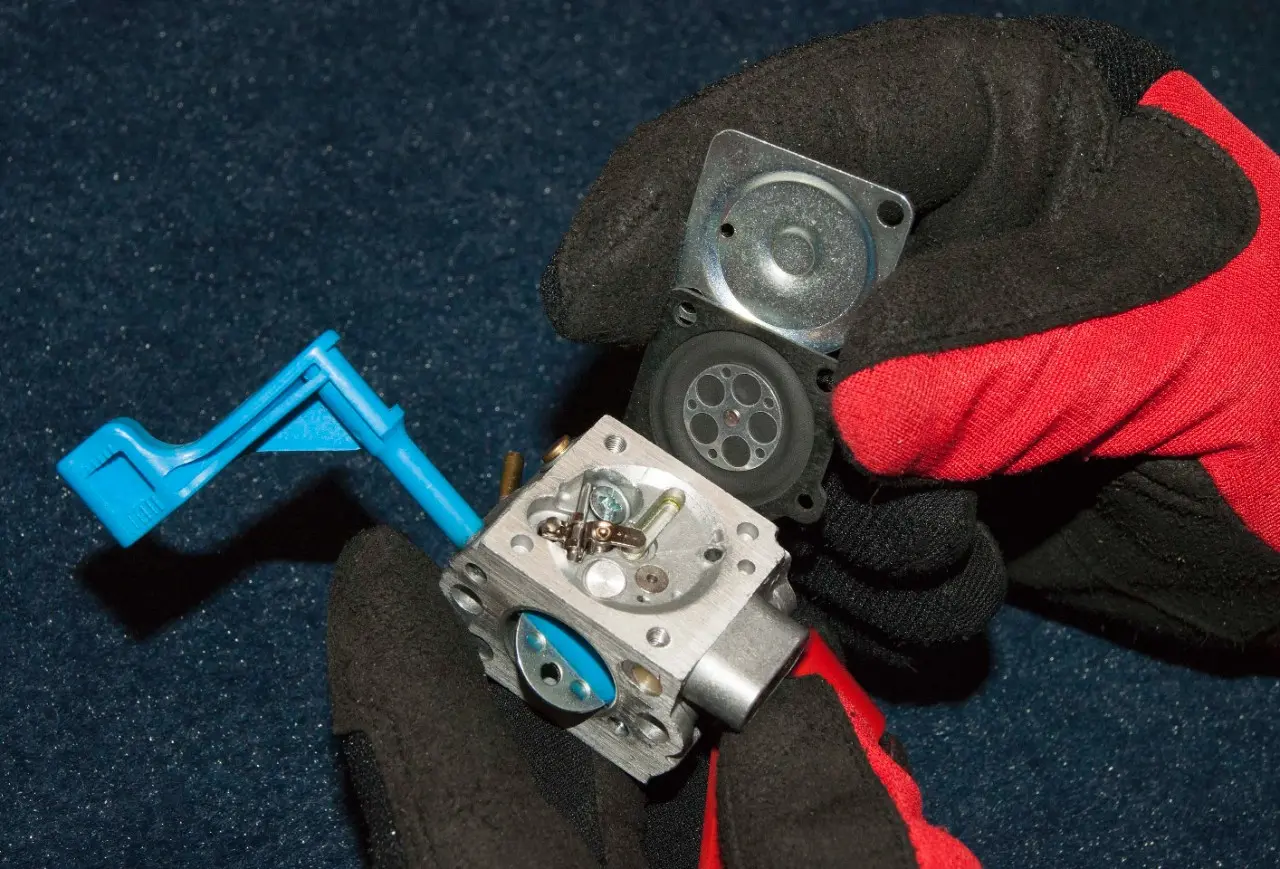
Many small engine carburetors have a metering side and a pump side, each held by small screws. Remove the screws carefully. Keep the screws in order, because some are longer than others.
Under the cover, you may see a diaphragm, gasket, spring, needle, or metering lever. Lay each piece out in the order you removed it. Do not stretch or crease the diaphragm.
8. Clean the internal parts
Spray carburetor cleaner through every fuel passage, jet, and opening. Use short bursts. Then follow with compressed air if you have it. The goal is to clear gum and debris, not flood the whole unit.
Pay attention to the tiny holes inside the carburetor throat. These openings control idle and acceleration. A blockage here can make the blower bog down when you pull the throttle.
Important cleaning tip
Do not push wire, drill bits, or metal picks into the jets unless the maker specifically allows it. Many passages are very small and easy to damage. Carb cleaner and air are usually enough. If a jet is fully blocked and removable, soak it only if the manufacturer instructions allow it.
9. Clean the fuel screen and needle area
Some carburetors have a fine screen that catches dirt before it reaches the metering system. Clean it gently with spray and air. If the screen is badly damaged, replace it.
Also inspect the needle valve and seat area. Sticky fuel residue here can cause fuel starvation or flooding. Clean the area until the parts move freely again.
10. Wash the external surfaces
Wipe the outside of the carburetor with a clean rag. Remove dirt, fuel residue, and old oil. Clean surfaces make it easier to spot leaks later. They also help you see whether the unit is seating properly during reassembly.
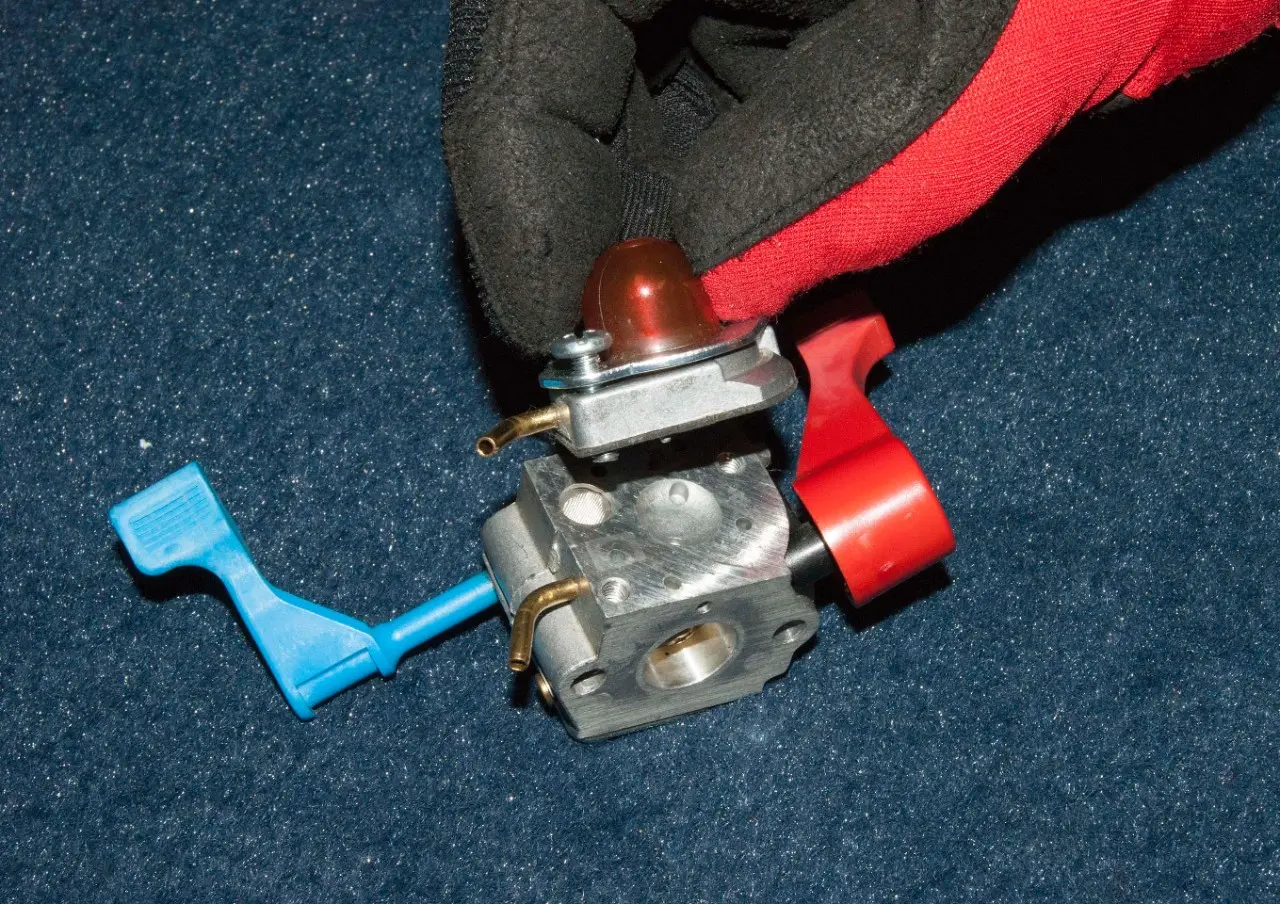
11. Reassemble the carburetor
Put the parts back in the same order they came off. Make sure the gasket and diaphragm are facing the correct direction. Tighten screws evenly, but do not overtighten them. Small carburetor screws strip very easily.
Reconnect the metering arm, needle, linkage, and springs exactly as they were before. If the throttle plate does not move smoothly after reassembly, stop and recheck the linkage before reinstalling the carburetor.
12. Reinstall the carburetor on the blower
Mount the carburetor back onto the engine with the correct gasket and insulator pieces in place. Reconnect the fuel lines firmly. Make sure they are not crossed or pinched.
Reconnect the throttle and choke linkages. Replace the air filter and cover. Then reconnect the spark plug wire.
13. Prime, start, and test
Add fresh fuel. Use the primer bulb if your blower has one. Set the choke as needed and start the engine. It may take a few pulls to clear air from the fuel line.
Let the engine warm up, then test idle and throttle response. A clean carburetor should help the blower start easier, idle more smoothly, and respond faster when you squeeze the trigger.
How to Tell If Cleaning Worked
The first test is simple: does the engine start without a long struggle? If it starts, idles, and revs cleanly, the cleaning likely worked. But look for more than just “it runs.” Small changes matter.
Credit: searspartsdirect.com
Good signs after cleaning
- The engine starts in fewer pulls.
- Idle is steady instead of hunting or dying.
- Throttle response is smoother.
- The blower reaches full speed faster.
- Fuel smell is normal, not heavy or leaking.
If the blower still bogs down, check the air filter, fuel lines, spark plug, muffler screen, and fuel quality. Sometimes the carburetor was only part of the problem.
A second useful insight: if the engine runs better for a few minutes and then acts worse again, heat may be affecting a weak diaphragm, restricted fuel line, or partial vacuum leak. That usually means the cleaning helped, but another worn part still needs attention.
Common Mistakes That Cause More Trouble
Many people damage a carburetor while trying to fix it. Avoiding a few common errors can save time and money.
Using old fuel again
Fresh cleaning will not help if you refill the tank with stale fuel. Old fuel creates the same gummy deposits that caused the problem in the first place.
Mixing up parts
Carburetor pieces are small and easy to confuse. A gasket placed on the wrong side can stop the engine from running correctly. Keep parts in order and compare them before assembly.
Overtightening screws
Small screws do not need heavy force. Overtightening can warp covers, strip threads, or crack plastic parts. Tight is enough. Very tight is often too much.
Forcing clogged passages
Do not stab into tiny holes with metal wire unless you are certain it is safe. This can enlarge the hole and change fuel flow. A cleaner spray and air are the safer first choice.
Ignoring related parts
A dirty carburetor is not always the only issue. A blocked fuel filter, cracked line, weak primer bulb, or clogged spark arrestor can create the same symptoms. Check the whole fuel and air system, not just the carburetor.
When to Clean, Rebuild, or Replace
Not every carburetor should be cleaned the same way forever. Sometimes cleaning works well. Other times it is only a temporary fix.
Cleaning is enough when:
- The blower sat unused with old fuel.
- The carburetor is dirty but not damaged.
- The engine starts after cleaning and runs smoothly.
A rebuild kit makes sense when:
- The diaphragm is stiff or torn.
- The gaskets are worn or leaking.
- The needle or lever is sticking even after cleaning.
Replacement is better when:
- The body is cracked or warped.
- Screw threads are stripped badly.
- The carburetor has been cleaned many times but still fails.
If you are unsure, compare the cost of a rebuild kit with the cost of a new carburetor. For many common leaf blowers, replacement is simple and not very expensive. For higher-end models, a rebuild may be the better value.
If you want a trusted small-engine reference for maintenance basics, the U.S. Environmental Protection Agency has helpful guidance on fuel system care here: EPA consumer facts.
Maintenance Tips to Keep the Carburetor Cleaner Longer
Cleaning the carburetor once is good. Keeping it clean is better. A few habits can prevent the same problem from coming back quickly.
Use fresh fuel only
Do not let fuel sit in the tank for long periods. If you will store the blower for more than a few weeks, use a fuel stabilizer if the manufacturer allows it, or run the engine dry before storage.
Clean the air filter often
A dirty air filter reduces airflow and can make the engine run rich. That extra fuel can leave more residue inside the carburetor over time. Check the filter regularly, especially in dusty yards.
Inspect fuel lines and primer bulbs
Hard, cracked, or leaking fuel lines can let air into the system. Air leaks can mimic carburetor trouble. Replace worn rubber parts before they fail completely.
Run the engine periodically
If the blower sits unused for months, fuel can degrade inside the carburetor. Running the engine every few weeks with fresh fuel helps keep internal parts moving and reduces gum buildup.
Store it the right way
Keep the blower in a dry place away from heat. Do not store it with a full tank of old fuel. Good storage habits matter more than many people think, because most carburetor problems start during downtime, not while the machine is being used.
Final Thoughts
Learning how to clean a leaf blower carburetor is one of the most useful small-engine skills you can pick up. It can bring back easier starts, better throttle response, and stronger airflow without buying a new blower too soon. The key is to work carefully, use fresh fuel, and pay attention to tiny parts that are easy to miss.
If your blower still does not run right after a careful cleaning, do not keep forcing it. Check for worn diaphragms, bad fuel lines, or a clogged air system. In many cases, the carburetor can be saved. In others, a rebuild or replacement is the smarter path. Either way, a clean and healthy fuel system will keep your leaf blower ready when you need it most.
Credit: searspartsdirect.com
FAQs
1. How often should I clean a leaf blower carburetor?
You usually only need to clean it when symptoms appear, such as hard starting, stalling, or poor throttle response. If you use fresh fuel and store the blower properly, you may not need to clean it often. Many carburetor problems happen after fuel sits too long.
2. Can I clean the carburetor without removing it?
Sometimes a light external spray can help with minor dirt, but it usually will not solve internal blockage. For real cleaning, removing the carburetor is the better choice. The tiny fuel passages inside need direct cleaning to work properly again.
3. Is carburetor cleaner safe for leaf blower parts?
Yes, if you use a cleaner made for carburetors and small engines. Still, do not soak rubber parts for too long unless the product label says it is safe. Some plastics, seals, and diaphragms can be damaged by harsh chemicals.
4. Why does my blower still not run after cleaning the carburetor?
If the blower still fails, the problem may be elsewhere. Check the spark plug, fuel filter, fuel lines, air filter, and muffler screen. A vacuum leak, weak ignition, or damaged diaphragm can also stop the engine from running well.
5. Should I rebuild or replace a carburetor after cleaning?
If cleaning improves the blower but it still runs poorly, a rebuild kit can be a good next step. If the body is cracked, heavily worn, or badly corroded, replacement is usually the better option. The right choice depends on the condition of the part and the cost of repairs.
