
If you are new to woodworking, a router table can feel a little intimidating at first. The machine looks simple, but it can do a lot: smooth edges, cut grooves, shape profiles, and make repeated cuts that look clean and professional. The good news is that once you understand the basics, it becomes one of the most useful tools in the shop.
This guide explains how to use a router table in a clear, beginner-friendly way. You will learn how to set it up, choose the right bit, feed wood safely, and avoid the mistakes that often ruin first projects. The goal is not just to make cuts. The goal is to help you use the tool with control and confidence.
Router tables are especially helpful because they keep the router steady while you move the wood. That simple change gives you more accuracy and better edge control. It also makes many jobs safer and easier than using a handheld router, especially when you need repeatable results.
What a router table actually does
A router table holds the router upside down under a flat surface. The router bit sticks up through the table, and you guide the wood across the bit. This setup gives you better control for many tasks, especially edge shaping and groove cutting.
Instead of moving the router through the wood, you move the wood through the router. That may sound small, but it changes how the tool feels. The table supports the workpiece, which helps you keep cuts straight and even.
Most beginners use a router table for these jobs:
- Rounding over sharp edges
- Adding decorative edge profiles
- Cutting dadoes, rabbets, and grooves
- Making repeated parts the same size
- Creating raised panels or small moldings
A router table is not only for advanced woodworkers. In fact, it can make beginner projects easier because the tool stays fixed and the wood is easier to guide.
What you need before you start
Before learning how to use a router table, make sure you have the right basic setup. You do not need expensive gear, but you do need a stable, safe starting point.
Basic items you should have
- A router table with a flat, stable surface
- A router that fits the table
- Router bits for your project
- Fence, miter gauge, or featherboards if available
- Push blocks or push sticks
- Safety glasses and hearing protection
- Dust collection if possible
One important beginner mistake: many people focus only on the bit and forget the fence and support tools. But on a router table, stability matters just as much as cutting power. A good fence and proper support often improve results more than a more expensive router does.
Choose the right router bit
The bit shape decides the cut. A straight bit makes grooves. A round-over bit softens edges. A flush trim bit copies a template. A rabbeting bit cuts a step along the edge of wood.
For beginners, it is smart to start with simple bits. A small round-over bit or a straight bit is easier to control than a large decorative profile bit. Big bits remove more wood and need slower, more careful passes.
If you want to see a trusted safety overview for router and table use, the Woodwork Web site is a helpful reference for general woodworking safety and setup ideas.
Check the router and table fit
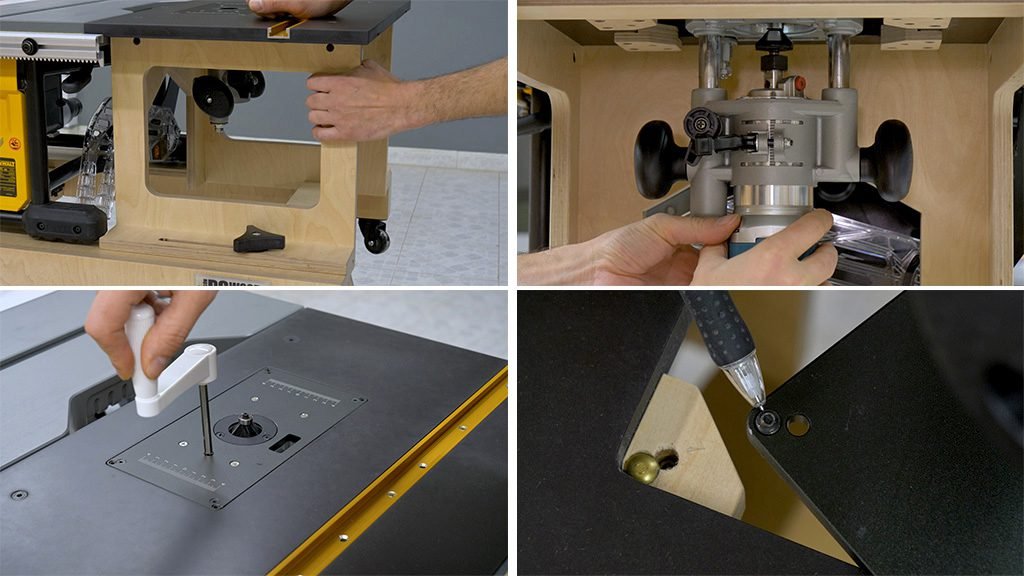
Not every router fits every table in the same way. Make sure the router mounts tightly and the bit opens through the table insert correctly. A loose mount can cause vibration, noise, and poor cuts.
If your table has an insert plate, make sure it sits flat. Even a small step at the insert can catch the wood and ruin a cut.
Set up the router table the right way
Good setup makes the work easier and safer. Take a few minutes to prepare before turning on the router. This is one of the biggest habits that separates careful beginners from frustrated ones.
1. Place the table on a stable surface
The table should not rock or shift while you work. A steady base helps you keep the wood under control and lowers the chance of mistakes. If the table moves, your cut quality drops fast.
2. Install the router bit correctly
Unplug the router before changing bits. Insert the bit fully, then pull it back slightly before tightening. This helps the bit hold properly in the collet. Tighten it firmly, but do not force it.
3. Set the bit height
The right height depends on the cut. For a round-over, the bearing or cutting edge must line up with the part of the wood you want shaped. For a groove, you may need to test the depth on scrap wood first.
Beginner tip: always set the bit in small steps. A tiny height change can make a big difference in the final result. Many new users set the bit too high and end up removing too much material at once.
4. Adjust the fence
The fence helps guide the wood. Set it so the cutting edge is where you need it. Some jobs need the fence close to the bit. Others need part of the bit exposed, or the fence set back a little.
For edge profiling, the fence may protect the back side of the workpiece from tipping. For groove cutting, the fence helps control depth and placement.
5. Plan dust collection
Router tables create a lot of fine dust. That dust can hide your cut line and make the workspace messy fast. If your table has dust collection, connect it before starting. If not, clean the area first and stop often to remove buildup.
How to use a router table safely
Safety matters because the bit spins very fast and can grab wood if the setup is wrong. You do not need fear, but you do need respect for the tool.
Credit: woodcraft.com
Wear the right protection
- Safety glasses
- Hearing protection
- No loose sleeves, jewelry, or dangling cords
Keep long hair tied back. If your shirt or cord can catch on the bit or fence area, stop and fix it before you begin.
Always feed wood in the correct direction
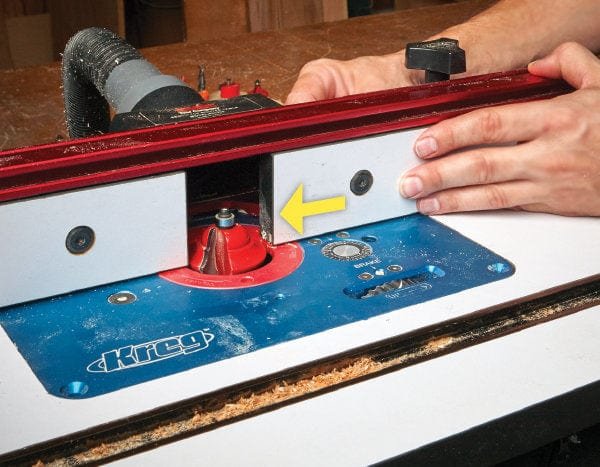
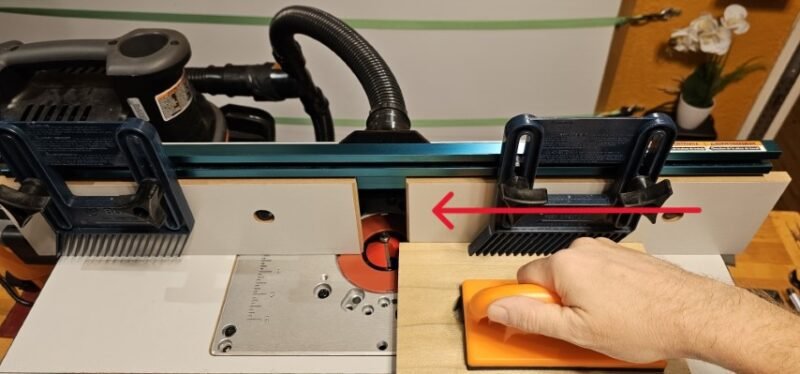
This is one of the most important rules. On a router table, you usually feed the wood from right to left. That lets the bit cut against the movement and gives you control.
If you feed the wrong way, the bit can pull the wood hard and throw it. This is called a climb cut in many situations, and it is not the normal safe approach for beginners.
Use the fence and support tools
Do not try to hold small pieces by hand too close to the bit. Use featherboards, push sticks, push blocks, or a miter gauge when needed. These tools keep your hands away from danger and help the wood move smoothly.
Non-obvious insight: many cutting problems are actually control problems, not bit problems. If the board shifts even a little as it passes the bit, the edge will look rough. Support tools solve more issues than most beginners expect.
Keep your hands away from the bit path
Plan your hand position before you start the cut. Do not reach over the spinning bit. Do not try to catch a board as it leaves the cutter. Let it pass completely before picking it up.
Your first cut: a simple edge profile
The best first project is usually a simple round-over edge on a scrap board. It teaches you how the feed feels without being too risky.
Step 1: Practice on scrap wood
Use a piece of wood that matches your project material. Hardwood and softwood cut differently, so practice on the same type if possible. This helps you see how the bit behaves before you touch the final piece.
Step 2: Mark the sides
Mark the face and edge you want to shape. This avoids confusion once you start moving the board. It also helps you keep the same orientation on every piece if you are making several parts.
Step 3: Start the router and let it reach full speed
Do not push the board into a bit that is still speeding up. Wait until the router sounds steady. A stable speed gives a cleaner cut and reduces chatter.
Step 4: Feed the wood smoothly
Move the board with even pressure. Do not force it. If you push too hard, you may burn the wood or strain the router. Let the bit do the work.
Step 5: Remove the board only after the cut is done
Once the wood has fully passed the bit, keep holding it steady until it is clear. Then turn off the router and wait for the bit to stop before making adjustments.
Common cuts you can make on a router table
Once you are comfortable with a simple edge, you can try other cuts. These are common tasks that help you get more value from the machine.
Round-over edges
This is one of the easiest and most useful cuts. It softens sharp edges and makes furniture more comfortable to touch. It also gives a finished look without much setup.
Rabbets
A rabbet is a step cut along the edge of a board. It is useful for cabinet backs, panels, and joinery. It usually takes a straight bit or rabbet bit and careful fence adjustment.
Grooves and dadoes
Grooves are narrow cuts inside the board or near an edge. They help hold shelves, panels, or decorative inlays. When cut well, they are neat and consistent.
Raised panels
This is more advanced, but many router tables can do it with the right bit. It is common in cabinet doors. The bit removes a lot of material, so you need slow, careful passes.
| Cut type | Best for beginners? | What to watch for |
|---|---|---|
| Round-over | Yes | Bit height and smooth feed rate |
| Rabbets | Yes, with practice | Fence position and consistent depth |
| Grooves | Yes | Accurate marking and test cuts |
| Raised panels | No, not first | Large bit size and multiple passes |
How to get clean results every time
Clean router table cuts are not luck. They come from small habits repeated well. These habits matter more as your work becomes more detailed.
Credit: paoson.com
Make test cuts first
Always test on scrap wood before cutting your real piece. This checks bit height, fence position, and feed direction. It also gives you a chance to correct the setup without waste.
Take light passes when needed
If the cut is deep or the wood is hard, do not try to remove everything at once. Make two or three lighter passes. That reduces tear-out, burning, and strain on the router.
Second non-obvious insight: a lighter pass often gives a better surface than one heavy pass, even when the tool seems powerful enough. The cleanest cut is usually the one that asks the bit to do less work each time.
Watch the grain direction
Wood grain can lift and tear if the bit cuts in the wrong direction. On edge profiles, you may get a cleaner result by approaching the board from the correct side first. If you see tear-out on one end, try a light climb cut only if you already understand the risk and know how to control the piece. For most beginners, it is safer to adjust the order of cuts and use scrap first.
Keep the bit sharp
A dull bit burns the wood and leaves rough edges. If you need to push too hard or see dark marks on the cut, the bit may need cleaning or sharpening. Resin buildup can also cause trouble, even on a sharp bit.
Common beginner mistakes to avoid
Learning how to use a router table becomes much easier when you know the usual mistakes before they happen. Most problems are simple to prevent.
Feeding too fast
Fast feed can shake the board, burn the wood, or cause chipped edges. Keep the board moving at a steady pace and listen to the motor. If the router sounds strained, slow down.
Trying to remove too much material
This is a common mistake with deep cuts and large profiles. Beginners often think one pass is better. In reality, safer and cleaner cuts often come from several smaller passes.
Ignoring the fence setup
If the fence is not aligned well, the cut will not stay even. Check it before each new job. A small mistake in fence position can change the width or depth of the cut.
Using small parts without support
Small boards are harder to hold and easier to lose control of. Use push blocks, featherboards, or a wider sacrificial board when possible.
Not checking the direction twice
Many router table problems happen because the board was fed the wrong way. Before starting, pause and look at the setup. This simple habit prevents a lot of damage.
When to use a router table instead of a handheld router
A router table is not always the best choice, but it is better for certain jobs. Knowing when to use it helps you work smarter.
Use a router table when you need:
- Stable edge shaping
- Repeatable cuts
- Better control on small or narrow pieces
- Hands-free support for longer workpieces
Use a handheld router when you need:
- Cutting in the middle of a large board
- Working on an installed piece
- Following a template in a way that is easier by hand
Many woodworkers use both tools together. The router table handles the repeatable shaping, while the handheld router handles work that cannot be done on the table.
Simple maintenance that keeps the table working well
A router table lasts longer and performs better when you maintain it. The work is small, but it protects the tool and improves your cuts.
- Clean dust from the table and fence after use
- Check the bit for buildup and wear
- Make sure bolts and mounts stay tight
- Keep the surface smooth and free from sticky residue
- Store bits safely so cutting edges do not get damaged
It also helps to inspect the collet and insert plate from time to time. A little vibration or debris in these parts can affect accuracy more than beginners expect.
Credit: protoolreviews.com
Build confidence with a small practice project
One of the best ways to learn is to make a simple project that uses the same cut more than once. For example, try a small box, a shelf, or a picture frame. These projects help you practice setup, feed control, and repeatable cuts.
Do not rush into decorative work on your first day. Start with one shape, one bit, and one short board. Once that feels normal, add another cut. This slower path builds skill faster than jumping into a complex project too soon.
As you practice, you will notice a useful pattern: most router table success comes from preparation, not force. Good setup, proper support, and light passes solve more problems than speed or power.
Final thoughts for beginners
Learning how to use a router table is really about learning control. The machine is powerful, but the process is simple once you break it into small steps: set up the router, choose the right bit, test on scrap, feed the wood correctly, and keep your hands clear of the bit path.
Start with easy cuts. Build good habits. Focus on steady movement and careful setup. After a few projects, the router table will stop feeling like a special tool and start feeling like a normal part of your workshop.
That is when it becomes truly useful. Not because it is complicated, but because it makes accurate woodworking easier, faster, and more repeatable.
FAQs
1. What is the first thing I should learn on a router table?
Start with a simple round-over edge on scrap wood. It teaches you bit height, feed direction, and control without being too difficult.
2. Which direction should I feed wood on a router table?
In most cases, feed the wood from right to left. This gives the bit the correct cutting action and helps prevent the wood from being pulled away.
3. Can I use any router in a router table?
Not always. Check that the router fits the table mount correctly and that the bit height can be adjusted safely from the table side if needed.
4. Why does my router table burn the wood?
Burn marks usually come from a dull bit, feeding too slowly, or removing too much material at once. Clean or sharpen the bit and try lighter passes.
5. Is a router table safe for beginners?
Yes, if you use it correctly. Wear eye and ear protection, feed the wood in the right direction, use support tools, and never reach near the spinning bit.
