
A bad capacitor can cause many problems. A fan may not start. A power supply may hum. An air conditioner may trip. A circuit board may act strange for no clear reason. The good news is that you can often check a capacitor at home with a simple multimeter.
Learning how to test a capacitor with a multimeter can save time, money, and guesswork. You do not always need special lab tools. In many cases, a standard digital multimeter is enough to spot a weak, open, shorted, or leaky capacitor.
This guide shows a safe and practical way to do it step by step. You will learn what to check, how to read the meter, common mistakes to avoid, and when a capacitor should be replaced instead of tested again.
Before You Touch the Capacitor
Do not start testing right away. A capacitor can hold charge even after power is off. That charge can give you a shock or damage your meter. Safety comes first.
Also, not every capacitor is tested the same way. Small ceramic capacitors, film capacitors, electrolytic capacitors, and large motor run capacitors all behave a little differently. The method in this article works best for common capacitors found in home electronics, appliances, and power circuits.
What you need
- A digital multimeter with capacitance mode, if possible
- Insulated test leads
- A resistor for discharging, such as 10kΩ to 100kΩ, 1/2 watt or higher
- Safety glasses
- Optional: the capacitor’s rated value, printed on the body
First, disconnect power
Turn the device off and unplug it. If the capacitor is inside a powered circuit, wait a few minutes before touching anything. Some circuits hold charge longer than expected.
Important: Never assume a capacitor is safe just because the machine is unplugged. That is a common mistake.
Discharge the capacitor safely
Use a resistor to discharge the capacitor. Hold the resistor leads across the capacitor terminals for several seconds. This is safer than shorting the terminals with a screwdriver.
Why does this matter? A direct short can create a spark, damage the capacitor, and stress nearby parts. A resistor slows the discharge and lowers the risk.
One useful habit many beginners miss
After discharging, measure the voltage once before testing capacitance. Some capacitors can “recover” a small charge after discharge. This is called voltage rebound. It is not always dangerous, but it is worth checking.
Understand What the Multimeter Can and Cannot Tell You
A multimeter is useful, but it has limits. It can tell you if the capacitor is charging, shorted, open, or close to the expected value. It may not reveal every problem.
For example, a capacitor can still show the correct capacitance and yet fail under real load because of high ESR, leakage, or poor performance at frequency. That is why test results should match the symptoms you see in the device.
If you want a deeper technical reference on capacitance and measurement basics, a trusted source like Tektronix’s capacitance measurement primer can help.
Common capacitor problems
- Open capacitor: The capacitor no longer stores charge properly.
- Shorted capacitor: Internal plates touch or act like a short circuit.
- Leaky capacitor: It slowly loses charge through internal leakage.
- Out-of-range capacitor: The capacitance value has drifted too far from its rating.
Identify the Capacitor Type First
The type of capacitor affects how you test it. The body shape, markings, and placement in the circuit give clues.
| Capacitor type | Common use | Testing note |
|---|---|---|
| Electrolytic | Power supplies, audio circuits | Polarized; watch positive and negative leads |
| Ceramic | Signal filtering, timing, decoupling | Usually small and non-polarized |
| Film | Audio, AC circuits, timing | Usually stable and non-polarized |
| Motor run/start capacitor | Fans, compressors, pumps | Often larger; may need a meter with capacitance mode |
Non-obvious tip: A capacitor in circuit can give misleading readings because other parts connect in parallel or series with it. If your reading looks strange, remove one leg from the circuit before testing again.
Method 1: Test a Capacitor with Capacitance Mode
This is the most direct method. If your multimeter has a capacitance symbol, often shown as F, nF, or a capacitor icon, use that first.
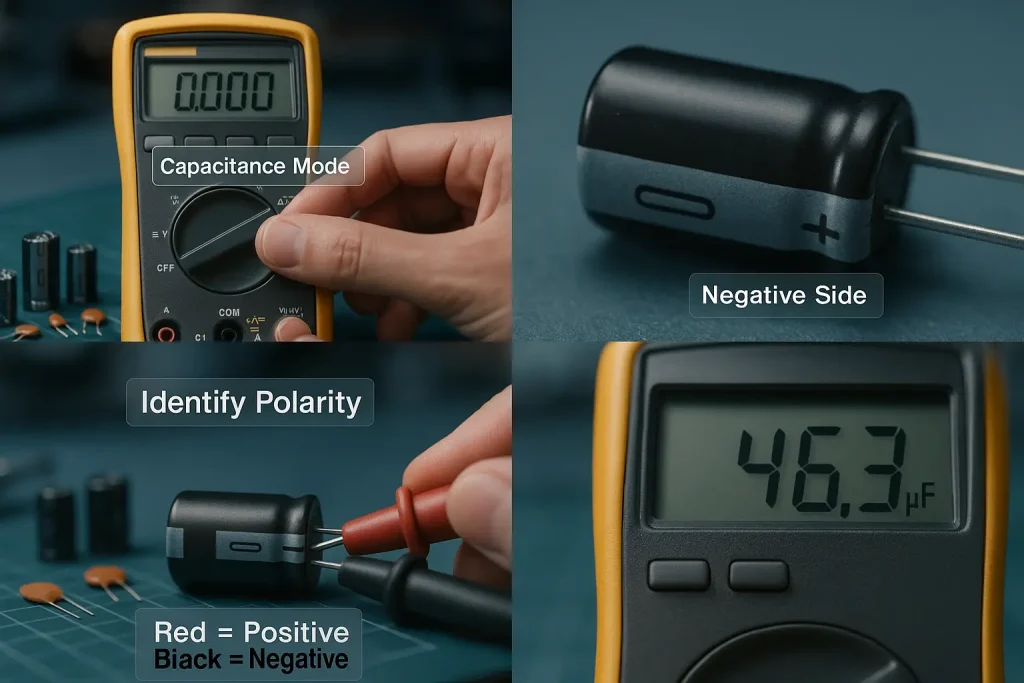
Credit: mme-ae.com
Step 1: Set the meter correctly
Turn the dial to capacitance mode. Some meters require you to press a function button to switch from resistance to capacitance. Check your meter manual if needed.
Step 2: Remove the capacitor from the circuit, if possible
For the best result, remove at least one leg from the circuit. Testing fully in circuit can work sometimes, but it is less reliable.
If the capacitor is part of a board and hard to remove, try isolating one terminal. This is often enough for a cleaner reading.
Step 3: Connect the probes
Touch the meter probes to the capacitor leads. For non-polarized capacitors, either lead can go to either probe. For electrolytic capacitors, some meters are not sensitive to polarity in capacitance mode, but it is still a good habit to match positive to positive when marked.
Step 4: Wait for the reading to stabilize
The display may take a few seconds to settle. Small capacitors often read quickly. Larger capacitors may take longer. Be patient.
Step 5: Compare the reading to the rated value
The capacitor body usually shows a value such as 10µF, 100µF, or 0.47µF. Compare your reading to that number.
Many capacitors have a tolerance range. That means the actual value can be a little higher or lower than the printed rating. For example, a 100µF capacitor may still be acceptable if it reads slightly above or below that value, depending on its tolerance rating.
What counts as bad?
A capacitor is often suspicious if the reading is far below the marked value, near zero, or wildly unstable. If it reads open or does not register at all, it may be bad. If it reads much higher than expected, that can also be a sign of damage or measurement error.
Beginner mistake: People often think “any number” means the capacitor is good. Not true. The number must be close enough to the rated value, and the reading must make sense for that capacitor type.
Method 2: Test a Capacitor with Resistance Mode
If your multimeter does not have capacitance mode, you can still get useful clues with resistance mode. This method does not give an exact capacitance value, but it can show charging behavior.
Step 1: Switch the meter to ohms
Use a higher resistance range if your meter is not auto-ranging.
Step 2: Place the probes on the capacitor terminals
Watch the display closely. A good capacitor often starts with low resistance and then the reading climbs toward higher resistance, sometimes toward infinity or “OL.”
Step 3: Reverse the probes
For electrolytic capacitors, the reading may change slightly when you reverse the probes because the capacitor charges in the opposite direction. A healthy capacitor usually shows a brief jump, then rising resistance again.
How to read the results
- If resistance stays very low: The capacitor may be shorted.
- If resistance rises slowly: The capacitor may be charging normally.
- If resistance stays open from the start: The capacitor may be open, but the circuit or meter setting should be checked too.
- If the reading jumps around badly: The capacitor may be weak, or it may still be in circuit with other components.
This test is helpful, but it is less precise than capacitance mode. Use it as a quick check, not a final answer when the application is important.
Method 3: Check for a Shorted Capacitor
A shorted capacitor can cause fuses to blow, boards to fail, or motors to overheat. This test is simple and useful when a device is not starting.
Step 1: Discharge the capacitor first
Never test resistance on a charged capacitor. The reading will be wrong, and the meter may be stressed.
Step 2: Set the meter to resistance or continuity
Use continuity mode if your meter has it. A steady beep usually means a low-resistance path.
Step 3: Probe the terminals
If the meter beeps and stays near zero ohms, the capacitor may be shorted. A healthy capacitor should not behave like a wire.
Keep in mind that a short reading in circuit may come from another part of the circuit. That is why isolating one lead is so important.
Method 4: Compare the Reading to the Device Symptom
Good testing is not only about numbers. It is also about matching the reading to the problem.
For example:
- A ceiling fan that hums but does not start often has a weak motor capacitor.
- A power supply that will not turn on may have a failed filter capacitor.
- An audio amplifier with noise or poor bass response may have a dried-out electrolytic capacitor.
Non-obvious insight: Some capacitors fail only when warm. If the device works for a while and then stops, a cold test may look normal. In that case, the capacitor may still be weak under real operating conditions.

Credit: reddit.com
Step-by-Step Example: Testing an Electrolytic Capacitor
Let us walk through a simple example. Suppose you have a 220µF electrolytic capacitor from a small power board.
- Unplug the device and wait a few minutes.
- Discharge the capacitor through a resistor.
- Remove one leg from the circuit.
- Set the multimeter to capacitance mode.
- Touch the probes to the leads.
- Wait for the reading to settle.
- Compare the result to 220µF.
If the meter reads 215µF, that may be fine. If it reads 40µF, the capacitor is likely bad. If it reads 0 or shows no stable value, the capacitor may have failed or your test setup may be wrong.
Now switch to resistance mode and repeat. A healthy electrolytic capacitor often shows a low reading first, then the resistance climbs. If the reading stays near zero, that suggests a short. If it stays open instantly and never moves, the capacitor may be open or very small.
Common Mistakes When Testing Capacitors
Many bad readings come from simple mistakes, not bad meters.
Testing a charged capacitor
This is the most dangerous mistake. Always discharge first.
Testing fully in circuit without thinking
Other components can affect the result. If the reading looks odd, remove one leg and test again.
Using the wrong range
Some meters need the correct mode or range before they can show a stable result. A wrong setting can make a good capacitor look bad.
Ignoring tolerance
Not every capacitor must read exactly on the printed value. Check the allowed tolerance when possible.
Assuming a good capacitance reading means perfect health
A capacitor can still fail under load because of high ESR or leakage. This matters a lot in power supplies and motor circuits.
What to Do If the Meter Has No Capacitance Mode
Many basic multimeters do not measure capacitance directly. That does not mean you are stuck.
You can still use resistance mode to check for charging behavior, or continuity mode to look for a short. For a more serious repair, you may need an ESR meter or a dedicated capacitance tester. Those tools are better for troubleshooting capacitors in switching power supplies and high-demand circuits.
Still, for many home repairs, the basic resistance test gives enough information to decide whether the capacitor is likely faulty.
When the Capacitor Should Be Replaced
Replace the capacitor if one or more of these are true:
- The capacitance is far below the rated value
- The capacitor reads shorted
- The meter shows unstable or inconsistent results even after isolating the part
- The capacitor is swollen, leaking, or physically damaged
- The device problem clearly matches capacitor failure and the test supports it
If you replace it, choose the same capacitance rating and an equal or higher voltage rating. Do not lower the voltage rating. That is a common replacement error.
Practical tip: In many power circuits, a slightly higher voltage rating is fine, and sometimes better. But the capacitance value should stay the same unless the circuit design clearly allows a change.
Extra Tips for Better Results
Check the temperature rating
Some capacitors fail early because they run hot. If you are replacing one near a heat source, use a part with a suitable temperature rating, often 105°C for tougher environments.
Look for physical signs
A bulged top, cracked case, or leaked electrolyte often means the capacitor is already bad. In those cases, testing is useful, but the visual clue may be enough.
Test more than one capacitor if the device is old
If one capacitor failed in an older device, nearby capacitors may also be weak. This is especially common in power supplies and appliances that run hot.
Keep the leads steady
Loose probe contact can make the reading jump. Hold the probes firmly and wait for the number to settle.
How to Read the Results Quickly
Here is a simple way to think about the result after testing:
- Close to the rated value: Likely good
- Much lower than rated value: Weak or bad
- Near zero or constant beep in resistance mode: Possibly shorted
- Never changes from open: Possibly open or not tested correctly
- Jumping, unstable, or odd in circuit: Test out of circuit again
This simple pattern helps you make a decision faster, even if you do not know every technical detail.
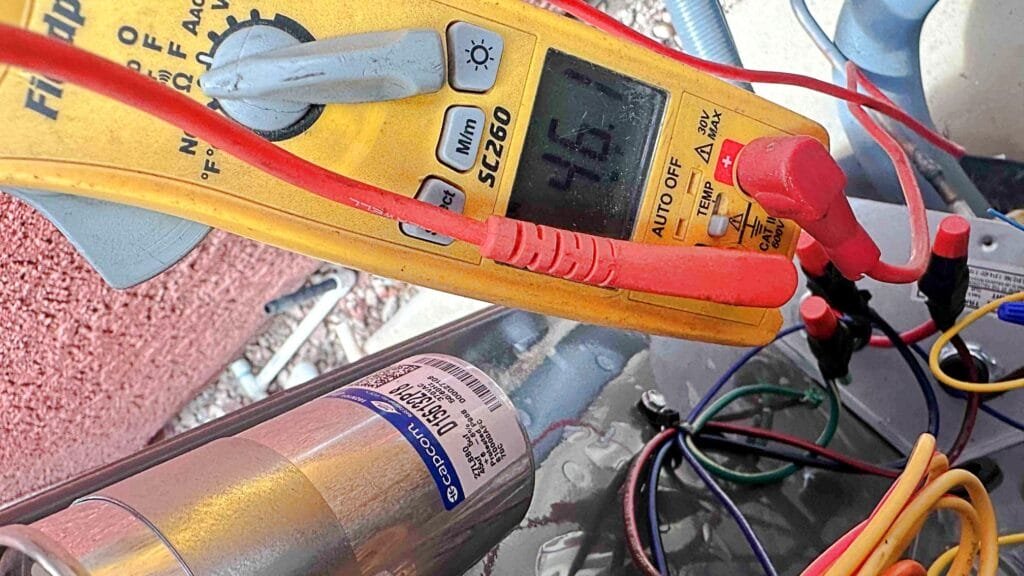
Credit: bobsrepair.com
Final Thoughts
Once you know how to test a capacitor with a multimeter, a lot of repair work becomes easier. You can check common failures, confirm your suspicion, and avoid replacing parts by guesswork. The key is to work safely, discharge the capacitor first, and test in the right mode.
Remember one important point: a meter reading is only part of the story. The device symptoms, the capacitor type, and the test setup all matter. When you combine them, you get a much clearer answer.
With a little practice, capacitor testing becomes fast and simple. You will know when a part is healthy, when it is weak, and when it should be replaced.
FAQs
1. Can I test a capacitor without removing it from the circuit?
Yes, sometimes you can. But the reading may be wrong because other parts affect the test. For a more reliable result, remove at least one leg of the capacitor from the circuit.
2. What should a good capacitor reading look like on a multimeter?
In capacitance mode, the reading should be close to the value printed on the capacitor, within its tolerance range. In resistance mode, a good capacitor often shows a brief low reading that rises toward open or very high resistance.
3. Why does my multimeter keep showing a strange or unstable reading?
This can happen if the capacitor is still charged, if it is still connected to other parts, or if the probes are not making good contact. Try discharging it again and testing one leg out of circuit.
4. Is it safe to test large capacitors with a regular multimeter?
Usually yes, as long as you discharge them first and stay within the meter’s voltage and capacitance limits. For large motor or power capacitors, be extra careful and check the meter manual if the part is very large.
5. Can a capacitor be bad even if the meter says the value is correct?
Yes. A capacitor can still fail under real load because of high ESR, leakage, or heat-related problems. That is why the meter test should be combined with the device’s symptoms.
