A stripped, rusted, rounded bolt can turn a small repair into a long, frustrating fight. The head no longer grips. Rust locks the threads in place. One wrong move can make the bolt even harder to remove.
The good news is that you do not always need a drill right away. In many cases, you can remove stripped rusted rounded bolt problems with heat, penetrating oil, better grip tools, or a few careful extraction methods. The key is to start with the least destructive fix and move step by step.
This guide shows practical ways to free a stubborn bolt, when to stop, and how to avoid damage to the part around it. You will also learn a few tricks that many beginners miss, like why cooling can help after heating, and why the tool you choose matters more than force.
What makes this bolt so hard to remove
Three problems often happen at the same time. The bolt head is stripped, so your tool cannot bite. The bolt is rusted, so the threads are stuck. The head may also be rounded, which removes the flat edges needed for a wrench or socket.
When these problems stack up, many people try harder and harder force. That usually makes things worse. A socket slips. The head gets more damaged. The bolt may snap below the surface, which creates a much bigger repair.
Before you start, look at the bolt and decide how much room you have. Can you reach it with pliers? Can you heat the area safely? Is there space for a left-hand drill bit or extractor? A good plan saves time and reduces damage.
Know what kind of failure you are dealing with
- Stripped head: the tool no longer grips the bolt properly.
- Rounded head: the corners are worn away, so sockets slip.
- Rusted bolt: corrosion has fused the threads in place.
- Seized bolt: the bolt will not turn, even if the head still looks okay.
Many bolts have more than one problem. For example, a rounded head may also be rusted into the hole. That is why the best method is usually a sequence, not one single trick.
Gather the right tools before you start
You do not need every tool on the market. But you do need the right mix of grip, heat, and cutting tools. Having them ready before you begin keeps the job calm and safe.
| Tool | Why it helps | Best use |
|---|---|---|
| Penetrating oil | Helps loosen rust in the threads | First step before turning |
| Vise-grip pliers | Clamp tightly on damaged bolt heads | When the head is partly exposed |
| Socket extractor set | Bites into rounded bolt heads | For rounded fasteners with access from the front |
| Impact driver or impact wrench | Uses shock to break rust bonds | Stubborn bolts that still have some grip |
| Propane torch or heat gun | Expands metal and helps break rust | Metal parts only, away from fuel or plastic |
| Left-hand drill bits | May spin the bolt out while drilling | When other grip methods fail |
| Bolt extractor set | Helps remove drilled or damaged bolts | Last-stage removal |
| Center punch and hammer | Helps drill in the correct spot | Before drilling |
If you want a deeper look at rust and corrosion basics, this guide from NACE International is useful. It explains why rust can lock metal parts together so strongly.
Start with the easiest fix: penetrating oil and patience
This is the safest first move. Penetrating oil works best when it has time to move into the tiny gaps between the bolt and the threads. It will not magically solve every case, but it can make the next step much easier.
- Clean loose dirt and rust from around the bolt with a wire brush.
- Spray penetrating oil directly on the bolt head and where the threads enter the part.
- Let it sit for at least 15 to 30 minutes. For heavy rust, wait several hours or overnight.
- Tap the bolt head lightly with a hammer to help the oil work deeper.
- Try to turn the bolt gently back and forth, not only in one direction.
Non-obvious tip: a few light taps often help more than extra spray. The vibration creates tiny cracks in the rust layer, which gives the oil a path inside.
Do not force the bolt at this stage. If the head starts to deform more, stop and move to a better gripping method.
Use the best grip you can get
If part of the bolt head is still visible, grip is the next thing to improve. Many people keep using a loose wrench or the wrong socket. That usually rounds the head further.

Credit: daitool.com
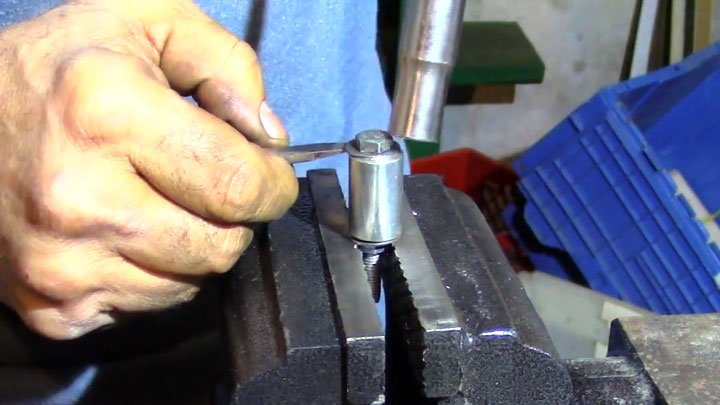
Try locking pliers first
Vise-grip pliers can work very well on damaged bolt heads. Adjust them so they clamp down hard. Then lock them tightly before turning.
For best results, position the jaws as flat and square as possible. If the pliers are angled, they are more likely to slip.
Use a bolt extractor socket for rounded heads
Extractor sockets are made to bite into rounded fasteners. They often solve the problem when regular sockets fail. Choose one that fits tightly. Tap it onto the head with a hammer so it grips better.
Then use a breaker bar or ratchet with steady pressure. A sudden jerk can snap the bolt or damage nearby parts.
Non-obvious tip: extractor sockets work best when you hammer them on fully. A loose fit looks harmless, but it usually wastes the tool’s grip and increases slipping.
Use the correct motion
Many bolts loosen by turning left, but rust can make the first movement feel impossible. Try a small back-and-forth motion first. Moving a bolt a few degrees in each direction may break the rust seal.
- Do not use fast, wild swings.
- Keep pressure steady and controlled.
- Pause if the tool starts slipping.
Add heat when rust is the main problem
Heat can be one of the best ways to remove stripped rusted rounded bolt issues because metal expands when it gets hot. That expansion can crack rust and help the threads move again.
Use heat only when it is safe for the part around the bolt. Avoid open flame near fuel lines, plastic pieces, rubber seals, paint, or anything flammable. If you are not sure, use a heat gun instead of a torch.
- Apply penetrating oil first and let it soak.
- Heat the area around the bolt, not just the bolt head.
- Warm it until the metal is hot, but not glowing.
- Try to turn the bolt while the part is still warm.
- If needed, cool the bolt quickly with air or a damp cloth on the surrounding area, then try again.
This heat-and-cool method is powerful because different metal parts expand and shrink at slightly different rates. That small movement can break the rust bond.
Safety note: if the bolt is near a sealed bearing, plastic trim, wiring, or fuel system parts, do not use flame heat. Choose a safer method instead.
Try impact force before cutting or drilling
An impact tool sends sharp turning force into the bolt. That shock can break rust loose better than slow pressure. It is especially useful when the bolt is seized but the head still has enough shape to hold a socket.
An impact driver, impact wrench, or hand impact tool may work where a regular ratchet fails. The important thing is not to overdo it. Use short bursts and check the bolt often.
If you are using a hand impact driver, hold it firmly and strike it with a hammer. That combines turning force with a shock that helps crack the rust bond.
Why impact works so well
Rust creates a sticky bond that resists slow turning. Impact force sends quick energy through the bolt and can break that bond before the head twists apart. This is one of the reasons mechanics use impact tools on old fasteners.
Still, impact should not be your first move if the head is already badly damaged. In that case, a socket extractor or pliers may be the better start.
Move to cutting or drilling only when needed
If the bolt still will not come out, you may need to remove the head or drill the center. This is a more aggressive fix, so use it carefully.
Cut a slot for a flat tool
If the bolt head has enough exposed surface, you can cut a straight slot across the top using a rotary tool or cut-off wheel. Then use a large flat screwdriver or impact driver bit to turn it.
This method works best on bolts that are not too large and still have some body left above the surface. The slot must be deep enough to grip, but not so deep that the head weakens too much.
Drill with a left-hand bit first
A left-hand drill bit turns in the opposite direction from a standard drill bit. As it cuts into the bolt, it may grab and spin the bolt out on its own. That is why many repair people try this before a standard extractor.
- Mark the center of the bolt with a punch.
- Start with a small pilot hole.
- Use cutting oil if possible.
- Drill slowly and keep the bit centered.
- Stop if the bit starts wandering off-center.
Non-obvious tip: drilling off-center is one of the fastest ways to ruin the surrounding threads. A small mistake here can turn a simple bolt removal into a thread repair job.
Use a bolt extractor carefully
If drilling leaves a clean enough hole, a bolt extractor may help. Tap the extractor into the hole and turn it slowly. The extractor is designed to bite as you turn counterclockwise.
Do not use a huge amount of force. If an extractor snaps inside the bolt, the job becomes much harder because extractor steel is very hard to drill.
What to do when the bolt breaks flush
If the bolt snaps at the surface, you still have options. This is frustrating, but not the end of the repair.
First, look for any part of the broken bolt above the surface. If there is even a tiny edge, try locking pliers again. If it is flush, center punch the exact middle and drill carefully.
The goal is to make the broken piece smaller and easier to collapse inward. In many cases, after drilling the center, the remaining thread ring can be picked out with a small pick or collapsed with a thread chaser.
Credit: daitool.com
When the hole is in soft material
If the bolt threads into aluminum or another soft metal, be extra careful. Soft material can damage easily. Slow drilling and accurate centering matter a lot here.
After removal, inspect the threads. If they are damaged, run a thread chaser or the correct tap through them gently. A full cutting tap is not always the best choice if you only need to clean the threads.
Common mistakes that make the job harder
Most failed bolt removals happen because of impatience. Here are the mistakes that cause the most trouble.
- Using the wrong size tool: a loose socket strips the head faster.
- Skipping penetrating oil: dry force fights rust instead of working with it.
- Turning too hard too soon: this often shears the bolt.
- Heating unsafe materials: this can damage nearby parts or create a fire risk.
- Drilling without centering: this harms the threads and may break the extractor.
- Giving up too early on soaking time: rust needs time to loosen.
One of the biggest beginner mistakes is assuming more force is always better. In bolt removal, control usually wins.
How to choose the right method in the right order
The best order is usually simple: clean, soak, grip, shock, heat, then drill. Not every bolt needs every step, but starting gentle gives you the highest chance of success with the least damage.
| Problem | Best first move | Next move if it fails |
|---|---|---|
| Light rust, good head shape | Penetrating oil | Socket and breaker bar |
| Rounded head | Extractor socket | Vise-grips or heat |
| Seized by rust | Oil plus heat | Impact tool |
| Head badly damaged | Locking pliers | Drill and extractor |
| Bolt snapped flush | Center punch and drill | Extractor or thread repair |
This order matters because each step protects the part and improves the odds for the next one. For example, heat works better after oil has had time to soak. And a socket extractor works better if the bolt head is cleaned first.
How to stop the same problem from happening again
Once the bolt is out, take a minute to make the next repair easier. A clean thread and a little prevention can save a lot of time later.
- Clean the hole and threads before installing a new bolt.
- Use anti-seize on bolts that are likely to rust again, especially in outdoor or high-heat areas.
- Choose the correct bolt grade and size.
- Do not overtighten during reassembly.
- Replace badly rusted hardware instead of reusing it.
Non-obvious tip: anti-seize should be used carefully. A little can help, but too much can change torque readings and lead to overtightening. Use only a thin coat when appropriate.
Credit: cartreatments.com
When to stop and get help
Some bolts are not worth forcing at home, especially if they hold safety parts, engine components, or structural hardware. If the bolt is near a brake system, suspension part, fuel line, or engine block, the cost of a mistake can be high.
Call a professional if the bolt is in a dangerous location, if drilling has gone off center, or if the extractor breaks inside the bolt. These situations can still be fixed, but they often need special tools.
If you are working on a valuable part, it is also smart to stop before making the damage worse. A short repair visit can cost less than replacing a broken housing.
Final thoughts
To remove stripped rusted rounded bolt problems successfully, start with patience, clean the area, and use the lightest method that has a real chance of working. Penetrating oil, better grip, impact force, and heat often solve the problem without drilling. Only move to cutting or extraction when simpler steps fail.
The main idea is simple: do not fight rust with brute force alone. Work with the bolt, not against it. That approach gives you better results and less damage.
FAQs
1. What is the easiest way to remove a stripped rusted rounded bolt?
The easiest first step is usually penetrating oil, followed by a tight-grip tool like vise-grip pliers or an extractor socket. Let the oil soak before turning the bolt.
2. Can heat really help remove a stuck bolt?
Yes. Heat can expand the metal and break the rust bond. It works best when used carefully and safely on metal parts that are not near plastic, fuel, or rubber.
3. What should I do if the bolt head is completely rounded?
Use a bolt extractor socket first. If that fails, try locking pliers if there is any edge left, or move to drilling and extraction.
4. Is it safe to drill out a rusted bolt?
It can be safe if done slowly and centered correctly. Use a punch to mark the middle first, and drill carefully so you do not damage the surrounding threads.
5. How can I avoid stripping bolts in the future?
Use the correct tool size, avoid overtightening, and replace badly rusted hardware early. A thin coat of anti-seize can also help on bolts that are exposed to moisture.
