If you are new to woodworking, a miter saw is one of the best tools you can own. It helps you make fast, clean cuts with less effort. That is why miter saw diy projects are so popular in home workshops. They are practical, beginner-friendly, and useful around the house.
The best part is that you do not need a large workshop or advanced skills to get started. With a few simple boards, careful measuring, and a little patience, you can build projects that save money and improve your home. Many of these projects also teach core skills like cutting angles, making square cuts, and joining pieces neatly.
In this guide, you will find simple project ideas that are realistic for beginners. You will also learn what makes each project a good choice, what to watch out for, and how to get better results from your saw. If you want projects that are useful, doable, and satisfying, this is a strong place to start.
What makes a miter saw useful for beginner projects
A miter saw is designed for accurate crosscuts and angle cuts. That means it is great for trim, frames, shelves, small furniture parts, and many home workshop builds. It is not the most complex saw, but it is one of the most helpful.
Beginners like it because the cut is fast and easy to control. You place the board against the fence, lower the blade, and get a repeatable cut. This makes it ideal for projects where many pieces must match in length.
Another reason it works well for home workshops is consistency. If your cuts are accurate, your project looks more professional even if the design is simple. A clean cut can make a basic shelf look far better than a fancy build with sloppy joints.
One thing many beginners miss is that a miter saw is not only for angled cuts. In many miter saw diy projects, straight cuts are the real work. The saw becomes valuable because it gives you speed, accuracy, and repeatability in one tool.
10 project ideas that work well in a home workshop
These projects are chosen because they are practical, beginner-friendly, and useful. Some are small weekend builds. Others can become the start of a larger woodworking habit.
1. Simple picture frames
Picture frames are one of the best first projects for a miter saw. They teach you how to make precise 45-degree cuts, which is a skill you will use again and again. Even a small error can show up in the corners, so this project helps you improve fast.
You can use pine, poplar, or other softwood boards. Keep the design simple at first. A plain frame with a clear finish is better than a complicated style with weak joints.
Why it works for beginners: it uses short pieces, easy angles, and visible results. If the corners line up well, you know your saw setup is good.
2. Floating shelves
Floating shelves are very useful in kitchens, bathrooms, and living rooms. They are a strong choice for beginners because the cuts are simple, but the final result looks modern and polished. Most floating shelves need straight cuts and careful measurement more than advanced joinery.
Start with a single shelf made from plywood or solid wood. The important part is making sure the shelf is square and the support system is strong. The miter saw helps you cut the parts to the same size, which is key for a clean fit.
Beginner tip: if the shelf will hold weight, do not rely on looks alone. Check the wall anchors and support structure before finishing the build.
3. Basic planter boxes
Planter boxes are a popular outdoor project because they are useful and forgiving. If a cut is a little off, the box still often works. That makes it a smart early project for new woodworkers.
You can build a simple rectangular planter for herbs, flowers, or small vegetables. Most designs use straight cuts, though some include mitered corners for a cleaner look. If you want to practice angles, this is a good place to do it without too much pressure.
Non-obvious insight: outdoor planter boxes need drainage. Beginners often focus on the frame and forget to leave holes or gaps for water to escape. Without drainage, wood can rot faster and plants can suffer.
4. Small storage crates
Storage crates are practical for closets, shelves, garages, and kids’ rooms. They are also simple to customize. You can make them wide, narrow, tall, or shallow depending on your needs.
The miter saw is useful here because it helps you cut identical sides. If your cuts match well, the crate goes together faster and looks cleaner. You can build a crate with basic butt joints, then add handles or labels later.
Why beginners like it: it teaches planning and repetition. You learn how to cut several parts to the same length, which is an important workshop skill.
5. Wall-mounted coat rack
A coat rack is a small project that gives real value in an entryway, mudroom, or bedroom. It is a good way to practice making a neat, finished piece that people will use every day.
The base board can be cut to size with the miter saw, and small decorative pieces can be added for style. Hooks make the project functional, and a stain or paint finish makes it feel complete.
Beginner tip: think about screw placement before you cut and assemble. If the piece will hang on a wall, it should be easy to mount securely into studs or with proper anchors.
6. Step stool
A simple step stool is one of the most useful beginner woodworking projects. It helps in the kitchen, garage, or workshop. It also teaches you how to work with multiple parts that must fit together well.
Use strong wood and keep the design simple. A small stool with a flat top and angled legs is enough for a first version. The miter saw helps you cut the legs and braces to the correct length, which is important for stability.
Non-obvious insight: a stool is not just about strength. It must also feel stable when a person steps on it. Even a small wobble makes the piece feel unsafe, so check the level carefully during assembly.
7. Outdoor bench
An outdoor bench may sound like a bigger project, but a basic version is still beginner-friendly if you keep the design simple. The seat, legs, and supports can all be cut accurately with a miter saw.
This project is good for learning how to build something larger from repeatable parts. It also helps you understand how to check square, measure twice, and keep angles consistent.
Use wood that can handle outdoor use, and finish it with protection against moisture. If you want a project that feels impressive but is still manageable, this is a great choice.
8. Garden trellis
A garden trellis is lightweight, useful, and easy to customize. It supports climbing plants and adds structure to a garden bed or patio space. Many trellises can be built with simple cut lists and repeating pieces.
The miter saw is helpful because the pieces often need to be the same length. If you want a decorative shape, you can also add angled cuts for a nicer look. This project is a good mix of function and style.
Beginner tip: do not make it too heavy. A trellis should support plants, not overpower the garden space. Light, well-spaced parts usually work best.
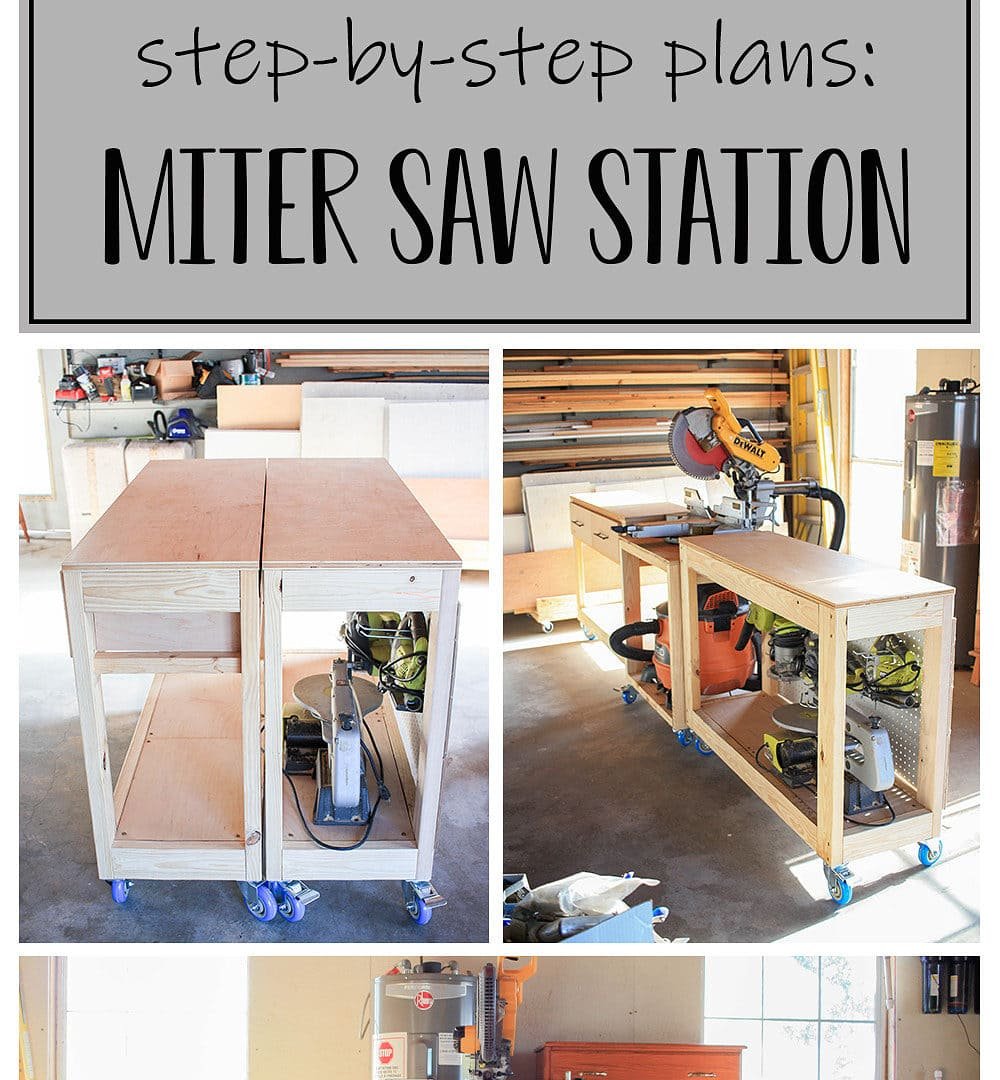
9. Simple workbench accessories
Sometimes the best miter saw diy projects are not full furniture pieces. Bench accessories like tool trays, clamp holders, jig parts, or small organizers can make your workshop much easier to use.
These projects are great for beginners because they are fast and practical. You can use leftover wood and learn how to make accurate cuts without needing a large amount of material.
A helpful approach is to build one accessory at a time. For example, a small tray for screws and pencils can be made in an afternoon. Once you see how useful it is, you will want to build more.
10. Decorative wall art or wood signs
Wood signs and wall art are good practice projects because they let you work on clean cuts and creative layouts. You can make geometric shapes, framed signs, or layered designs using simple boards.
This project is less about strength and more about neatness. That makes it perfect for practicing finish quality. The miter saw helps you cut boards to exact lengths so the final design looks balanced.
Helpful insight: decorative projects often fail because of poor spacing, not poor cutting. Before assembling, lay the pieces out dry and look at the proportions. A design that feels crowded on the bench will look crowded on the wall too.
Project comparison at a glance
It can help to think about which projects are easiest and which ones give the most practical value. The table below keeps it simple.
| Project | Skill level | Main cut type | Best use |
|---|---|---|---|
| Picture frames | Very easy | 45-degree miter cuts | Home decor |
| Floating shelves | Easy | Straight cuts | Storage and display |
| Planter boxes | Easy | Straight and angled cuts | Garden use |
| Storage crates | Easy | Straight cuts | Organization |
| Coat rack | Easy | Straight cuts | Entryway storage |
| Step stool | Moderate | Straight and angled cuts | Household use |
| Outdoor bench | Moderate | Straight and angled cuts | Seating |
| Garden trellis | Easy | Straight cuts | Plant support |
| Workbench accessories | Very easy | Straight cuts | Workshop organization |
| Wall art or signs | Easy | Straight and miter cuts | Decor |

Credit: woodworkmag.com
How to choose the right project for your skill level
Not every beginner should start with the same build. The right project depends on your confidence, your available tools, and what you want the finished piece to do.
If you are very new, start with a project that uses short cuts and simple assembly. Picture frames, storage crates, and tool trays are good choices. They help you practice measuring and cutting without a large material cost.
If you already know how to make basic cuts, try something that needs more fitting, like a bench or step stool. These projects teach you about structure, not just shape. They are useful because they force you to think about strength and stability.
If you want a fast win, choose a project you will use every day. A coat rack or shelf gives you practical value right away, which makes the effort feel worth it.
One thing many beginners overlook is material choice. Softwoods like pine are easier to cut and cheaper to replace if you make a mistake. That makes them better for first builds than expensive hardwoods.
Credit: homegrail.com
Simple habits that improve every cut
Good results are not only about the saw. They also come from a few habits that save time and reduce mistakes.
- Measure twice, cut once. This sounds old, but it still matters. A tiny measurement error can ruin a frame or shelf.
- Support long boards. If a board drops while you cut, the angle can shift and the cut may be wrong.
- Use a stop block for repeated cuts. This helps when several pieces must be exactly the same length.
- Check the blade path before cutting. Make sure the blade will not hit clamps, screws, or loose pieces.
- Test the setup with scrap wood. A practice cut can save a lot of material.
These habits may seem small, but they make a big difference. In many miter saw diy projects, success comes from repeatable accuracy, not from complex building.
Common mistakes beginners should avoid
Even simple projects can go wrong if you rush. The most common mistakes are easy to prevent once you know what to watch for.
Cutting before checking the saw
If the saw is not calibrated, even careful measurements will not help. Make sure the fence, blade angle, and bevel settings are correct before you begin.
Ignoring the grain and finish direction
Wood can look different depending on which side faces out. Beginners often cut everything correctly but assemble it with the rough face showing. Take a second to choose the best faces before building.
Using the wrong material for the job
A lightweight shelf might be fine with pine, but a step stool needs stronger stock. Match the wood to the purpose of the project, not just the price.
Forgetting final sanding
Clean cuts still need light sanding. Sharp corners can feel rough, and small saw marks can affect stain or paint. A few minutes of sanding can improve the final look a lot.
Tools and materials that help you get better results
You do not need a huge setup to make good beginner projects, but a few tools make the work easier. A tape measure, square, pencil, clamps, and sandpaper are essential. A good work surface also helps keep cuts safer and more accurate.
For materials, start with straight boards that are easy to handle. Warped wood creates extra problems, especially on small projects where accuracy matters. If possible, inspect each board before buying it.
For more guidance on safe saw use and workshop habits, the WOOD Magazine website is a useful place to learn more. It offers practical advice for woodworkers at different skill levels.
Credit: theinspiredworkshop.com
Why these projects are worth your time
The best beginner projects do more than fill time. They teach useful skills, build confidence, and give you something you can actually use. That is why a miter saw is such a strong first tool for a home workshop.
With each project, you improve your measuring, cutting, and assembly. You also learn how to solve small problems before they become big ones. That is real woodworking progress.
Another benefit is motivation. When you finish a shelf, frame, or planter box, you see a real result. That feeling matters because it keeps you building instead of stopping after one attempt.
If you choose simple, useful projects first, your skills grow faster. Then the more advanced builds become much easier later on.
FAQs
1. What are the easiest miter saw diy projects for beginners?
The easiest projects are picture frames, storage crates, workbench trays, and simple shelves. These builds use basic straight cuts and do not need advanced joinery. They are ideal for learning how to measure and cut accurately.
2. Can I make useful home projects with only a miter saw?
Yes, you can make many useful projects with just a miter saw and basic hand tools. A tape measure, square, drill, clamps, and sandpaper are often enough for beginner builds. The saw handles the cutting, while the other tools help with assembly.
3. What wood is best for beginner miter saw projects?
Pine is one of the best choices because it is affordable, easy to cut, and widely available. Poplar is also a good option if you want a smoother finish. Try to avoid warped boards, since they make fitting and assembly harder.
4. How do I avoid bad cuts on my first projects?
Use a sharp blade, support the board well, and test your settings on scrap wood before cutting the real piece. Also, mark your cut line clearly and hold the wood firmly against the fence. Careful setup matters more than speed.
5. Which project should I build first if I am a complete beginner?
A simple picture frame or small storage crate is a smart first choice. Both projects are easy to measure, cut, and assemble. They also teach skills you will use in almost every future woodworking project.
