If you want to cut, sand, scrape, or trim in tight spaces, an oscillating multi tool is one of the most useful tools you can own. It looks simple, but many beginners do not use it well at first. The blade can move fast, the tool can vibrate a lot, and the results depend on the right blade, angle, and pressure.
This guide shows how to use an oscillating multi tool in a clear step-by-step way. You will learn how to choose the right accessory, make safe cuts, handle different materials, and avoid common mistakes. By the end, you should feel much more confident using this tool for home projects, repairs, and small renovation jobs.
One reason people like this tool is its control. It does not spin like a drill or saw. Instead, it moves side to side very quickly. That makes it easier to work near walls, corners, trim, pipes, and other tricky spots. But control only comes when you understand the basics.
What an oscillating multi tool actually does
An oscillating multi tool is a hand tool with a head that moves back and forth at a very small angle, very fast. This motion lets it cut, sand, grind, and scrape with precision. It is often used where larger tools cannot fit.
For beginners, the biggest advantage is control. You can make small, careful cuts without removing too much material. That is why this tool is popular for trim work, plunge cuts, drywall repairs, undercutting door jambs, and removing old caulk or adhesive.
Still, the tool is not magic. It works best when you let the accessory do the work. If you push too hard, the blade can heat up, wear out faster, or bounce around. That is one of the first things new users need to learn.
Common tasks this tool handles well
- Cutting wood, drywall, plastic, and thin metal
- Trimming door casings and baseboards
- Removing grout, caulk, and adhesive
- Sanding small corners and edges
- Making flush cuts in tight spaces
What it is not best for
This tool is not the fastest choice for long straight cuts or heavy demolition. It can do those jobs in some cases, but a circular saw, jigsaw, or reciprocating saw may be better for larger work. If you try to force an oscillating tool into a job that needs speed more than precision, you may waste time and wear out blades quickly.
Choose the right blade or accessory first
The tool itself matters, but the accessory matters just as much. A beginner mistake is trying to use one blade for everything. That usually leads to slow cutting, rough edges, or damaged material.
Before you start, match the accessory to the task and material. If you are cutting wood, use a wood-cutting blade. If you are cutting nails or thin metal, use a bi-metal blade. If you need to sand, attach a sanding pad with the correct grit. If you need to scrape old sealant, use a scraper blade.
| Task | Best accessory type | What to watch for |
|---|---|---|
| Wood cutting | Wood blade | Tooth wear and blade heat |
| Metal cutting | Bi-metal blade | Spark control and slow feed |
| Drywall repair | Drywall blade | Dust and hidden wires or pipes |
| Sanding | Sanding pad | Dust buildup and worn paper |
| Scraping | Scraper blade | Surface damage from too much force |
Non-obvious insight: many beginners choose a blade based on the material alone, but cut shape matters too. A narrow blade works better for plunge cuts and tight corners. A wider blade can be more stable for flush cuts. This small choice can improve your result a lot.
Set up the tool before you touch the workpiece
Good setup saves time and reduces mistakes. Start by checking that the accessory is attached tightly. On many tools, a loose blade will vibrate badly and make poor cuts. If your model uses a clamp or quick-release system, make sure it locks fully into place.
Next, check the speed setting. Many oscillating tools have variable speed. Lower speed is usually better for delicate work, plastic, or metal. Higher speed can help with wood or aggressive cutting. Beginners should usually start at a medium setting and adjust after a test cut.
Also inspect your work area. Remove nails, screws, cords, and loose items. If you are cutting into a wall or floor, think about what might be behind it. Pipes, electrical wires, and hidden fasteners can create serious problems.
If dust will be heavy, set up a vacuum or dust control if your tool allows it. Clean visibility helps you stay accurate.
Safety gear you should wear
- Safety glasses or goggles
- Hearing protection
- Dust mask or respirator when needed
- Work gloves for grip and protection
For general tool safety guidance, you can also review advice from OSHA. It is a trusted source for safe work practices.
Learn the right way to hold the tool
How you hold the tool changes how clean the cut will be. Use both hands if possible. One hand should grip the main body and the other should steady the front or handle. Keep your wrists relaxed but firm.
Do not hold the tool too far from the cutting area. The closer you are to the blade, the more control you usually have. At the same time, keep your fingers clear of the accessory. The blade can get hot after a short time, especially on hard materials.
Stand in a balanced position. Do not stretch too far or lean awkwardly. If you lose balance while cutting, the blade may slip and mark the surface. Good body position matters more than many beginners think.

Credit: slashgear.com
Angle and pressure basics
In many cases, the best cutting angle is small, not steep. Let the blade rest lightly against the work. If you press too hard, the tool may slow down or stall. Light pressure usually gives a smoother cut and longer blade life.
A useful beginner rule is this: guide the tool, do not force it. If the tool is struggling, slow down and let the accessory do the work.
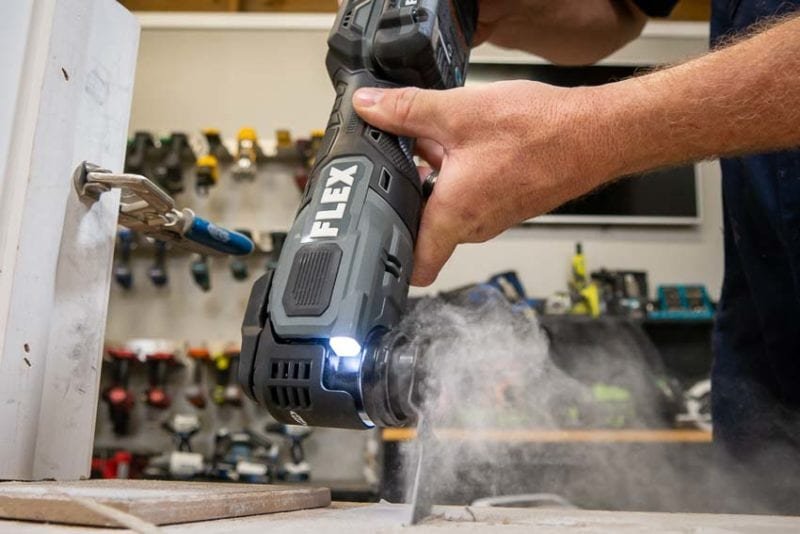
How to use an oscillating multi tool for cutting
Cutting is the most common use, so this is the skill most beginners want first. The exact method changes a little by material, but the basic process stays the same.
Step 1: Mark the cut line
Use a pencil, painter’s tape, or a knife line to mark where you want to cut. Clear marking matters because the blade removes material slowly. If your line is hard to see, it is easy to drift off course.
Step 2: Make a test touch
Before starting a full cut, lightly touch the blade to the material. This helps you feel how the tool reacts. If it jumps or vibrates too much, adjust your grip, speed, or angle.
Step 3: Start slowly
Turn the tool on before the blade touches the material, then bring it into contact gently. Starting in the cut this way often gives more control than forcing the blade into place while it is already deep in the material.
Step 4: Move at a steady pace
Use slow, even movement. Do not rush. The tool cuts by oscillation, so it needs a little time to work. If you move too fast, the blade can overheat or leave a rough edge.
Step 5: Finish cleanly
When you reach the end of the cut, ease off the pressure and let the blade finish naturally. Pulling away too fast can chip the edge or leave an uneven finish.
Non-obvious insight: for many materials, making several shallow passes is better than trying to cut all the way through in one aggressive move. This is especially helpful when working near finished surfaces, such as trim or flooring.
How to make plunge cuts without damage
Plunge cuts are one of the most useful features of an oscillating multi tool. A plunge cut means starting in the middle of a surface instead of from the edge. This is useful for drywall openings, electrical box cutouts, and repair work.
To make a plunge cut, place the tip or edge of the blade on the marked spot. Hold the tool firmly and start it at a low or medium speed. Then tilt slightly if needed and let the blade bite gently into the material. Once it starts cutting, level out and continue along the line.
Be careful not to twist the blade too much. Side pressure can bend the accessory or make the cut wander. If you need a larger opening, cut a little at a time and check the fit often.
Common plunge cut mistakes
- Starting at full speed and letting the tool jump
- Pushing too hard into dense material
- Cutting without checking what is behind the surface
- Trying to turn corners too sharply with a wide blade
How to sand with an oscillating multi tool
Sanding with this tool is useful for corners, edges, and small repair spots. It is not meant for large surfaces, but it does well where standard sanders cannot reach.
Attach the sanding pad and choose the right grit. Lower grit removes material faster. Higher grit gives a smoother finish. For paint touch-ups or light smoothing, start with a medium grit and finish finer if needed.
Move the tool lightly over the surface. Do not stay in one spot too long, or you may create a dip or burn mark. Dust can also clog the sanding paper, so stop and replace it when it loses cutting power.
Best uses for sanding
- Cleaning up tight corners
- Smoothing patched drywall spots
- Preparing small wood areas for paint
- Refining edges after a cut
How to scrape, remove, and clean surfaces
Scraping is another strong use of this tool. It works well for old caulk, glue, paint flakes, and adhesive residue. A scraper blade can save a lot of time in renovation work.
Keep the blade nearly flat against the surface and use controlled, short movements. If you angle it too steeply, you can gouge wood or scratch tile. On soft surfaces, go slower and use less pressure.
This job often improves when the material is warmed slightly, if safe to do so. For example, some old adhesive becomes easier to remove when softened. But never use heat in a way that could damage the surface underneath.
Credit: protoolreviews.com
Practical scraping tip
Work in small sections. Do not try to remove an entire line of caulk or adhesive in one pass. Small sections give you better control and less surface damage.
How to use an oscillating multi tool on wood, metal, and drywall
Different materials respond in different ways. Knowing the differences helps you work faster and avoid damage.
Wood
Wood cuts well with the right blade, but soft wood can splinter if you rush. Use steady pressure and a sharp blade. If you are cutting trim or flooring, score the surface first if needed to reduce tear-out.
Metal
Metal needs patience. Use a bi-metal blade and slower movement. Too much speed can overheat the blade. If you are cutting nails or screws, pause occasionally and let the blade cool.
Drywall
Drywall is easy to cut, but dust can be heavy. Use controlled strokes and keep your eyes on the line. Be extra careful around outlets, pipes, and studs.
One beginner mistake is using too much speed on every material. That may work for some wood cuts, but it is often too aggressive for metal or delicate trim. Adjusting speed is part of learning how to use an oscillating multi tool well.
Common mistakes beginners make
Most beginner problems come from the same few habits. If you know them early, you can avoid a lot of frustration.
- Using the wrong accessory — A blade made for wood may not handle nails or metal.
- Pressing too hard — This slows the tool and shortens blade life.
- Skipping the test cut — A quick test helps you understand the tool’s behavior.
- Ignoring hidden hazards — Always think about wires, pipes, and fasteners behind the surface.
- Working with a dull blade — A worn blade makes rough cuts and creates more heat.
Another mistake is expecting the tool to be fast like a saw. It is not built mainly for speed. It is built for control, access, and precision. When you use it with that in mind, the results improve quickly.
How to get cleaner results every time
A few small habits make a big difference. Keep your blade sharp. Use the right speed. Hold the tool firmly with both hands. Make light passes. Check your work often.
It also helps to let the blade cool if it feels hot. Heat reduces cutting efficiency and can damage some accessories. If you are doing a long job, plan short breaks so the blade and tool stay in better shape.
Clean the tool after use. Remove dust, chips, and residue from the head and accessory area. A clean tool lasts longer and works more smoothly next time.
Simple maintenance habits
- Wipe off dust after each use
- Check the blade mount for looseness
- Replace worn accessories early
- Store blades in a dry place
When to stop and use another tool instead
Knowing when not to use the oscillating multi tool is part of using it well. If you need to cut a long board, this tool will usually be slower than a saw. If you need to remove a large amount of material, a different tool may be better.
Use another tool when speed matters more than precision. Also switch tools if the material is too thick or too hard for the accessory you have. Forcing the multi tool into the wrong job can waste blades and create poor results.
The best users do not rely on one tool for everything. They use the oscillating tool for the jobs it handles best: detail work, tight spaces, and controlled cuts.

Credit: blog.rockwelltools.com
Final thoughts before your first project
Learning how to use an oscillating multi tool is mostly about control. Start with the right accessory, use a steady grip, choose the correct speed, and work slowly. Do not force the blade. Let it move through the material with small, careful passes.
If you remember only a few things, remember these: match the blade to the task, keep your pressure light, and always check what is behind the surface before cutting. Those habits will help you get cleaner results and stay safer on the job.
With practice, this tool becomes one of the most flexible tools in your kit. It may not be the fastest tool in the room, but it can solve problems that many other tools cannot.
FAQs
1. What is the easiest way to learn how to use an oscillating multi tool?
The easiest way is to start with a simple task, such as trimming wood or scraping caulk. Use a medium speed, hold the tool with both hands, and make light test cuts first. Small practice jobs help you understand how the tool vibrates and how much pressure to use.
2. Can an oscillating multi tool cut nails?
Yes, it can cut nails if you use a bi-metal blade made for metal. Move slowly and do not force the tool. If the nail is thick or the blade starts heating too much, pause and let it cool before continuing.
3. Why does my oscillating multi tool vibrate so much?
Some vibration is normal, but too much usually means the blade is loose, dull, or the wrong type for the material. It can also happen if you press too hard. Check the attachment, lower your pressure, and use the correct accessory.
4. How do I keep from damaging the surface I am cutting?
Use a sharp blade, start slowly, and keep the tool angle low. Mark your line clearly before cutting. If the surface is finished or delicate, make shallow passes instead of one deep cut. That gives you more control and reduces the chance of gouging.
5. How long do oscillating multi tool blades last?
Blade life depends on the material, pressure, and blade quality. Soft wood may be easy on blades, while nails, screws, or dense material will wear them faster. If the blade cuts slowly, creates extra heat, or leaves rough edges, it is probably time to replace it.
