
If you want to test a battery, check a socket, or find a broken wire, a multimeter is one of the most useful tools you can own. It can look confusing at first, but once you understand the basic settings, it becomes simple and very practical.
This guide will show you how to use a multimeter step by step, without technical stress. You will learn what the main parts do, how to measure voltage, resistance, and continuity, and how to avoid common mistakes that beginners often make.
By the end, you should feel confident using a multimeter for basic home, car, and electronics tasks. You do not need advanced knowledge. You only need a little patience and the right safety habits.
First, understand what a multimeter does
A multimeter is a test tool that can measure several electrical values. The three most common ones are voltage, current, and resistance. Many beginners only use two of these at first: voltage and continuity. That is normal and completely fine.
Think of it as a simple electrical detective. It helps you find out whether power is present, whether a wire is broken, or whether a part is working as expected. If something does not turn on, the multimeter can often help you narrow down the problem fast.
There are two main types:
- Digital multimeter – the most beginner-friendly type, with a screen that shows the result.
- Analog multimeter – older style, with a moving needle. Less common for beginners.
For most people, a digital multimeter is the best choice. It is easier to read and safer to use for simple testing.
Main parts you need to know
Before you start measuring anything, learn the basic parts of the tool. This saves time and prevents mistakes.
- Display – shows the reading.
- Dial or selector knob – used to choose the test type.
- Probes – the red and black test leads.
- Ports – where the probes plug in.
The black probe usually goes into the COM port. The red probe goes into the port for the test you want to perform. This is one of the first things beginners should get right.
Set up the multimeter the right way
Before measuring anything, make sure the probes are in the correct ports and the dial is set to the correct function. This may sound basic, but many errors happen at this stage.
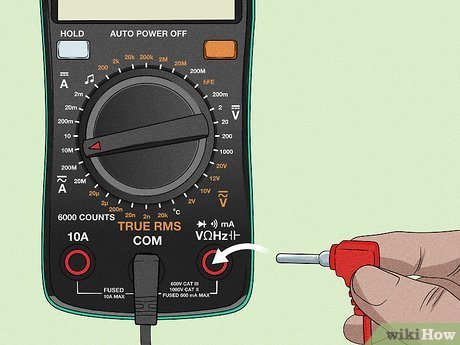
Plug in the probes correctly
Insert the black probe into the COM port. This port is used for common or ground connections. Then insert the red probe into the port marked for voltage, resistance, continuity, or current.
Some multimeters have more than one red port. If you are measuring small things like voltage or resistance, use the regular red port, often labeled V or V/Ω. If you are measuring higher current, there may be another port marked for amps or milliamps.
Select the correct mode
Turn the dial to the setting that matches the test you want to do.
- Use V for voltage.
- Use Ω for resistance.
- Use the sound wave or diode-like symbol for continuity.
- Use A or mA for current.
If your meter has separate AC and DC settings, choose carefully. Batteries and most small electronics use DC. Wall outlets use AC.
Beginner tip: If you are not sure which setting to use, stop and check. Using the wrong mode can give the wrong reading or damage the meter in some cases.
A quick safety check before testing
Look at the probes. Make sure the metal tips are not damaged and that the leads are not cracked. Also check the meter’s battery if the screen is dim or unstable.
For basic home use, a good digital multimeter from a trusted brand is usually enough. If you want official safety and testing guidance from a reliable source, you can also review the Fluke multimeter guide.
How to measure voltage
Voltage is one of the most useful things to measure. It tells you how much electrical pressure is present in a circuit. If you want to know whether a battery still has power or whether an outlet is live, voltage is the first test to learn.
Testing a battery
This is one of the easiest and safest tests for beginners.
- Turn the dial to DC voltage or V with a straight line.
- Start with a range that is higher than the battery voltage if your meter is not auto-ranging.
- Touch the black probe to the negative side of the battery.
- Touch the red probe to the positive side.
- Read the number on the screen.
For example, a fresh AA battery should usually read close to 1.5V. A 9V battery should read near 9 volts. If the value is much lower, the battery may be weak.
Important insight: A battery can still show some voltage and still fail under load. That means a reading alone does not always prove it is good. For simple home use, though, this test is very helpful.
Testing a wall outlet
Wall outlets carry dangerous voltage, so be careful. If you are not comfortable working near household power, ask a qualified person for help.
- Set the meter to AC voltage or V with a wavy line.
- Choose a range above your local outlet voltage, if needed.
- Hold the probes by the insulated part only.
- Place one probe into each slot of the outlet.
- Read the value on the screen.
A standard outlet may show around 120V in some countries or around 230V in others. The exact number depends on where you live. If the reading is very low or zero, the outlet may have a problem.
Common voltage mistakes
- Using the current setting instead of voltage.
- Mixing up AC and DC.
- Touching the probes to the wrong points.
- Trying to test power without checking the meter range.
Non-obvious tip: When checking batteries, clean metal contact points first if they are dirty. Dirt or corrosion can make a good battery look bad.
How to measure resistance
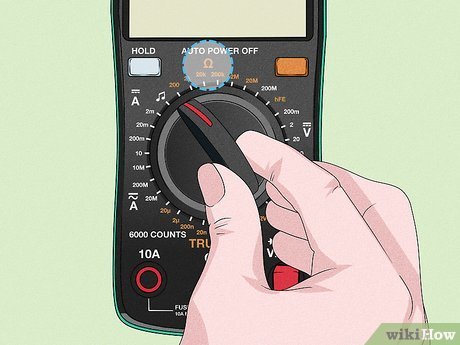
Resistance tells you how much a part resists electric flow. It is measured in ohms, shown as Ω. This test is useful for checking wires, heaters, fuses, switches, and many electronic parts.
Credit: wikihow.com
How to test resistance step by step
- Turn off power to the circuit.
- Set the dial to Ω.
- Put the probes on the part you want to test.
- Read the value shown on the display.
If you test a resistor, the value should be close to its marked rating. If you test a wire, the resistance should be very low. If the screen shows OL or an open circuit symbol, that usually means there is no connection.
Never measure resistance on a live circuit. Power can give false readings and may damage the meter.
What the readings mean
- Low resistance – easy electrical flow.
- High resistance – harder electrical flow.
- OL or infinity – open circuit or no path.
Beginner insight: Resistance tests are best done after removing the part from the circuit, if possible. Other parts connected nearby can affect the result and confuse you.
How to use continuity mode
Continuity mode is one of the easiest and most useful functions on a multimeter. It checks whether a path is complete. If there is a full path, the meter usually beeps. If the path is broken, there is no beep.
This is great for finding broken wires, blown fuses, bad switches, and loose connections.
When to use continuity
Use continuity when you want a simple yes-or-no answer. For example:
- Is this wire broken?
- Is this fuse still good?
- Does this switch work?
- Is there a connection between these two points?
How to test continuity
- Turn off power to the circuit.
- Set the dial to the continuity symbol.
- Touch the probes together first.
- You should hear a beep or see a very low reading.
- Then test the wire, fuse, or component.
If you do not hear a beep when the probes touch each other, the meter may be set wrong or the battery may be weak.
Non-obvious tip: Continuity can sometimes beep even when a part is not fully healthy. For example, a wire with internal damage may still pass a basic beep test but fail under real use. If a problem keeps returning, test more carefully.
How to measure current safely
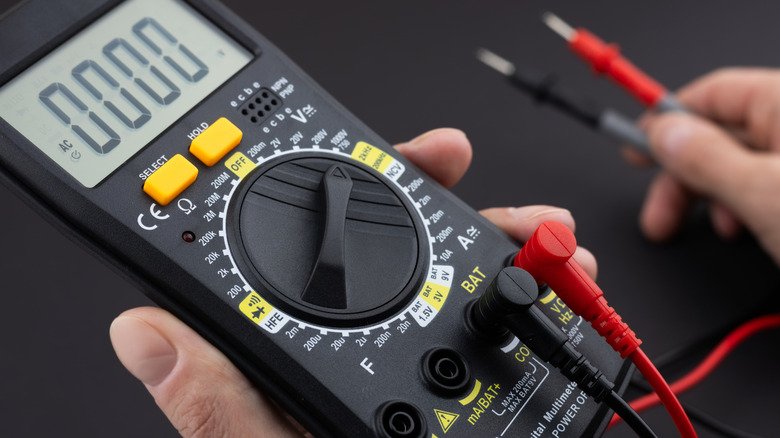
Current is the amount of electricity flowing in a circuit. This test is less common for beginners because it requires the meter to be connected in a special way. If you connect it wrong, you can blow the meter’s fuse.
Credit: slashgear.com
Why current testing is different
To measure current, the circuit must be opened and the meter placed in line with the flow. This is different from voltage, where you measure across two points.
That is why many beginners avoid current at first. There is no shame in that. For most simple tasks, voltage and continuity are enough.
Basic current test steps
- Turn off power.
- Move the red probe to the correct current port.
- Set the dial to A or mA.
- Open the circuit.
- Connect the meter so current flows through it.
- Turn power back on and read the value.
If you are not fully sure how to do this, stop and study the meter manual first. This is the area where many beginners make expensive mistakes.
Important warning: Never try to measure current by placing the probes across a battery or outlet like you would for voltage. That can create a short circuit.
Read the display with confidence
Once you know the mode, reading the screen is usually easy. Still, a few symbols can confuse beginners at first.
| Symbol or reading | What it usually means |
|---|---|
| V | Voltage |
| Ω | Resistance |
| A | Current |
| OL | Open line or out of range |
| Beep | Continuity is present |
| – | Some meters show a minus sign when probe polarity is reversed |
Many digital meters are auto-ranging. That means they choose the range for you. If yours is manual-range, you may need to adjust the dial until you get a clear reading.
If the display shows a strange number, it may simply mean the meter is on the wrong setting. Do not panic. Switch modes and try again.
Common beginner mistakes to avoid
Learning how to use a multimeter becomes much easier when you know the common mistakes in advance. These are the ones that cause the most confusion.
- Using the wrong mode – for example, testing voltage while set to resistance.
- Leaving the red probe in the wrong port – especially after measuring current.
- Measuring resistance on a live circuit – this can create bad readings.
- Ignoring AC vs DC – a battery and a wall outlet are not tested the same way.
- Touching metal probe tips carelessly – this can be dangerous around live electricity.
One smart habit is to stop and say the three questions out loud before each test: What am I measuring? Is the power on or off? Are the probes in the right ports? This simple habit prevents many errors.
Simple real-world examples
Here are a few practical situations where a multimeter helps right away.
Checking a dead remote
Open the battery compartment and test the batteries with DC voltage. If they are low, replace them. If the batteries are good, the issue may be dirty contacts or a problem inside the remote.
Finding a blown fuse
Remove the fuse and use continuity mode. If the meter does not beep, the fuse is likely blown. If it beeps, the fuse is still connected internally.
Testing a lamp cord
With the power unplugged, test continuity from one end of the cord to the other. If one side fails, there may be a break inside the cable.
Checking a car battery
Set the meter to DC voltage and place the probes on the battery terminals. This helps you see if the battery is charged enough to start the car.
Practical tips that make testing easier
These small habits can make a big difference when you are learning.
- Start with the highest safe range if your meter is not auto-ranging.
- Keep one hand away from live circuits when possible.
- Hold probes by the insulated handles only.
- Test on a known good battery first to build confidence.
- Store the meter with the dial turned off to save battery life.
Another beginner insight: A multimeter does not replace careful observation. Burn marks, loose wires, corrosion, and broken insulation often tell you a lot before the meter does. Use your eyes first, then use the meter to confirm.
Credit: wikihow.com
How to get better with practice
The best way to learn how to use a multimeter is to practice on safe, low-risk items. Do not begin with a live outlet if you are nervous. Start with batteries, cables, and simple fuses.
Try this easy practice path:
- Test a new battery and a used battery.
- Check continuity on a spare wire.
- Test a fuse you already know is good.
- Measure a small device battery pack.
- Only then move to more advanced tasks.
With a little repetition, the meter stops feeling complicated. The settings begin to make sense fast, and you will start solving small electrical problems on your own.
Final thoughts
A multimeter is not just for electricians. It is a useful everyday tool for anyone who wants to understand batteries, wires, outlets, and basic electrical problems. Once you learn the main modes, the meter becomes much less intimidating.
The key is to move slowly, choose the right setting, and stay safe. If you remember the difference between voltage, resistance, continuity, and current, you already know the core of how to use a multimeter. The rest comes with practice.
FAQs
1. What is the easiest multimeter function for beginners?
Voltage and continuity are the easiest to learn first. Voltage helps you check if power is present, and continuity helps you see if a wire or fuse is connected.
2. Can I test a battery with a multimeter?
Yes. Set the meter to DC voltage and touch the probes to the battery terminals. The reading tells you how much charge the battery still has.
3. Is it safe to use a multimeter on a wall outlet?
It can be done carefully, but wall outlets carry dangerous voltage. If you are not confident, ask a trained person for help and always use the correct AC voltage setting.
4. Why does my multimeter show OL?
OL usually means open line or out of range. For resistance or continuity, it often means there is no complete path between the probes.
5. What should I do if the reading does not make sense?
Check the mode, the probe ports, and whether the circuit is powered on or off. Most strange readings come from using the wrong setting or measuring the wrong way.
