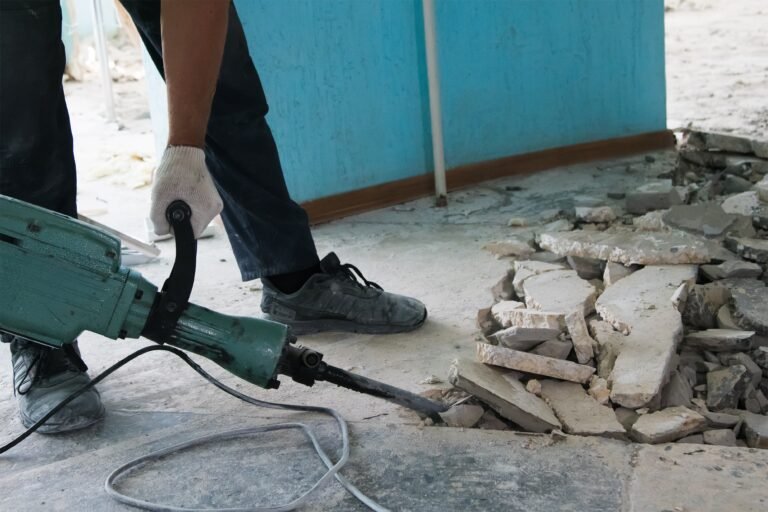
If you need to pull up old floor tile, a demolition hammer can save a lot of time and effort. It is much faster than a hand chisel, and it works well on stubborn tiles, thick mortar, and large areas. But this tool is powerful. If you use it the wrong way, you can damage the subfloor, break nearby materials, or even hurt yourself.
That is why it helps to know the right method before you start. The goal is not only to remove tile quickly. The goal is to remove it cleanly, safely, and with less dust, less noise, and fewer mistakes. With the right setup and technique, you can turn a hard job into a much easier one.
In this guide, you will learn how to use a demolition hammer to remove tile step by step. You will also learn what to check before starting, how to protect the room, and how to avoid the common problems that waste time and damage surfaces.
What to know before you begin
A demolition hammer is not the same as a regular drill or a small rotary hammer. It is built for breaking and chipping hard material. For tile removal, it works best when the tile is firmly attached or when the mortar bed is thick. In many cases, it removes floor tile much faster than manual tools.
Still, not every tile job is a good match for this tool. If you are removing tile from a fragile surface, a thin wall, or an area with hidden pipes or wiring, you need extra care. The tool has strong impact force, so the surface below the tile matters just as much as the tile itself.
One thing beginners often miss is that the angle of attack matters more than force. Many people push too hard and expect the hammer to do all the work. That usually causes broken subfloors, gouged concrete, and more cleanup later. A light, steady angle often works better than heavy pressure.
Another useful point: old tile jobs are often built in layers. You may face tile, thinset, backer board, and even a mortar bed. Knowing what you are cutting into helps you choose the right bit and the right pace.
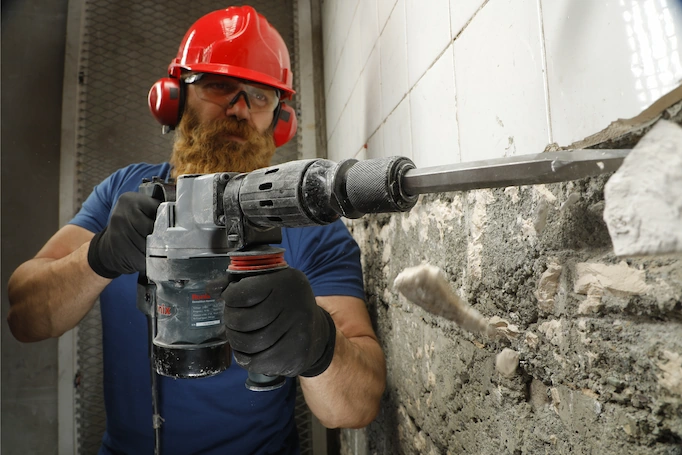
Safety gear you should wear
Before using the tool, put on proper protection. Tile removal creates flying chips, sharp edges, and heavy dust. Good safety gear is not optional.
- Safety glasses or a full face shield
- Hearing protection
- Dust mask or respirator
- Gloves with a strong grip
- Long sleeves and durable pants
- Work boots with closed toes
If the tile is very old, test for possible asbestos before disturbing it. Some older floor tiles, mastics, and backing materials can contain hazardous fibers. If you are unsure, stop and get professional testing. This is one of the most important safety checks you can make.
For general tool safety advice, you can also review the guidance from OSHA, which offers clear information on protective equipment and safe work practices.
Prepare the room the right way
Good preparation makes the job faster and cleaner. Skipping this step is a common mistake. People often focus on the hammer itself and forget the room around it. That leads to broken trim, dust everywhere, and more cleanup than expected.
Clear the work area
Remove furniture, rugs, loose items, and anything that could be damaged by vibration or dust. If you are working in a kitchen or bathroom, take out small objects from cabinets and shelves nearby. Strong hammering can move items that seem far away.
Also protect doorways and vents. Cover them with plastic sheeting if you want to keep dust out of the rest of the house. A simple dust barrier can save hours of cleaning later.
Find the tile edge and start point
Tile removal usually starts easier near a broken tile, loose grout line, or exposed edge. If you do not have one, you may need to create a start point with a floor scraper, pry bar, or cold chisel. Starting in the middle of a tile field is harder and usually less efficient.
Look for places where tile already lifts slightly, or where grout has cracked. Those spots give the demolition hammer a better entry point. This small detail can make the first few minutes much easier.
Inspect the surface below the tile
Before you begin, think about what lies under the tile. Is it concrete? Wood subfloor? Cement board? Thinset over backer board? The answer changes how carefully you should work.
Concrete is usually more forgiving. A wood subfloor is more delicate and can be damaged quickly. If you are working over wood, keep the hammer at a shallower angle and use less force. This is another point many beginners overlook. The tool feels powerful enough to remove anything, but the base layer often decides how hard you can work.
Choose the right bit for tile removal
The bit you use matters a lot. A demolition hammer can accept different chisels, and each one behaves differently. For tile work, the best choice is usually a wide flat chisel or tile removal bit. The wide edge helps lift tile without digging too deep into the subfloor.
| Bit type | Best use | Strength | Risk level |
|---|---|---|---|
| Flat chisel | General tile removal | Good balance of speed and control | Medium |
| Wide scraper bit | Thinset and tile lifting | Works well on larger surfaces | Low to medium |
| Point chisel | Breaking a hard starting spot | Strong penetration | Higher |
| Scaling chisel | Removing leftover mortar | Useful for cleanup | Medium |
For most tile floors, start with a flat or wide chisel. Use a point chisel only when you need to crack a very stubborn area and create a starting space. If you use a pointed bit too much, it can dig into the base too deeply.
Credit: jblflooringsolutions.com
Set up the demolition hammer correctly
Check the tool before powering it on. Make sure the bit is locked in place, the cord is in good condition, and the housing is not cracked. If the tool has a variable speed or impact setting, start at a lower setting if possible. This gives you more control at the beginning.
Stand in a balanced position with both feet firm on the floor. Keep your body slightly to the side, not directly behind the tool. This helps if the bit slips or if tile suddenly breaks loose. Hold the hammer with both hands and let the weight of the tool help you work.
Do not press down hard. A demolition hammer works by impact, not by force from your arms. If you push too much, you may reduce the tool’s efficiency and increase vibration in your hands and shoulders. Let the bit glide under the tile edge and do the lifting work.
Use the right angle
Keep the chisel at a shallow angle, usually around 20 to 30 degrees, when starting under the tile edge. This helps the bit slide beneath the tile and break the bond between tile and mortar. If you stand the tool too upright, you may chip the base material instead of lifting the tile.
Once a tile starts to come up, work in small sections. Do not try to remove a huge area at once. Small controlled passes give you better control and reduce the chance of damage.
How to use a demolition hammer to remove tile step by step
Here is the practical process for how to use a demolition hammer to remove tile safely and efficiently.
-
Start at a weak point.
Place the chisel at a cracked grout line, broken edge, or lifted corner. If needed, make a starting break with a manual chisel first.
-
Set the chisel at a shallow angle.
Slide the edge of the bit under the tile instead of driving straight down into it. This helps lift the tile more cleanly.
-
Turn on the hammer and work in short passes.
Use steady bursts rather than long, uncontrolled pressure. Move the bit along the tile line as the bond starts to break.
-
Lift one tile section at a time.
When part of the tile comes loose, stop and move to the next bonded section. Do not force the tool under the entire tile at once.
-
Remove broken pieces often.
Clear loose tile shards as you go. Piles of debris make the surface harder to read and can trap the bit.
-
Work across the room in a pattern.
Many people move randomly and waste time. A better approach is to work in rows or sections so you can keep track of progress.
-
Clean the surface after tile removal.
Once the tile is gone, switch to a scraping bit or a floor scraper to remove leftover mortar and thinset.
This process sounds simple, but a few small habits make a big difference. For example, when a tile begins to lift, pause and reposition. Do not keep hammering in the same spot. That often gouges the base layer. Also, remove debris often. A clean work surface makes the next cut easier to judge.
How to remove stubborn mortar without damaging the floor
The tile is only part of the job. In many cases, the hardest part is the material left behind. Thinset, adhesive, and old mortar can cling tightly to the floor. If you leave too much behind, new flooring may not sit flat.
Use a scaling or scraping chisel at a lower angle to shave off leftover mortar. Keep the tool moving. Do not dig straight into the floor. Short, controlled passes work better than hard, deep hits.
Credit: ronixtools.com
When to stop using the hammer
If the mortar layer is thin and the floor starts to show signs of damage, stop and switch to a manual scraper or a floor grinder with the right attachment. A demolition hammer is excellent for breaking and lifting tile, but it is not always the best final cleanup tool.
Another good rule is to stop if the surface below becomes uneven too quickly. That usually means the tool is biting into the subfloor instead of the tile layer. Slow down and change your angle.
Common mistakes to avoid
Most tile removal problems come from rushing. Speed matters, but control matters more. Here are the mistakes that cause the most trouble.
Using too much pressure
Many beginners push the hammer downward with force. This does not help much and often causes more vibration and more surface damage. The tool already provides impact. Your job is to guide it.
Starting in the wrong place
If you begin in the center of a solid tile, you will spend more time breaking and less time removing. A weak edge gives you a better chance of clean separation.
Ignoring the subfloor
Tile may come up fast, but the layer below may not be strong enough for aggressive work. A wood subfloor can split or dent. Concrete can still chip if the chisel is too sharp or too steep.
Working with a dull or wrong bit
A worn bit slows the job and increases frustration. If the chisel edge is damaged, replace it. A clean edge cuts more efficiently and reduces the amount of force you need.
Forgetting about dust control
Tile removal creates fine dust, especially when breaking mortar. Use dust barriers, open windows if possible, and clean as you work. Wetting the surface slightly can help in some situations, but do not create slippery conditions or electrical risks.
How to make the job faster and cleaner
If you want better results, focus on technique, not brute strength. A few small habits can save a lot of time.
- Work from the edge inward so the tile has room to break free.
- Keep debris cleared so you can see the bond lines.
- Use the tool’s weight instead of pushing down hard.
- Change bits when needed rather than forcing one bit to do everything.
- Take short breaks to reduce hand fatigue and check your progress.
One lesser-known tip is to plan your exit path before you start. Loose tile pieces can make the floor slippery and messy very quickly. If you clear a path behind you as you work, you reduce trip hazards and make cleanup easier.
Another helpful habit is to test a small area first. Every floor is different. Some tiles lift in large sheets, while others break into sharp fragments. A 2-minute test area tells you a lot about the bond strength and the condition of the base layer.
How to know when the subfloor is ready for new tile
Once the old tile is gone, look closely at the base. A floor is not ready for new tile just because the old tile is removed. It needs to be flat, solid, and clean.
Check for loose spots, deep gouges, broken sections, and leftover adhesive. Run a straightedge over the floor if possible. High spots and dips can affect the new tile layout. For the best result, the surface should feel stable underfoot and look even enough for the new installation method you plan to use.
If you damage the subfloor during removal, fix it before moving on. Small repairs now are easier than dealing with cracked new tile later. This is one of the biggest beginner mistakes: they rush the removal, then skip the prep. Good tile work starts with a strong base.
When a demolition hammer is not the best choice
Although this tool is very effective, it is not always the right answer. If the tile area is very small, a manual chisel may be enough. If you are removing tile from a fragile wall, a lighter rotary hammer or hand tools may give better control. If the surface may contain hazardous material, stop and test before using any breaking tool.
For some jobs, a demolition hammer is best for the first stage only. You can use it to remove the bulk of the tile and then switch to a scraper or grinder for cleanup. That approach often gives the best balance of speed and control.
Credit: safetyexpress.com
Final tips for safer, better results
Tile removal is easier when you treat it like a controlled process, not a race. Use the right bit, keep a shallow angle, and let the tool work for you. Protect the room before you begin. Keep debris under control. Check the surface below as you go.
If you remember only two things, remember this: control is more important than power, and the base layer matters as much as the tile. Those two ideas can prevent most of the damage people cause when they first learn how to use a demolition hammer to remove tile.
With the right preparation and steady technique, you can remove tile safely, save time, and get the floor ready for the next step without unnecessary damage.
FAQs
1. Can I use a demolition hammer on bathroom floor tile?
Yes, you can use it on bathroom floor tile if the subfloor is strong enough and there are no hidden pipes or electrical lines in the work area. Bathroom floors often have cement board or concrete below the tile, but you should still start carefully and use a shallow angle.
2. What bit is best for removing tile?
A wide flat chisel or tile removal bit is usually best. It gives better control and helps lift the tile without digging too deeply into the floor below. Use a point chisel only for very stubborn starting points.
3. How much pressure should I apply?
Very little. Let the demolition hammer do the work. Pressing too hard can damage the subfloor and increase vibration in your hands. A light guide is usually enough.
4. Can a demolition hammer remove thinset too?
Yes, it can remove leftover thinset and mortar, but it works best on thicker buildup. For lighter residue, a scraping bit or manual floor scraper may be better and safer for the base surface.
5. Is it safe to remove old tile without testing for asbestos?
No, it is not safe if the tile or adhesive is old enough to be a possible asbestos risk. If the tile was installed many years ago and you are unsure about the material, get it tested before you start. This is especially important in older homes.
