A damaged ceiling can make a whole room look tired. Water stains, cracked drywall, sagging corners, and soft spots are not just ugly. They can also point to a bigger problem above your head. If the damage is small, you may only need a patch. But when the sheet is badly broken, soaked, or falling apart, a full ceiling drywall replacement is often the better fix.
If you are wondering how to replace a ceiling drywall, the good news is that the job is very manageable with the right steps. It takes planning, patience, and safe working habits. It also helps to know what causes ceiling damage in the first place, because the repair is only smooth when the root problem is solved first.
This guide walks you through the full process in a simple way. You will learn how to prepare the room, remove the old drywall, install the new sheet, tape and finish the joints, and avoid common mistakes that create cracks later. The goal is not just to fix the ceiling. The goal is to make the repair look clean and last.
Before You Start the Ceiling Repair
Ceiling work is different from wall work. Gravity works against you. The sheet is heavy, awkward, and harder to hold in place. That is why preparation matters so much. A smooth result starts before you remove a single screw.
First, check the damage carefully. Look for water stains, soft drywall, mold, bowed areas, or loose tape. If the ceiling was damaged by a leak, stop and fix the leak first. Installing fresh drywall over active moisture is a mistake that usually leads to the same problem again.
It also helps to check the framing above the drywall. The ceiling needs solid backing to hold the new sheet. If the joists are damaged, warped, or spaced poorly, the new drywall may sag later. A repair is only as strong as the structure behind it.
Tools and materials you will need
Gather everything before you begin. Running up and down a ladder slows the job and makes the repair harder than it should be.
- New ceiling drywall sheets
- Drywall screws
- Utility knife
- Drywall saw
- Screw gun or drill
- Tape measure
- Pencil
- T-square or straightedge
- Drywall lift or a helper
- Joint tape
- Joint compound
- Drywall knives
- Sanding sponge or pole sander
- Primer and ceiling paint
- Safety glasses, dust mask, and gloves
Choose the right drywall thickness
For most ceilings, 1/2-inch drywall is common, but some ceilings need 5/8-inch drywall for better strength and sag resistance. If the ceiling spans a wide area or the joists are spaced farther apart, thicker drywall is usually a smarter choice. This is one of those details beginners often miss. Using the wrong thickness can cause future sagging even when the installation looks fine on day one.
Protect the room first
Cover the floor and furniture with plastic sheeting or drop cloths. Dust from ceiling drywall gets everywhere. Remove light fixtures if needed, and turn off power to the work area if you will cut near wires. If the ceiling has insulation above it, expect some mess when you open the damaged section.
For safety, use a stable ladder or scaffold. Do not stretch too far from the ladder. Ceiling work punishes rushed movement, and a small imbalance can become a serious fall.
How to Replace a Ceiling Drywall the Right Way
Now we come to the main process. The steps below apply to most ceiling drywall repairs, whether you are replacing one damaged section or a larger area. Take your time, measure twice, and cut once. A careful fit makes finishing much easier.
1. Mark the damaged area
Draw a clean rectangle or square around the damaged section. Try to cut back to the middle of the nearest joists or blocking so the new drywall has solid support on all edges. If the damage is irregular, do not follow the broken shape. A straight opening is easier to repair and easier to tape.
One detail many people miss: do not cut too tightly around stains alone. Water can travel beyond the visible stain. Press the drywall lightly. If it feels soft or crumbly, the damage may be wider than it looks.
2. Remove the old ceiling drywall
Use a utility knife to score the edges, then cut through the drywall with a saw. If the sheet is already loose, you may be able to pull parts down by hand. Be gentle, because hidden wires, pipes, and insulation may sit above the ceiling. Cut carefully near any suspected utilities.
If the old drywall is held by screws, back them out with a drill. If it is nailed, you may need a pry bar. Remove all broken pieces until you reach firm framing and clean edges.
3. Inspect the framing above
Once the opening is clear, inspect the joists or furring strips. Look for rot, mold, cracks, or warped wood. If the wood is damaged, the drywall repair will not stay flat for long. Replace any weak framing before moving on. If the cause was a leak, make sure the area is fully dry.
This step is also the right time to check insulation and wiring. If insulation is wet, replace it. If electrical boxes or wires are in the way, do not force the drywall around them. Make a neat cutout instead.
4. Measure and cut the new drywall
Measure the opening carefully. Transfer those measurements to the new drywall sheet. Use a T-square for straight cuts and a utility knife to score the front paper. Snap the sheet along the cut line, then cut the back paper to finish the edge.
For ceiling work, precision matters more than speed. A sheet that is even slightly too large will be hard to fit overhead. A sheet that is too small leaves gaps that are harder to finish smoothly. Aim for a snug fit without forcing it.
If you need to cut around a light box, vent, or pipe, measure the location from fixed points like the wall edges or joist centerlines. A mistake here can waste a full sheet. Beginners often measure only the opening and forget to map the obstacle position onto the new board.
5. Lift and secure the new drywall
Hold the sheet in place with a drywall lift or ask a helper to support it. Start fastening the sheet at one edge and work across the board. Use drywall screws long enough to penetrate the framing firmly, usually about 1 1/4 inches for standard ceiling drywall over wood framing.
Place screws every 8 to 12 inches along the joists. Sink each screw just below the paper surface without tearing it. If the paper breaks, the screw loses holding power. The best screw head leaves a small dimple, not a crater.
If you are working alone, a drywall lift is worth it for larger sections. It saves your shoulders and helps keep the sheet tight against the joists. A loose ceiling sheet is a future crack waiting to happen.
6. Check for flatness and fix any high spots
Run your hand over the surface and check for bumps, gaps, or screw heads that sit too high. If one edge hangs lower than the rest, back out the screws and adjust it. Small alignment issues are easier to fix now than after taping.
Ceilings show light differently than walls. Even a small ridge may become visible once the paint dries. If the joint between old and new drywall is not level, spend extra time feathering it later. A good-looking ceiling depends on smooth transitions.
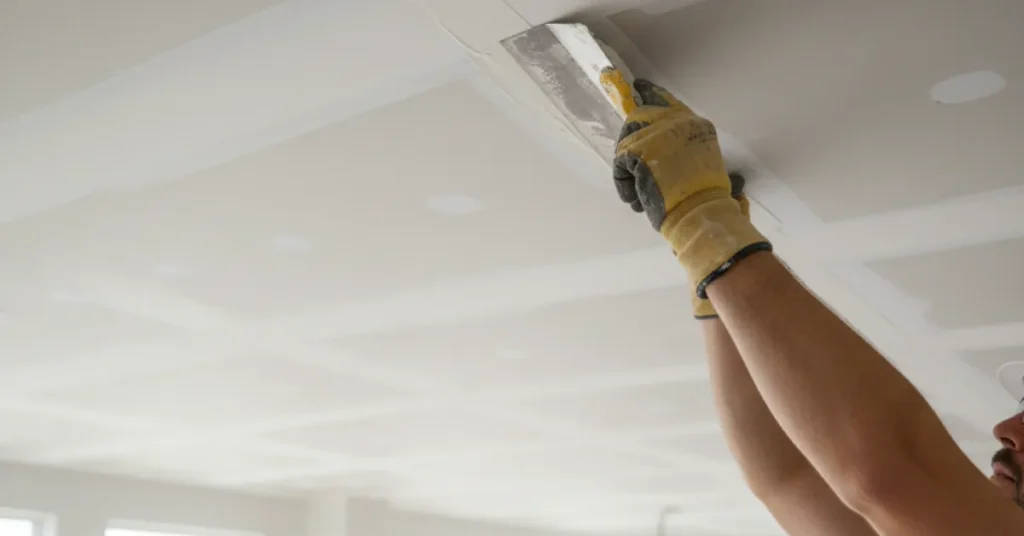
7. Tape the seams
Apply a thin layer of joint compound over the seams, then press the tape into it. Paper tape is a strong choice for most ceiling repairs because it resists cracking well when embedded properly. Cover the tape with another thin coat of compound.
Keep the coat thin. Thick mud may look faster, but it shrinks more and takes longer to dry. Thin coats are easier to sand and less likely to show through paint. This is one of the most useful habits in drywall finishing.
8. Apply joint compound in layers
After the tape coat dries, apply a wider second coat to blend the seam into the rest of the ceiling. Then add a third coat if needed for a smoother finish. Each coat should spread wider than the one before it. This gradual feathering helps the repair disappear under paint.
Use a wide knife for the final coat. Hold it at a low angle and pull the mud smoothly across the seam. Wipe away excess before it dries. If you rush this stage, you will spend more time sanding later.
9. Sand the surface carefully
When the compound is fully dry, sand the repaired area with a fine sanding sponge or pole sander. Use light pressure. The goal is to smooth the repair, not grind it down. Wear a dust mask, because drywall dust is very fine and spreads easily.
Check the ceiling from different angles. Shine a light across the surface to reveal bumps or ridges. This side light trick is simple, but it helps you see flaws that normal room light hides. Many first-time repairs look good straight on but show every line once painted.
10. Prime and paint
Prime the repaired area before painting. Drywall compound absorbs paint differently than the paper surface around it, so primer helps the finish look even. Once the primer dries, paint the ceiling with matching paint.
If the whole ceiling is old, painting only the repaired section may leave a slight color difference. In that case, painting the full ceiling usually gives the best result. A small repair can stand out more than a full repaint.
Common Problems and How to Avoid Them
Many ceiling repairs fail for the same reasons. The good news is that most of these mistakes are easy to avoid once you know what to look for.
| Problem | Why it happens | Better approach |
|---|---|---|
| Cracks after painting | Loose framing, poor taping, or thick compound layers | Fasten the sheet well and use thin coats |
| Sagging drywall | Wrong drywall thickness or weak support | Use the correct board and check joists first |
| Visible seams | Edges not feathered enough | Spread each coat wider and sand gently |
| Bubbling tape | Tape applied on too little mud or dirty surface | Embed tape in fresh compound and press firmly |
| Paint flashing | No primer or uneven absorption | Prime before painting the repair |
Another hidden problem is humidity. If the room is very damp, joint compound dries slowly and can stay soft longer than expected. That can lead to dents or damaged tape before the repair cures fully. Good airflow helps a lot.
Also, do not overfill screw holes or seams. Heavy patches may look strong, but they usually create more sanding and a less natural finish. The best repairs are built in layers, not in one thick pass.
:max_bytes(150000):strip_icc():format(webp)/SPR-how-to-replace-ceiling-drywall-1821510-step-04-b478650ec3b94d8b813db22bea34dc4e.jpg)
Credit: thespruce.com
Credit: agpdrywall.com
When a Ceiling Needs More Than a Simple Replacement
Sometimes the ceiling damage is bigger than the drywall itself. If the joists are rotten, the insulation is soaked, or mold is spreading, the repair may need more work than a standard drywall swap. In those cases, you may need help from a carpenter, plumber, roofer, or mold specialist before installing new board.
Another sign you need extra help is when the ceiling has structural movement. If the ceiling flexes when you walk above it or the cracks keep coming back, the problem may be framing movement rather than drywall failure. A new sheet will not fix a moving structure.
For large water-damaged areas, it is wise to identify the source first. The U.S. Environmental Protection Agency has useful guidance on mold and moisture problems. That matters because hidden moisture can ruin even a good drywall repair.
Practical Tips for a Cleaner Finish
Small habits make a big difference in the final result. These are the kind of details experienced drywall workers rely on.
- Cut the opening to a straight shape, even if the damage is uneven.
- Use a helper or drywall lift for larger ceiling sheets.
- Keep screws slightly below the paper, not deep enough to break it.
- Use thin compound coats instead of one thick layer.
- Sand lightly between coats only if needed, not aggressively.
- Prime before painting, even if the patch looks small.
- Let each layer dry fully before adding the next one.
One non-obvious tip: warm, dry air helps the finish, but too much heat can make compound dry too fast at the edges. If the edges dry faster than the center, the surface may crack or sand unevenly. Normal room temperature with steady airflow is usually best.
Another useful tip is to save a small offcut of the drywall you used. If you need to test paint or patch something later, having the same board type can help match texture and absorption better.
How Long the Job Usually Takes
The actual repair time depends on the size of the damaged area, the condition of the framing, and how many finishing coats you need. A small ceiling section may take one day for removal and installation, plus a few more days for compound drying and paint. A larger repair can take longer, especially if you need to fix water damage first.
Drying time is often the part that slows people down. Each coat of joint compound must dry before the next one goes on. Rushing this stage leads to soft spots, sanding problems, and visible seams. If you want a smooth ceiling, patience is not optional.
When Hiring a Pro Makes Sense
Some ceiling drywall jobs are good DIY projects. Others are better left to a professional. If the ceiling is very large, high, or badly damaged, the job may be physically hard and risky. If there is asbestos risk in an older home, do not cut into the ceiling without proper testing and guidance. That is not a DIY moment.
You may also want a pro if you want a nearly invisible finish, especially in a main living room or entry space. Ceiling light is unforgiving. Skilled finishers know how to blend seams so they disappear after paint.
:max_bytes(150000):strip_icc():format(webp)/SPR-how-to-replace-ceiling-drywall-1821510-step-02-c297d292eabe4af380c0d0296225f5de.jpg)
Credit: thespruce.com
Final Thoughts
Learning how to replace a ceiling drywall is really about doing the basics well. Fix the cause of the damage first. Cut the opening cleanly. Fasten the new sheet securely. Finish the joints in thin layers. Then prime and paint with care. If you follow those steps, the ceiling can look smooth again instead of patched.
The biggest difference between a rough repair and a clean one is rarely fancy tools. It is patience, good support, and careful finishing. Once you understand the process, ceiling drywall replacement becomes a practical home repair you can handle with confidence.
FAQs
1. Can I replace only part of a ceiling drywall sheet?
Yes, you can replace only the damaged section if the cut lines can land on solid framing. The new piece must be firmly supported on all sides. If the damage spreads too far or the sheet is weak in several places, replacing a larger section may give a better result.
2. What is the best drywall thickness for a ceiling?
Most ceilings use 1/2-inch drywall, but 5/8-inch drywall is stronger and helps reduce sagging on larger spans. The best choice depends on the joist spacing and the size of the room. If you are unsure, thicker board is often the safer ceiling choice.
3. Do I need a drywall lift for ceiling replacement?
A drywall lift is not always required, but it helps a lot on bigger sheets. It holds the board in place so you can fasten it without fighting gravity. For small repairs, a helper may be enough. For larger overhead sheets, a lift can save time and reduce strain.
4. Why does my new ceiling drywall crack after a repair?
Cracks usually happen because the sheet was not fastened well, the framing moved, or the joint compound was applied too thick. Poor taping can also cause cracking. Checking the framing, using enough screws, and applying thin coats of compound can prevent most of these issues.
5. Should I repaint the whole ceiling after replacing drywall?
It depends on the ceiling age and paint condition. If the ceiling is older or has visible color fading, painting the whole surface usually looks best. For a small repair in a newer ceiling, spot painting may work, but the repair can still show under strong light if the texture or color does not match well.
