Learning how to load a nail gun is a small skill, but it matters a lot. If you do it the wrong way, the tool can jam, fire badly, or even hurt you. If you do it the right way, the work feels smoother, faster, and much safer.
A nail gun is powerful. That is why many beginners feel nervous the first time they open the magazine or connect the air hose. The good news is that the loading process is simple once you understand the parts and the safety steps. You do not need special strength or advanced skill. You just need a careful method.
In this guide, you will learn how to load a nail gun step by step, what to check before you start, common mistakes to avoid, and how to keep the tool working well. The goal is simple: safe use, easy loading, and better results on the job.
What to check before you load the tool
Before you put nails into the magazine, stop and inspect the nail gun. This quick check takes less than a minute, but it can prevent serious problems. Many people skip this part because they are in a hurry. That is a mistake.
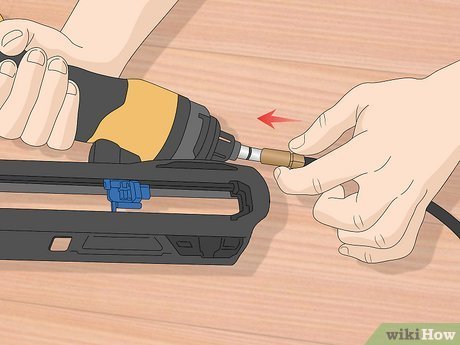
First, make sure the tool is disconnected from power. If it is an air nail gun, remove the air hose. If it is battery-powered, take out the battery. If it is a gas model, follow the maker’s safety steps before loading. The tool must never be active while you handle nails.
Second, check the nail type. Nail guns are made for specific nail sizes, angles, and strip styles. Using the wrong nails can cause jams or poor driving power. Look at the label on the tool, the magazine, or the manual. You want nails that match the exact model.
Third, inspect the magazine. Look for dust, bent metal, broken pieces, or old nail strips stuck inside. A dirty magazine can stop the nails from feeding properly. If needed, wipe it clean with a dry cloth.
If you want a safety reference from a trusted source, the OSHA website has useful general guidance on tool safety and workplace protection.
Common parts you should know
Knowing the basic parts makes the loading process much easier. Most nail guns have the same main sections, even if the design looks different.
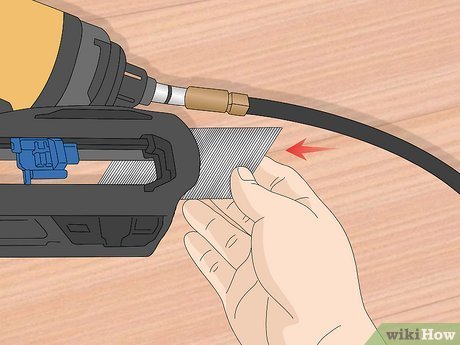
- Magazine: The long channel that holds the nails.
- Pusher: A spring-loaded part that pushes the nails forward.
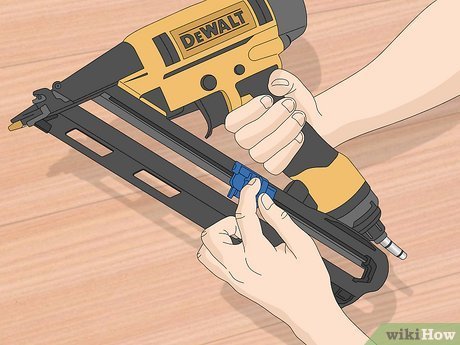
- Latch or release: The part that opens the magazine.
- Feed track: The path the nails follow as they move toward the firing point.
- Safety nose: The front area that contacts the work surface before firing.
If you understand these parts, you will load the tool with more confidence and less guesswork.
How to load a nail gun step by step
The exact design can vary, but the loading process is usually very similar. Take your time the first few times. Speed comes later.
- Disconnect the power source.
Remove the air hose, battery, or fuel source before touching the magazine. - Hold the tool in a safe position.
Point the nail gun away from your body and away from other people. Keep your finger off the trigger. - Open the magazine.
Find the latch or release button. Slide, pull, or unlock the magazine cover as your model requires. - Check for old nails or debris.
Remove any leftover nails, broken strips, or dust. A clean track helps the new nails feed correctly. - Prepare the nail strip.
Use the right size and angle. If the strip is connected by glue or wire, make sure it is not bent or damaged. - Place the nails into the channel.
Set the strip in the magazine with the correct orientation. The nail heads should sit where the pusher can press them forward. - Guide the pusher against the strip.
Slowly release the spring-loaded pusher so it presses the nail strip into place. Do not let it snap forward uncontrolled. - Close and lock the magazine.
Make sure the cover is fully shut and secured. A loose magazine can cause misfeeds. - Reconnect power only when ready to use.
Attach the air hose, battery, or fuel source only after the nails are loaded and the tool is closed. - Test the tool on scrap material.
Fire one or two nails into a practice piece to check depth, feeding, and alignment.
That is the basic process for how to load a nail gun safely. The small details matter, though. A nail strip can look “close enough” and still be wrong. Always match the tool exactly.
Loading an air nail gun
An air nail gun uses compressed air, so the loading process must be careful. After disconnecting the hose, open the magazine and insert the correct nail strip. Then guide the pusher into place and close the magazine firmly. Only after that should you reconnect the air hose.
One important point many beginners miss: some air nail guns store pressure in the system even after the hose is removed. For that reason, keep the trigger untouched and never point the nose at yourself or anyone else. Treat the tool as active until you are sure it is safe.
Loading a battery-powered nail gun
A battery-powered model is easier to move around, but it still needs the same caution. Remove the battery first. Then open the magazine, insert the nails, and close it fully before putting the battery back in. If your model has a power switch or mode setting, leave it off until you are ready to work.
Battery tools sometimes tempt users to “just quickly load it” without turning it off. Do not do that. A battery-powered nail gun can still fire if it is mishandled.
Loading a gas-powered nail gun
Gas nail guns often use a fuel cell plus a battery. That means there are two power sources to think about. Remove both before loading the nails. Then open the magazine, place the strip in correctly, close the tool, and reinstall the power sources only when you are finished.
Gas tools can also be more sensitive to dirty magazines and worn nails. If the feed feels rough, clean the channel before assuming the tool is broken.
How to know the nails are loaded the right way
A loaded nail gun should feel smooth when the pusher moves forward. The nail strip should sit flat in the magazine, not twisted or forced. The nails should align with the feed path so the next nail can move into position easily.
Here are a few simple signs that the loading is correct:
- The magazine closes without force.
- The pusher rests against the nail strip, not beside it.
- The nails sit straight and do not wobble.
- The tool fires one nail at a time during the test.
- There is no scraping, sticking, or grinding sound during feeding.
If something looks off, stop and open the magazine again. It is better to reload once than to fight with a jam later.
Credit: wikihow.com
A quick size and angle check
Many nail gun problems begin with the wrong nail size or strip angle. Even if a nail strip seems close, it may still be wrong. Some nail guns use straight strips, while others use angled strips. Some take clipped-head nails, while others need round-head nails. Do not guess.
| What to check | Why it matters | What can go wrong |
|---|---|---|
| Nail length | Must match the tool’s drive power and magazine space | Jamming, poor fastening, or nails sticking out |
| Nail angle | Must fit the magazine track | Strip will not seat properly |
| Head style | Affects feeding and holding strength | Misfeeds or weak fastening |
| Shank type | Influences grip in the material | Poor hold or splitting wood |
Safety habits that make loading easier
Safe loading is not only about one step. It is also about habits. Good habits make the process fast and calm. Bad habits make accidents more likely.
Always keep your fingers away from the trigger and nose. This is one of the easiest mistakes to avoid and one of the most important. A nail gun should never be treated like a casual hand tool.
Wear eye protection. Even when the tool is not firing, a damaged nail strip or a sudden jam can create danger. Safety glasses are a simple shield.
Work on a clean surface. Dirt, sawdust, and broken nails make loading harder. A clean bench or floor helps you see what you are doing.
Do not force the magazine shut. If the cover does not close easily, something is wrong. Wrong nails, bent strips, or a misaligned pusher can all create resistance.
Keep bystanders away. Children, helpers, and other workers should stay clear while you load and test the tool.
Credit: wikihow.com
Two details beginners often miss
One detail many beginners miss is the condition of the nail strip. Nails that are bent, rusty, or damaged may still fit into the magazine, but they often feed badly. If the strip looks rough, replace it. Do not try to “use it anyway.”
Another detail is the pusher tension. Some users think the pusher should snap forward as hard as possible. Not always. Too much force can damage the strip or make feeding uneven. The pusher should guide the nails smoothly, not crush them.
Common mistakes when loading a nail gun
Even experienced users make loading mistakes when they are tired or rushing. Knowing the common errors can save time and prevent jams.
- Using the wrong nail type.
This is the most common mistake and one of the easiest to avoid. - Forgetting to disconnect power.
This can turn a simple loading task into a dangerous one. - Putting the strip in backward.
Nails must face the correct direction for feeding. - Overfilling the magazine.
Forcing too many nails in can stop proper feeding. - Letting the pusher slam forward.
This can damage the strip or pinch your fingers. - Ignoring dirt in the track.
Dust and broken pieces often cause repeated jams.
Most of these problems are small, but they can create big frustration. A few extra seconds of care will usually save you a lot of time later.
What to do after loading the nail gun
Loading is not the last step. You still need to prepare the tool for safe use. First, inspect the magazine again to make sure it is locked. Then reconnect the power source only when your hands are clear and you are ready to work.
Before starting the job, test fire into scrap material. This simple test tells you if the nails feed well and if the depth setting is right. If the nail sits too deep or too high, adjust the tool before working on the real surface.
If the tool misfires, do not keep pulling the trigger. Stop, disconnect power, and check the magazine, nails, and feed path. Repeated firing with a jam can make the problem worse.
Depth setting matters more than many people think
Beginners often focus only on loading and forget the depth setting. But the loaded nail gun still needs the right drive depth. If the setting is too strong, nails may sink too deep and damage the material. If it is too weak, the nail may stick out. Good loading helps, but proper adjustment finishes the job.
How to store a nail gun after use
After the work is done, unload the tool if it will sit for a while. Remove the battery or disconnect the air hose. If there are leftover nails, follow the maker’s instructions for removing them safely. Clean the magazine so glue, dust, or debris do not harden inside.
Store the nail gun in a dry place. Keep it away from children and away from random tool piles where the trigger or nose can be pressed by accident. If your model came with a case, use it. A protected tool lasts longer and works more reliably.
Credit: wikihow.com
Why proper loading improves the whole job
A well-loaded nail gun does more than prevent jams. It improves speed, makes the tool easier to control, and helps each nail land where you want it. That means cleaner work, less waste, and fewer stops to fix problems.
Good loading also reduces wear on the tool. When nails feed smoothly, the moving parts do less unnecessary work. That can help your nail gun last longer and perform better over time.
The biggest lesson is simple: loading is not a small extra step. It is part of safe tool use. When you understand how to load a nail gun correctly, you work with more confidence and less stress.
FAQs
1. How do I know which nails fit my nail gun?
Check the tool manual, the label near the magazine, or the manufacturer’s website. You need the correct length, angle, and head style. If any one of these is wrong, the tool may jam or feed badly.
2. Can I load a nail gun with the battery still inside?
No. Remove the battery first. A battery-powered nail gun can still fire if it is not handled carefully, so always disconnect power before loading nails.
3. Why does my nail gun jam after loading?
The most common causes are the wrong nails, dirt in the magazine, a bent strip, or a pusher that is not seated correctly. Open the magazine, clear the issue, and reload carefully.
4. Do I need to unload the nail gun after every job?
Not always after every short pause, but you should unload it before storage, transport, or any time it will not be used for a while. This lowers the risk of accidental firing and keeps the magazine clean.
5. Is it safe to load a nail gun with one hand?
It is better to use both hands when possible. One hand should hold the tool safely while the other handles the nails and magazine. Two hands give you more control and reduce the chance of slipping.
