If you want walls that look clean, solid, and ready for paint, learning how to hang drywall is one of the most useful home skills you can build. It is not hard to understand, but it does reward care, patience, and good planning. The sheets are heavy, the edges matter, and small mistakes can show up later as bumps, cracks, or hard-to-hide seams.
The good news is that a smooth finish starts long before the first screw goes in. You need the right tools, a smart layout, and a simple method that keeps the panels flat and the joints tight. If you follow the steps below, you can get results that look much more professional than the average DIY job.
This guide walks you through the full process, from preparing the room to hanging each sheet and avoiding common mistakes. You will also see a few details beginners often miss, like how to stagger seams and why screw depth matters more than most people think.
Prepare the room before you lift a sheet
Good drywall work starts with a clean, square, and organized workspace. If the framing is not ready, the drywall will not sit flat. That means more patching, more sanding, and more visible seams later.
First, inspect the wall studs or ceiling joists. They should be straight, dry, and firmly attached. Look for bowed studs, loose nails, protruding screws, and bits of old drywall or glue. Even a small bump can create a proud spot in the finished wall.
Before you begin, make sure the room is ready for drywall installation:
- Electrical, plumbing, and insulation work should already be complete.
- Framing should be checked for level, plumb, and alignment.
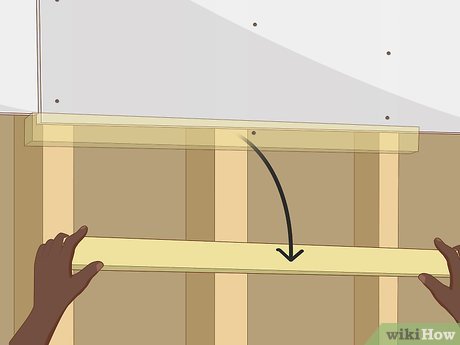
- Blocking should be added where sheet edges need support.
- Any high spots on studs should be shaved or planed down.
- Any low spots should be corrected with shims if needed.
One smart step many beginners skip is checking for twist in the framing. A wall can look straight from a distance but still have studs that lean in different directions. Drywall will not fully hide that. Use a long straightedge or string line to spot trouble before you start.
Also, store drywall sheets in the room for a day or two if possible. Letting them adjust to the room’s temperature and humidity can help reduce movement after installation.
Gather the right tools and materials
You do not need a huge tool collection, but you do need the basics. The right tools make the work safer, faster, and more accurate.
| Item | Why it matters |
|---|---|
| Drywall sheets | Main wall or ceiling panels, usually 1/2-inch for walls and 5/8-inch for ceilings in many cases |
| Drywall screws | Hold the panels securely to the framing |
| Utility knife | Used to score and cut drywall |
| T-square | Helps make straight cuts |
| Drywall lift or helper | Makes ceiling installation much easier |
| Drill or screw gun | Drives screws to the correct depth |
| Drywall saw | Used for outlet boxes and small openings |
| Measuring tape | Needed for accurate layout and cuts |
| Keyhole saw or rotary tool | Helpful for electrical cutouts |
| Safety gear | Includes eye protection, dust mask, gloves, and knee pads |
For fasteners, use the type recommended for your wallboard and framing. Drywall screws are usually better than nails because they hold more tightly and are less likely to pop later. That said, correct screw depth is essential. A screw that breaks the paper face can weaken the hold.
If you are working on a ceiling, a drywall lift can save your back and improve accuracy. It keeps the sheet in place while you fasten it. For solo work, this tool is often worth the cost or rental fee.
Measure and plan the layout
Before hanging the first panel, think about the full wall. Drywall work goes better when the seams land in smart places. The goal is to reduce weak joints and make finishing easier.
Measure the height and width of each wall. Then plan sheet placement so full sheets cover the largest areas where possible. Fewer cuts usually mean fewer seams. Fewer seams usually mean a smoother finish.
One of the most useful principles in how to hang drywall is this: stagger the joints. Do not line up seams across multiple rows if you can avoid it. Offset them so no long seam runs straight through the wall. This makes the finished surface stronger and less likely to crack.
Here are a few layout tips that help a lot:
- Hang sheets horizontally on many walls to reduce visible seams.
- Use full sheets when possible to limit waste.
- Place cut edges where they can be hidden or finished more easily.
- Avoid tiny strips along corners if a better sheet size can solve the problem.
- Mark stud locations on the floor or ceiling before lifting sheets into place.
One detail beginners often miss is the difference between factory edges and cut edges. Factory edges are slightly tapered and easier to tape and mud. Cut edges are square and can be harder to finish cleanly. Try to place factory edges together when possible.
Cut drywall the simple way
Drywall is easier to cut than many people expect. In most cases, you do not need to saw all the way through. A score-and-snap method works well and keeps edges cleaner.
Credit: wikihow.com
How to make a straight cut
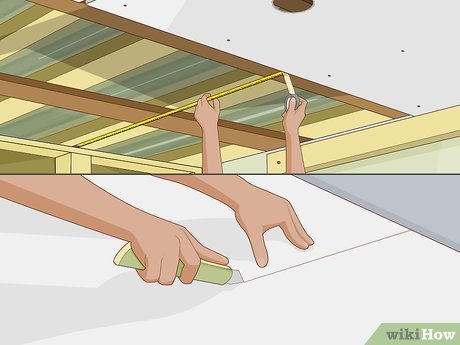
- Measure the area carefully and mark the cut line with a pencil.
- Place a T-square on the line.
- Use a utility knife to score the paper face once with firm pressure.
- Snap the board backward along the scored line.
- Cut the paper backing on the other side to separate the piece.
After cutting, trim rough edges with a drywall rasp or knife. Small corrections here can save time later during taping and joint compound work.
For outlet boxes, light switches, and other openings, measure carefully and mark the cutout on the sheet before lifting it into place. A clean opening is easier to achieve if you test-fit the board first, then trace the box location directly onto the panel. This avoids guessing and reduces costly mistakes.
A practical tip: when you cut a panel slightly short, do not try to “fix” it with a thick layer of joint compound. That usually creates a weak, visible patch. If the gap is too large, cut a new piece and do it right.
Start with the ceiling, then move to the walls
In most rooms, the ceiling should go up first. That way, the wall panels can help support the lower edges of the ceiling sheets. It also creates cleaner transitions at the corners.
Ceiling sheets are awkward and heavy, so work safely. Use a helper or a lift if possible. Position the board tightly against the framing and fasten it before it shifts.
Ceiling hanging steps
- Lift the sheet into place and hold it snug against the joists.
- Start a few screws near the center to hold the board.
- Work outward toward the edges.
- Keep screws about 12 inches apart on ceilings, or follow local code and manufacturer guidance.
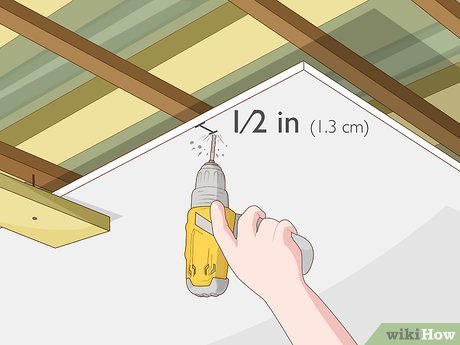
- Set screws just below the paper surface without tearing it.
Do not drive screws too deep. If you break the paper, the screw can lose strength. It is better to stop as soon as the head sits slightly below the surface. This is one of the most important finishing details in the entire process.
When hanging wall sheets, begin at the top and work down if the ceiling is already installed. Keep the top edge tight to the ceiling line. If the floor is uneven, trim the bottom edge later so the board sits properly without forcing it.
Fastening tips that prevent future problems
- Place screws about 16 inches apart on walls unless your local code or product instructions say otherwise.
- Keep screws at least 3/8 inch from the edge to reduce breakouts.
- Drive fasteners straight in, not at an angle.
- Check for missed studs before moving on.
- Look for high screws and fix them immediately.
Another beginner mistake is rushing the first row. If the first sheet is slightly off, every sheet after it can drift out of line. Take your time on the first piece. It sets the standard for the rest of the wall.
Work around openings, corners, and tricky areas
Doors, windows, outlets, and inside corners can slow the job down, but they are not hard if you approach them calmly. The goal is to keep each opening clean and each corner tight.
For electrical boxes, hold the drywall sheet in place and tap lightly to leave a mark, or measure from known framing points and transfer those measurements to the panel. Cut the opening a little smaller first, then trim it until the fit is right. A snug fit looks much better than a wide gap.
At outside corners, make sure the board edges meet cleanly and are backed by solid framing or corner bead later on. At inside corners, avoid forcing two sheets tightly together if the framing is not perfect. A small gap is better than a board that buckles.
Some walls require more than one person because the shape is awkward. If a panel is too long or too wide for one person to handle safely, use a helper. Forcing a board alone often leads to chips, cracked corners, and wasted material.
One useful but overlooked habit is to dry-fit difficult pieces before fastening. That quick test can reveal bad measurements, hidden pipes, or framing issues before the sheet is permanently attached.
Credit: wikihow.com
Check the surface before you move on
Once the drywall is up, do not rush straight into finishing. Walk the room and inspect every sheet. This step can save hours later.
Look for these issues:
- Raised screw heads
- Broken paper faces
- Wide gaps between sheets
- Panels that are not fully tight to the framing
- Misaligned seams
- Damaged corners
Any screw that is too high should be driven in a little more. Any screw that tore the paper should be removed and moved to a nearby spot. If the tear is serious, you may need to patch that area before taping.
This is also the time to check for bowing at the seams. Run your hand or a straightedge across the wall. If one sheet sits higher than the next, finishing will be harder. Sometimes the fix is as simple as adding the correct screw, while other times a framing issue needs attention.
If you want a reliable outside reference for drywall product and installation guidance, the USG website is a helpful place to review manufacturer information and best practices.
Common mistakes when hanging drywall
Even skilled DIYers can make small errors that lead to poor results. Knowing the common mistakes helps you avoid them from the start.
- Not checking framing first. Drywall cannot hide major wall problems.
- Using short screws or poor spacing. This can cause loose panels and later cracks.
- Aligning seams in straight lines. This makes the wall weaker and easier to spot after painting.
- Breaking the paper face. Torn paper weakens the hold and makes finishing harder.
- Leaving large gaps. Wide gaps are harder to tape and often show through paint.
- Skipping the inspection step. Small issues become big ones after mud and paint.
One less obvious mistake is over-tightening screws near edges. This can crush the gypsum and weaken the sheet. Another is cutting too many tiny filler pieces instead of planning a better layout. More seams usually mean more work and a less polished look.
How to make the finish look smooth and professional
Hanging drywall well is only half the job. The way the sheets are placed can make taping and finishing much easier. A clean hanging job reduces the amount of compound needed and makes the seams less visible.
To improve the final look, keep these ideas in mind while hanging:
- Keep joints tight but not forced.
- Use factory edges where possible for major seams.
- Stagger joints so they do not line up across the wall.
- Make sure screws are set consistently.
- Trim cuts neatly so tape sits flat later.
Think of the wall as a system. If the board layout is smart, the fastening is even, and the openings are clean, the finishing stage becomes much easier. That is how a wall starts to look professional even before tape and mud go on.
Another useful insight: light can reveal flaws more than paint color does. A wall that looks okay in dim light may look rough under a strong side light. That is why flatness and clean seams matter so much. Good drywall work is about surface control, not just covering the studs.
Final checks before taping
Before you begin finishing, sweep the room and remove dust, scraps, and loose bits of paper. Dust can interfere with joint compound and make your work harder.
Do one last walk-through with a flashlight held at an angle. Side lighting can show screw pops, ridges, and uneven joints more clearly than regular room light. Fix anything that looks wrong now. It is much easier to correct these problems before tape and compound hide them partially.
If the wall is ready for finishing, you should have:
- Secure sheets with no loose edges
- Screws set just below the surface
- Clean, manageable gaps
- Staggered seams
- Properly cut openings
At this point, the hard part is done. A careful hanging job creates the base for a clean finish, and that is what most people notice in the end.
Credit: wikihow.com
FAQs
1. What thickness drywall should I use for walls?
For many interior walls, 1/2-inch drywall is standard. Some ceilings and special areas may need 5/8-inch board for better stiffness and fire performance. Always check local code and product guidance before buying.
2. Should drywall be hung horizontally or vertically?
Both methods can work, but horizontal hanging often reduces the number of seams and can make finishing easier on many walls. The best choice depends on the room, framing layout, and whether you want to hide seams more effectively.
3. How far apart should drywall screws be?
On walls, screws are often placed about 16 inches apart, while ceilings usually need closer spacing. However, spacing can vary by code, board type, and manufacturer instructions, so it is smart to confirm before starting.
4. Can one person hang drywall alone?
Yes, but it is much easier for walls than ceilings. A drywall lift, good planning, and the right sheet size can help. For ceilings and large panels, having a helper is usually the safer and faster choice.
5. What is the biggest mistake beginners make when hanging drywall?
The biggest mistake is rushing the layout and fastening. If the panels are not placed well, or screws are too deep or too shallow, finishing becomes much harder. Careful placement and clean fastening create a far better final result.
