Glass looks hard and strong, but it can still crack very easily if you use the wrong drill bit, too much speed, or too much pressure. That is why many people feel nervous the first time they try to make a hole in a mirror, bottle, glass shelf, or decorative panel.
The good news is that how to drill a hole in glass is not difficult when you use the right tools and a careful method. The real secret is not force. It is control. If you move slowly, keep the glass cool, and support it well, you can make a clean hole with a much lower risk of breakage.
This guide walks you through the full process step by step. You will learn what tools to use, how to prepare the glass, how to drill safely, and how to avoid the mistakes that cause cracks, chips, and shattered pieces.
What you need before you start
Before you begin, gather everything in one place. Glass drilling works best when you do not stop in the middle to search for a tool. A calm setup helps you stay steady and reduces mistakes.
Tools and materials
- Diamond-tipped drill bit or glass and tile bit
- Variable-speed drill
- Masking tape
- Marker or grease pencil
- Spray bottle or small cup of water
- Soft towel, rubber mat, or scrap wood for support
- Safety glasses
- Gloves for handling sharp edges
- Small clamp or helper, if the piece can move
The most important tool is the drill bit. A regular wood or metal bit will usually slip, overheat, and damage the glass. A diamond bit is the safest choice for most glass drilling jobs. For extra protection, choose a trusted safety source to review basic eye and hand protection tips before working with sharp materials.
Choose the right glass
Not every glass item should be drilled. Some glass is safe to work on, while other types are too risky.
- Usually safe: plain glass, glass bottles, small glass panels, mirrors, and some shelves
- High risk: tempered glass, laminated safety glass with strong internal layers, and very thin decorative glass
Important: tempered glass cannot be drilled after it is made. If you try, it will likely shatter. If you are unsure, check the label or contact the manufacturer first.
Understand the hole size you want
Pick the drill bit size based on the exact job. Beginners often make a mistake here. They start drilling before checking the size needed for the screw, wire, tube, or fitting they plan to use. A hole that is too small can force you to widen it later, which increases the chance of cracking.
| Glass project | Typical hole size | Why it matters |
|---|---|---|
| Decorative bottle lamp | 6 mm to 10 mm | Fits cords or small fittings |
| Small mirror mount | 5 mm to 8 mm | Matches anchor hardware |
| Glass shelf hardware | 8 mm to 12 mm | Allows secure fastening |
| Aquarium or custom project | Based on fitting size | Must match bulkhead or connector exactly |
Set up a safe work area
A good setup is one of the biggest reasons a glass drilling project succeeds. Glass breaks when it is bent, moved, or heated too quickly. Your workspace should keep the piece flat, still, and cool.
Support the glass correctly
Place the glass on a flat surface with a soft layer underneath, such as a folded towel, rubber pad, or piece of foam. This helps reduce vibration and support the surface evenly. If you are drilling a bottle or curved object, use a towel or a clamp setup so it cannot roll.
Non-obvious tip: Do not support the glass only at the edges if the center area will be drilled. Uneven support creates bending stress, and that stress often turns into a crack as soon as the bit starts to bite.
Mark the drilling point
Use a marker to place a clear dot where the hole should go. Then place masking tape over the area in a small cross or X shape. The tape gives the drill bit a little grip at the start and helps stop the bit from skating across the surface.
If you need the hole to be exact, measure twice. Once a hole starts, there is no simple way to move it.
Wear the right protection
Always wear safety glasses. Tiny glass chips can fly off the surface even during slow drilling. Gloves help when handling the glass, but keep in mind that gloves should not be so loose that they reduce control.
Non-obvious tip: Keep long sleeves away from the drill and the work area. A sleeve that catches the spinning tool can pull your hand off line at the worst moment.
How to drill a hole in glass step by step
Now you are ready for the main process. Go slowly. If you feel pressure to hurry, stop and reset. Glass drilling is about patience, not speed.
Credit: kernowcraft.com
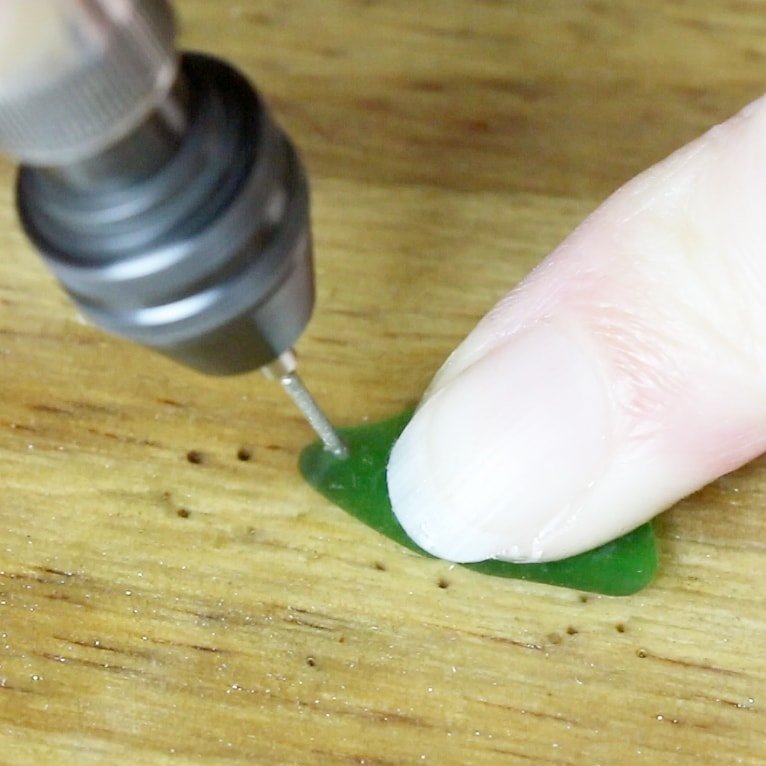
1. Install the correct drill bit
Insert a diamond-tipped or glass-rated bit into your drill and tighten it firmly. Check that it is straight and secure. A loose bit can wobble and chip the surface.
If your drill has speed settings, choose a low one. High speed creates heat fast, and heat is a major reason glass cracks.
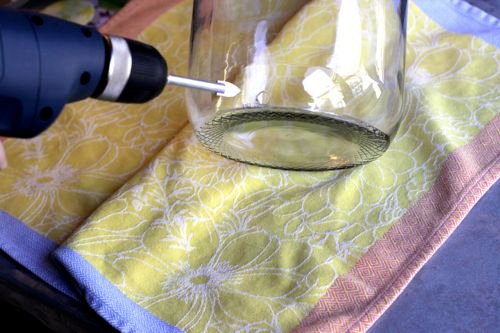
2. Add water for cooling
Glass gets damaged by friction heat. To keep the surface cool, wet the drill point before starting. You can spray water on the area or drizzle a small amount slowly while drilling.
For flat glass, many people use a small putty ring or clay dam around the hole and fill it with water. This keeps the bit cool for longer and gives better control.
Helpful rule: If you see steam, hear loud squealing, or notice the water drying too fast, stop and cool the area again.
3. Start at a very low angle
Place the bit on the taped mark and begin at a slight angle, not straight up. This helps the bit create a small starting groove instead of sliding. Once the groove forms, slowly bring the drill to a more upright position.
This step is especially useful for beginners. It gives the bit a better grip and reduces the chance of a sudden slip.
4. Use light pressure only
Let the drill bit do the work. Pressing too hard is one of the fastest ways to crack glass. Gentle, steady pressure is enough. You want the bit to cut slowly and smoothly, not force its way through.
If the drill is not moving, do not push harder right away. First check the speed, cooling water, and bit type. A better setup is safer than more force.
5. Keep the drill moving steadily
Hold the drill in a fixed line, but do not lock your body stiffly. A small natural movement is fine. The goal is smooth control. Keep the bit from wobbling side to side, because sideways force can chip the opening.
Drill in short intervals if needed. Pause often to cool the glass and remove dust or slurry from the hole area.
6. Reduce pressure as you near the other side
The last part is the most fragile. As the bit gets close to breaking through, the glass can chip more easily. Slow down and use even lighter pressure at this stage.
Non-obvious tip: Many cracks happen right at the exit side, not the entry side. If possible, place a scrap piece of wood or another support under the glass to help reduce breakout when the bit reaches the end.
7. Finish gently and clean the hole
When the bit finally passes through, stop the drill right away. Do not force it to keep spinning in the hole. Remove the bit carefully and wipe the area clean.
Rinse away glass dust and inspect the hole edges. If there are tiny chips, smooth them with very fine wet sandpaper or a diamond file, using gentle strokes only.
Common mistakes that crack glass
Most broken glass drilling jobs happen because of a few simple errors. If you know them early, you can avoid them easily.
Credit: designmom.com
Using the wrong drill bit
A standard bit is made for wood or metal, not glass. It can slip and create heat too quickly. Always use a bit made for glass, tile, or diamond drilling.
Drilling too fast
Fast speed creates heat and vibration. Both are dangerous for glass. Keep the drill at a slow setting and let the cutting edge work gradually.
Forcing the drill
More pressure does not mean faster success. In glass, extra force usually means more stress. Light pressure is safer and often faster in the end because you avoid breakage.
Skipping cooling water
Dry drilling is a bad idea. The surface can overheat, and the glass may crack from thermal stress. Keep the drill point wet the whole time.
Drilling on an unsupported surface
If the glass can flex, it becomes much easier to break. Always support it well from underneath. This is one of the simplest ways to reduce risk.
Extra tips for different glass objects
Different glass shapes need slightly different handling. A flat panel is not the same as a bottle or a curved vase.
For flat glass or mirrors
Flat pieces are easier to support, but they can still crack from edge stress. Keep the piece flat and avoid drilling too close to the edge. If the hole is near a corner, the risk goes up quickly.
Good practice: Leave enough space between the hole and the edge so the glass has room to stay stable.
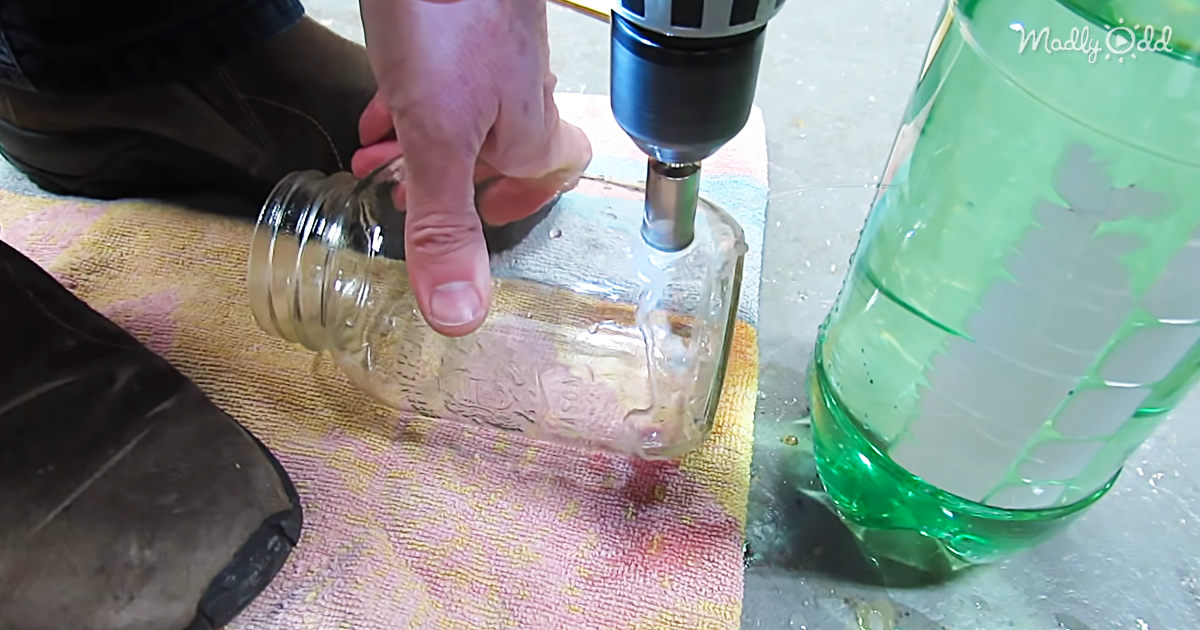
For bottles and jars
Curved glass rolls easily, so stability is the main challenge. Set the bottle in a padded holder or use a towel to keep it from moving. Some people also tape the bottle lightly in place to stop rolling.
Take extra care with round surfaces because the bit can wander if you do not hold it steady from the beginning.
For thick glass
Thick glass takes longer to drill, but it also gives you a little more material to work with. Even so, you should not rush. Keep cooling the bit and drill in short, careful bursts if needed.
For thin glass
Thin glass is the most delicate. It can chip very quickly, so use the lightest pressure possible. If the glass is very thin, it may be safer to choose a different method instead of drilling at all.
How to know if the hole is going well
A clean drilling job usually feels smooth and controlled. The sound should be low and even, not loud and harsh. The bit should cut gradually, and the glass should stay cool enough that you can keep water on the area without it drying too fast.
Warning signs include squealing, sudden vibration, visible cracks, chips spreading outward, and rapid heating. If you notice any of these, stop immediately. Check the surface, add water, reduce pressure, or switch to a better support setup before continuing.
After-drilling care
Once the hole is done, the work is not fully finished. Care after drilling helps protect the glass and make the hole safer to use.
Credit: madlyodd.com
Clean the area
Wash away any fine glass dust. Do not rub the hole hard. A soft cloth and water are enough for most jobs.
Smooth sharp edges
If the hole has small sharp spots, smooth them gently. Use a diamond file or very fine wet abrasive with light pressure. Do not try to grind aggressively, because that can enlarge the hole too much.
Test the fit carefully
Before installing hardware, test the fit by hand. Never force a screw, fitting, or grommet into the hole. If the fit is too tight, widen it carefully with the correct tool or start again with the right size next time.
When you should not drill glass yourself
Some jobs are better left to a professional. If the glass is large, expensive, part of a window, or made from safety-treated material, the risk may not be worth it. This is also true if the hole must be perfectly placed for plumbing, aquarium use, or load-bearing hardware.
You should also stop and rethink the project if the glass already has chips, cracks, or weak areas. Damaged glass is much more likely to fail during drilling.
Simple safety recap
If you remember only a few things, remember these: use the right bit, keep the drill slow, use water, support the glass well, and never force the tool. These five points solve most of the problems beginners face when learning how to drill a hole in glass.
Patience matters more than strength. A careful setup and a light touch can turn a risky job into a clean, successful one.
FAQs
Can I drill glass with a regular drill bit?
It is not a good idea. A regular bit can slip, overheat, and crack the glass. Use a diamond-tipped or glass-rated drill bit instead.
Will water really help when drilling glass?
Yes. Water cools the bit and the glass surface. This lowers heat, which helps reduce cracking and keeps the drill moving more smoothly.
How do I know if my glass is tempered?
Check for a label, stamp, or manufacturer details. If you are not sure, assume it may be tempered and do not drill it. Tempered glass usually shatters if drilled.
Why does glass crack at the end of drilling?
The exit side is weaker because the bit is breaking through the last layer. This is why you should slow down near the end and use very light pressure.
Can I make a hole bigger after drilling?
Yes, but it is risky. Use the correct tool and go very slowly. In many cases, it is safer to drill the correct size hole from the start.
