Saw blades cut better when they are clean. This sounds simple, but many people ignore it until the blade starts burning wood, leaving rough edges, or cutting slower than usual. Dirty blades do not only look bad. They also work harder, heat up more, and wear out faster.
If you use a table saw, miter saw, circular saw, or handsaw, blade cleaning should be part of normal tool care. Dust, resin, pitch, glue, and metal particles can build up on the teeth. Once that happens, even a sharp blade can feel dull. The good news is that cleaning is not difficult. With the right method, you can bring back cleaner cuts in a short time.
This guide explains how to clean saw blades in a safe, practical way. You will learn what to use, what to avoid, and how to keep blades cleaner for longer. The steps are simple, but a few small details make a big difference.
Why saw blades get dirty so fast
Saw blades collect waste every time they cut. Wood resin sticks to the teeth. Softwood leaves more pitch than many people expect. MDF and plywood can add glue residue. Cutting plastic can leave sticky film. Metal cutting can leave tiny chips and heat marks.
When dirt builds up, the blade does not slice cleanly. It starts to push material instead of cutting it. That creates friction, which creates heat. Heat makes the buildup worse. It also affects the life of the carbide teeth and can make the blade seem dull long before it is truly worn out.
One thing many beginners miss is that a blade can be technically sharp but still cut badly because the teeth are covered. That is why cleaning is not just about looks. It directly affects cutting quality and safety.
Signs your saw blade needs cleaning
- It leaves burn marks on wood
- The saw feels like it is working harder than usual
- Cuts become rough or slow
- You hear more noise during cutting
- Resin or pitch is visible on the teeth
- The blade heats up quickly
If you notice two or more of these signs, the blade likely needs attention soon.
What you need before you start
You do not need many tools to clean a saw blade. In most cases, a small set of basic items is enough. The exact cleaner depends on the type of blade and the type of dirt, but the process stays similar.
| Item | Why it helps |
|---|---|
| Bucket or shallow container | Holds the cleaning solution |
| Blade cleaner or simple degreaser | Breaks down pitch, resin, and grease |
| Soft nylon brush or old toothbrush | Removes buildup from teeth and gullets |
| Microfiber cloth or paper towels | Wipes away residue and dries the blade |
| Gloves | Protects your hands from sharp teeth and cleaner |
| Safety glasses | Helps protect your eyes from splashes |
| Rust remover, if needed | Useful for blades with light corrosion |
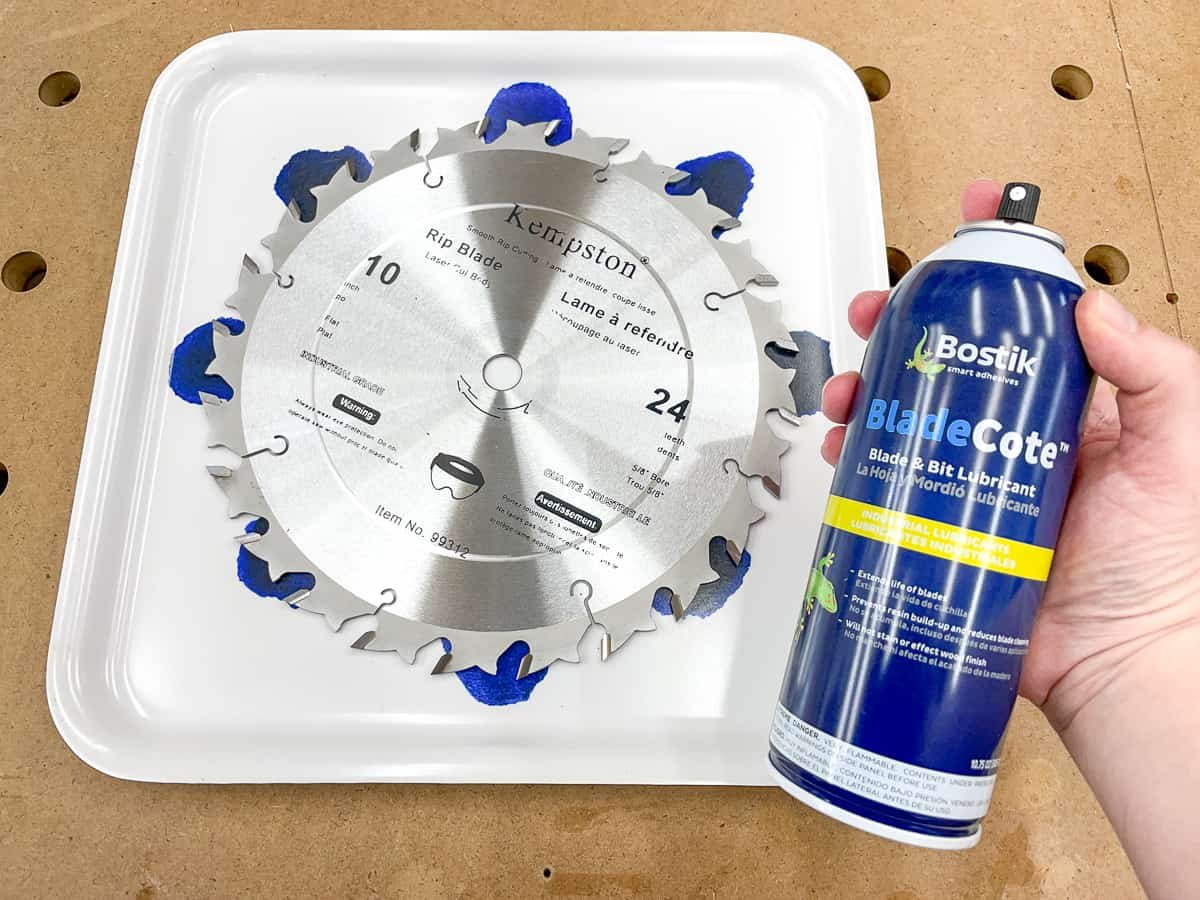
For many woodworking blades, a dedicated blade cleaner works best. If you want a simple reference for safe handling and blade care, this Wood Magazine guide is useful because it explains practical cleaning habits for common saw blades.
Important: Never use harsh tools that can scratch the carbide teeth. Avoid steel wool, metal scrapers, and aggressive wire brushes. These can damage the cutting edge or leave tiny scratches that catch dirt faster later.
How to clean saw blades step by step
The steps below work well for most woodworking saw blades. If your blade is very dirty, you may need to repeat the process once. Take your time. A careful cleaning is better than a fast rough one.
1. Remove the blade from the saw
Always disconnect power before touching the blade. Unplug the saw or remove the battery. Wait until the blade stops completely.
Then remove the blade from the saw according to the tool manual. If you are not sure how to do this safely, check the manufacturer instructions first. This is one of the most important safety steps. A blade should never be cleaned while it is still mounted unless the tool manual clearly allows it and the blade can be fully secured.
2. Inspect the blade before cleaning
Look at the teeth closely. Check for heavy pitch, rust, bent teeth, missing carbide tips, or cracks in the body. Cleaning can improve performance, but it cannot fix damage.
If the blade has a cracked body or loose teeth, stop using it. That blade should be repaired or replaced. Cleaning a damaged blade does not make it safe.
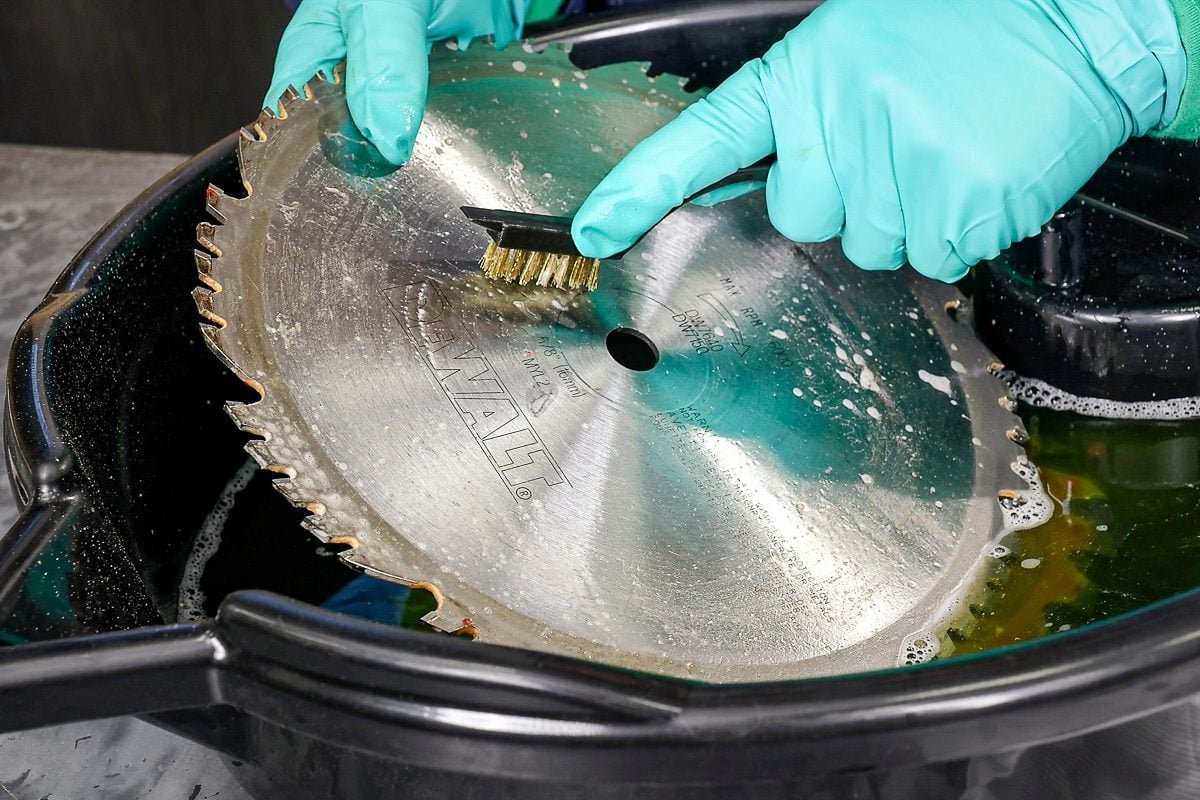
3. Soak the blade in the right solution
Place the blade in a shallow container with enough cleaner to cover the cutting area. Let it soak for 5 to 15 minutes, depending on how dirty it is.
A commercial blade cleaner is the easiest option. You can also use warm water with a mild degreasing cleaner if the blade is designed for it. Do not soak blades in anything that can harm the blade coating or the metal body. If the blade has special anti-stick coating, check the label first.
For light dirt, a short soak is enough. For heavy resin, you may need a longer soak, but avoid leaving the blade in liquid for too long unless the cleaner label says it is safe.
4. Scrub between the teeth
Use a soft nylon brush or an old toothbrush to clean between each tooth. Work gently. Focus on the gullet, which is the curved space between the teeth. This area often holds the most buildup.
Move slowly around the blade. Clean both sides. If a spot still feels sticky, soak it again for a few minutes and brush once more.
Beginner mistake: many people brush only the tooth tips. That leaves grime in the gullets, and the blade still performs poorly. The spaces between the teeth matter just as much as the teeth themselves.
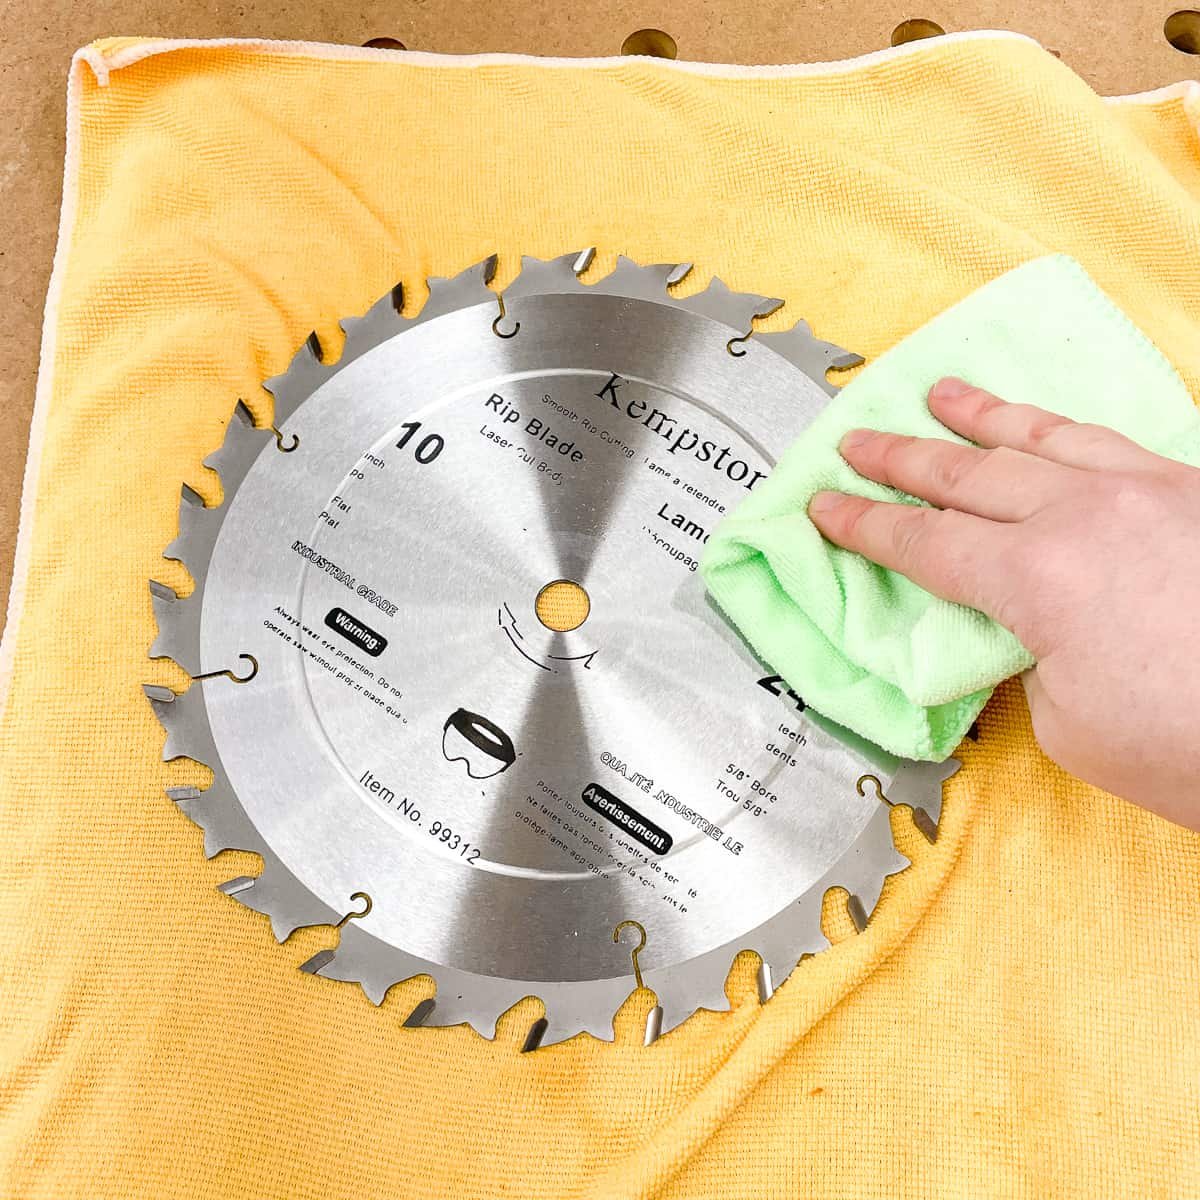
5. Wipe away residue
After brushing, wipe the blade with a microfiber cloth or paper towel. This removes loosened dirt and leftover cleaner. Keep wiping until the metal feels clean and smooth.
If you used a liquid cleaner, make sure no film remains. A thin layer of cleaner or loosened pitch can attract dust again very quickly.
6. Dry the blade completely
Drying is a key step. Water left on the blade can cause rust, especially on steel blades. Use a clean dry cloth and dry both sides carefully.
If needed, let the blade air-dry for a few minutes before storage. Do not reinstall a damp blade. That small mistake can create rust spots surprisingly fast.
7. Check for rust and polish lightly if needed
If the blade has light rust spots, use a rust remover that is safe for saw blades. Apply it only where needed and follow the product directions. Do not overdo it.
For tiny marks, a soft cloth and cleaner may be enough. If rust is deep or the blade surface is badly damaged, cleaning may not be enough to restore performance.
8. Reinstall and test the blade
Once the blade is dry and clean, reinstall it properly. Tighten it according to the saw manual. Make sure the blade spins freely and is set in the correct direction.
Then make a test cut in scrap material. A clean blade should cut with less effort and leave a smoother edge. If the cut still looks poor, the blade may need sharpening or replacement.
Best cleaning methods for different blade types
Not every saw blade needs the same treatment. The blade material and the type of work you do matter. Using the wrong cleaner can shorten the blade life or reduce performance.
Credit: thehandymansdaughter.com
Carbide-tipped woodworking blades
These are the most common blades for table saws, miter saws, and circular saws. They usually respond well to blade cleaner, warm water with mild detergent, or a citrus-based degreaser. Use a nylon brush and avoid metal tools.
Carbide tips are hard, but the thin metal body can still rust. Dry the blade well after cleaning.
Steel hand saws
Hand saws often build up sawdust and rust more than pitch. A light scrub with cleaner, followed by drying, is usually enough. If rust is present, use a rust remover carefully.
If the saw has a painted or coated handle, keep liquid away from the handle as much as possible.
Diamond blades
Diamond blades used for tile, masonry, or concrete do not collect pitch the same way wood blades do. They often need cleaning after use because dust can clog the cutting edge. Water and a stiff nylon brush often work well, but follow the blade maker’s instructions.
Do not use harsh acids unless the manufacturer says they are safe. Diamond blades can be damaged by the wrong cleaner.
Metal-cutting blades
These blades can collect fine metal dust and cutting fluids. Clean them with a degreaser approved for metal tools. Make sure to remove all residue, because leftover oil can affect the next cut.
Common mistakes that make cleaning less effective
People often clean saw blades in a hurry. That is when mistakes happen. Some of them are small, but they can reduce blade life or create safety problems.
- Using the wrong cleaner — strong chemicals can damage coatings or the blade body.
- Scrubbing with metal tools — this can dull teeth and scratch the surface.
- Skipping the drying step — moisture can lead to rust.
- Forgetting the gullets — buildup stays between the teeth and keeps the blade dirty.
- Reinstalling a damaged blade — cleaning does not make cracks or broken teeth safe.
Another mistake is waiting too long. A blade that gets cleaned often is much easier to maintain than one covered in months of buildup.
Credit: familyhandyman.com
How often should you clean saw blades?
There is no single perfect schedule. It depends on what you cut and how often you use the blade. If you cut resin-heavy softwood, MDF, or glued sheet goods, you may need to clean the blade more often. If you only use it lightly, cleaning can be less frequent.
A practical rule is to inspect the blade after each heavy project. If you see buildup, clean it before it becomes thick. For frequent users, a quick wipe after use can prevent bigger cleaning jobs later.
Useful habit: do not wait for the blade to look terrible. Small, regular cleaning takes less time and helps keep cuts consistent.
How to keep blades cleaner for longer
Cleaning is only half the job. The best results come when you slow down the dirt buildup in the first place. A few habits can make a real difference.
Use the right blade for the material
A blade designed for wood should not be used for materials that create heavy resin or glue residue unless it is made for that job. The more suitable the blade, the less buildup you will get.
Avoid forcing the cut
When you push too hard, the blade heats up more. Heat makes pitch stick faster. Let the blade do the work. Feed the material at a steady pace.
Keep the saw area clean
Dust around the saw can stick to the blade again after cleaning. Cleaning the saw table, throat plate, and nearby surfaces helps keep the blade cleaner longer.
Store blades properly
Store clean blades in a dry place. Use blade sleeves, hangers, or protective cases if possible. Moisture and dust are both bad for sharp tools.
Apply a light protective coat if appropriate
Some users apply a very light corrosion inhibitor or blade protectant after cleaning. This can help prevent rust, but only use products that are safe for your blade type. Do not apply anything that could affect cutting performance.
When cleaning is not enough
Sometimes a blade still cuts badly after a proper cleaning. That usually means one of three things. The blade is dull. The teeth are damaged. Or the blade is not right for the material you are cutting.
If the cut still burns after cleaning, check the tooth condition. Carbide-tipped blades may need sharpening by a professional. Some low-cost blades are not worth sharpening and may be better replaced. If the blade body is warped, cracked, or overheated, replacement is the safer choice.
This is another detail beginners often miss: cleaning helps reveal the real condition of the blade. Once the buildup is gone, you can judge whether the blade still has good life left in it.
Simple cleaning routine that works well
If you want an easy habit, use this short routine after heavy use:
- Disconnect power and remove the blade.
- Inspect for damage.
- Soak in blade cleaner for a few minutes.
- Brush between the teeth.
- Wipe clean and dry fully.
- Check the blade again before reinstalling.
This routine does not take long, but it helps a lot. It keeps cuts cleaner, reduces drag, and often extends the useful life of the blade.
Credit: thehandymansdaughter.com
Final thoughts on keeping saw blades sharp and clean
Knowing how to clean saw blades is one of the easiest ways to improve your cutting results. A clean blade cuts smoother, runs cooler, and works more efficiently. It also helps you notice damage sooner, before it turns into a bigger problem.
The key is simple: clean the blade often, dry it well, and avoid harsh tools or chemicals. If you build this into your normal workshop routine, your saw will perform better and your cuts will look more professional.
FAQs
1. How often should I clean saw blades?
Clean saw blades whenever you see pitch, resin, dust buildup, or reduced cutting quality. For heavy use, that may mean after every big project. For light use, once in a while may be enough.
2. Can I use household cleaner to clean saw blades?
Sometimes, but not always. Mild degreasers or warm soapy water may work on some blades. However, a cleaner made for saw blades is usually safer and more effective, especially for carbide-tipped blades.
3. Is it safe to clean a saw blade without removing it?
It is safer to remove the blade first. Cleaning it while mounted can be risky unless the tool manual clearly allows it and the blade is fully secure. Always disconnect power before any blade care.
4. Why does my blade still burn wood after cleaning?
If the blade is clean but still burns wood, the blade may be dull, damaged, or not suitable for the material. Alignment problems, slow feed rate, or wrong blade type can also cause burn marks.
5. What is the best way to prevent rust after cleaning?
Dry the blade fully after cleaning and store it in a dry place. If appropriate for your blade type, use a light protective coating made for tools. Never put a damp blade back on the saw.
