If your ceiling is cracked, sagging, water-stained, or badly damaged, repair work may no longer be enough. In many cases, the best answer is to replace the drywall ceiling completely. That sounds like a big job, but with the right plan, the work becomes much easier to manage.
This guide shows how to replace a drywall ceiling step by step. You will learn how to remove the old ceiling, check the framing, install new drywall, finish the joints, and get a smooth result that looks clean and professional. The goal is not just to hang new boards. The goal is to avoid the common mistakes that make ceilings look uneven, cracked, or rough after the job is done.
Whether you are fixing one room or an entire floor, the process is similar. What matters most is careful prep, good support, and patient finishing. A ceiling is harder than a wall because it works against gravity, so small mistakes show fast. The good news is that the process is very manageable when broken into clear steps.
Before You Start: Know What You Are Dealing With
Before you begin, look closely at the damage. Not every ceiling needs full replacement. If the problem is only a few small cracks, joint repair may be enough. But full replacement is usually the better choice when the ceiling has large water damage, sagging drywall, mold growth, or many failed patches.
Also check what is above the ceiling. Is there a bathroom, roof, or plumbing line? If there was a leak, the source must be fixed first. New drywall will fail again if moisture is still present. This is one of the most common mistakes beginners make: they replace the ceiling first and solve the leak later.
If the ceiling has popcorn texture or another finish, be careful. Older textured ceilings may contain asbestos. If the home was built before 1980 and the texture is unknown, testing is smart before removal. For safety guidance on asbestos in older homes, you can review information from the U.S. Environmental Protection Agency.
Signs the Ceiling Should Be Replaced
- Large stains from water damage
- Sagging or bowed drywall
- Cracks that keep returning
- Soft spots or broken drywall paper
- Mold growth or a musty smell
- Multiple bad repairs in the same area
If you see more than one of these problems, full replacement usually gives a better long-term result than repeated patching.
Tools and Materials You Will Need
Good tools save time and reduce mistakes. You do not need a huge workshop, but you do need the right basics before starting.
| Tools | Materials |
|---|---|
| Utility knife | Drywall sheets |
| Drywall saw | Drywall screws |
| Drill or screw gun | Joint tape |
| Measuring tape | Joint compound |
| T-square | Corner bead if needed |
| Drywall lift or helpers | Primer and ceiling paint |
| Step ladder | Construction adhesive if needed |
| Dust mask and eye protection | Plastic sheeting and painter’s tape |
| Putty knives and sanding pole | Texture material if matching an existing finish |
Non-obvious tip: A drywall lift is one of the best investments for ceiling work, especially if you are working alone. It keeps the sheet in place while you fasten it and helps prevent tired arms from causing poor screw placement.
Second useful tip: Buy your drywall screws in the right length for your ceiling thickness and framing depth. Screws that are too short will not hold well. Screws that are too long may create problems in thin framing or near wires and pipes.
Step 1: Protect the Room
Before removing anything, prepare the room. Ceiling demolition creates a lot of dust and debris. Move furniture out if you can. If that is not possible, cover everything with plastic. Seal doorways with plastic sheeting to keep dust from spreading to the rest of the house.
Turn off power to any ceiling lights, fans, or circuits in the area. Remove light fixtures carefully. If you are not comfortable with electrical work, disconnect power and call a licensed electrician for help with the fixtures.
Take down vents, smoke detectors, and any fragile trim pieces around the ceiling. The more you clear now, the less damage you may cause later.
Step 2: Remove the Old Drywall Ceiling
Start by finding the framing direction. Drywall is usually fastened to joists or furring strips. Once you know where the joists run, you can remove the ceiling more cleanly.
Use a utility knife to cut along edges where the ceiling meets the walls. This helps reduce damage to nearby drywall or trim. Then use a drywall saw or pry bar to begin removing the panels. If the ceiling is badly damaged, it may come down in pieces. That is normal.
Work carefully around wiring, pipes, vents, and recessed lights. If insulation is above the ceiling, remove it only if needed and keep it dry and clean.
Make the Removal Easier
- Score the seams first so the drywall breaks more cleanly.
- Pull down one section at a time instead of forcing large pieces.
- Watch for hidden screws or nails that may still hold the board.
- Have a trash bin or debris pile ready before you start.
One mistake people often make is rushing this stage. If you tear the old drywall out too aggressively, you can damage the joists, electrical boxes, or wall edges. Slow removal gives you a cleaner base for the new ceiling.
Step 3: Inspect the Framing Above
Once the ceiling is open, inspect the joists or framing carefully. This step matters a lot because new drywall will only stay flat if the framing is sound and level enough.
Look for:
- Cracked or split joists
- Water damage
- Mold or rot
- Loose nails or screws
- Twisted or uneven framing
- Obstacles like wires, ducts, or pipes
If you find a leak, fix it before closing the ceiling. If you find a damaged joist, repair or sister it as needed. If the framing is uneven, this is the time to shim or plane it, not after the drywall is up.
Important insight: Many ceiling cracks come from framing movement, not from the drywall itself. If the joists are not stable, new drywall may crack again. A strong finish starts with a stable frame.
Credit: agpdrywall.com
Step 4: Measure and Plan the New Layout
Measure the ceiling carefully in both directions. Drywall sheets should be planned so joints land on framing whenever possible. Avoid ending a panel edge in open space. That creates weak seams and makes finishing harder.
If you can, install drywall with the long edge perpendicular to the joists. This creates stronger support and fewer seams. On ceilings, that detail makes a big difference in strength and appearance.
Also think about sheet size. Larger sheets reduce seams, but they are harder to lift. For most rooms, 4×8, 4×10, or 4×12 sheets are common choices. Use the size that matches both the room and your ability to handle the boards safely.
Measure Openings Before Cutting
Mark all light boxes, vents, sprinkler heads, and access points before you cut the new boards. A small error here can waste a full sheet. Measure twice, then cut once.
For light openings, use a tape measure from a known wall edge and transfer the same numbers to the drywall sheet. A clean cut now saves a lot of patching later.
Step 5: Cut the Drywall Sheets
Lay each sheet on a flat surface if possible. Mark the dimensions clearly with a pencil. Use a T-square to guide straight cuts. Score the face paper with a utility knife, snap the board, then cut the back paper.
For openings like lights or vents, cut carefully with a drywall saw or a rotary tool. It is better to make a hole slightly small and enlarge it than to cut it too large the first time.
If you are working with textured or fire-rated ceiling material, check the product label and install it according to the manufacturer’s instructions. Different ceiling areas may need different board thicknesses or ratings.
Step 6: Lift and Fasten the New Ceiling Drywall
This is the hardest physical part of the job. Ceiling sheets are heavy, and you must hold them overhead while fastening. Use a drywall lift if possible. If not, get at least one helper.
Raise the sheet into position and start with a few screws in the center area. Then work outward. Keep the board tight to the framing. Do not overdrive screws. The screw head should sit just below the surface paper, not break through it.
Space screws evenly, usually about 12 inches apart on ceilings, unless the product or local code says otherwise. Keep fasteners a little away from edges so the board does not crumble.
How to Avoid Uneven Ceiling Boards
- Check that each sheet is flush before adding many screws
- Do not force a warped board into position
- Use shims where the framing is slightly uneven
- Stagger seams when possible for a stronger result
Non-obvious tip: Start fastening at the center of the sheet and move outward. This helps pull the panel flat against the framing. If you begin at one edge, the sheet may hang slightly and create a visible hump.
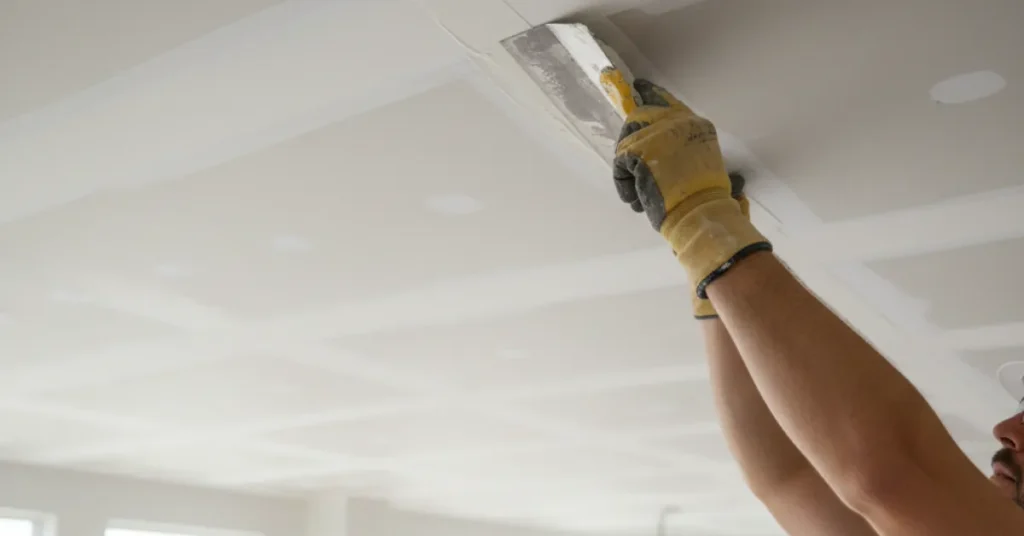
Step 7: Tape and Fill the Joints
After the ceiling is installed, the finishing work begins. This stage is what gives the ceiling its smooth, professional look. It also takes the most patience.
Apply a thin layer of joint compound over each seam. Press drywall tape into the wet compound. Then cover the tape with another thin layer. Do not leave the layer too thick. Thick mud dries slowly and often leaves ridges or cracks.
Use paper tape or fiberglass mesh based on your preference and the situation. Paper tape is often stronger at seams, while mesh can be easier for beginners in some repairs. For most full ceiling replacements, paper tape is a solid choice for main joints.
Three Coats Usually Work Best
- First coat: embed the tape
- Second coat: widen and smooth the seam
- Third coat: feather the edge for a clean finish
Let each coat dry fully before adding the next. Rushing this step can trap moisture and lead to soft spots or sanding problems later.
Inside corners need clean tape placement. Outside corners, if any, should be protected with corner bead. That gives the edge a stronger, straighter line.
Step 8: Sand with Care
Once the compound is dry, sand it smooth. Use a fine sanding sponge or a sanding pole. Keep the pressure light. The goal is to smooth the surface, not to remove too much material.
Wear a dust mask and eye protection. Ceiling sanding creates dust that falls down on you. Good lighting helps too. Shine a work light across the ceiling at a low angle so you can see ridges and dips more clearly.
Be careful at this stage. A ceiling that looks smooth in poor light may still show lines after paint. Raking light reveals flaws that normal room light can hide.
:max_bytes(150000):strip_icc():format(webp)/SPR-how-to-replace-ceiling-drywall-1821510-step-04-b478650ec3b94d8b813db22bea34dc4e.jpg)
Credit: thespruce.com
Common Sanding Mistakes
- Sanding too hard and exposing the tape
- Skipping the final inspection under angled light
- Leaving dust on the surface before priming
- Trying to fix deep flaws with paint instead of mud
If you sand through the compound and expose tape, apply another thin coat and let it dry again. Paint cannot hide a poor seam. Smooth finishing must happen before painting.
Step 9: Prime and Paint
Primer is not optional. Drywall compound absorbs paint differently from the paper face of drywall. Without primer, the ceiling may flash, meaning some areas look dull and others look shiny after painting.
Use a drywall primer or a quality sealing primer. After it dries, paint the ceiling with a flat ceiling paint. Flat paint helps hide small surface marks and gives a more even look overhead.
Use a roller with an extension pole and work in small sections. Keep a wet edge so the finish stays even. Ceiling paint should not be overworked. Too much rolling can leave streaks or lap marks.
If the room had a matching texture before, you may need to retexture the ceiling before priming. Match the existing finish as closely as possible, or repaint the entire ceiling for a cleaner visual result.
Step 10: Reinstall Fixtures and Clean Up
After the paint dries, reinstall light fixtures, vents, detectors, and trim. Turn the power back on only after all electrical parts are secure. Test every fixture before you finish cleaning the room.
Remove plastic sheeting carefully so dust does not spread. Vacuum the floor, baseboards, and any remaining surfaces. Ceiling dust can drift into nearby rooms, so do a full cleanup, not just a quick sweep.
A careful cleanup is part of a professional finish. A room that looks newly repaired should also feel fresh and free of dust.
How Long the Job Usually Takes
The total time depends on room size, damage level, and whether you have help. A small room may take a weekend if the framing is sound and the finishing is simple. A larger room or a ceiling with water damage may take several days because each coat of compound needs drying time.
Here is a realistic breakdown:
- Removal: 2 to 6 hours
- Framing inspection and repairs: 2 to 8 hours
- Drywall installation: 4 to 10 hours
- Taping and finishing: 1 to 3 days with drying time
- Priming and painting: 1 day
The finishing stage is where patience matters most. A ceiling is not just about speed. It is about letting each step dry and settle fully before moving on.
Tips for a Cleaner, More Professional Finish
Some small habits make a big difference in the final result. These details are easy to miss, especially if this is your first ceiling replacement.
- Plan seams away from the main view. If possible, place seams where room lighting will not highlight them as much.
- Use enough screws, but not too many. Over-fastening can damage the board, while under-fastening causes movement and cracks.
- Keep compound layers thin. Thin coats dry faster and sand better than thick ones.
- Check with side lighting before painting. This reveals flaws that normal light hides.
- Prime the whole ceiling, not just the repairs. That helps the paint look even.
Another overlooked detail is room temperature and humidity. If the room is very damp, compound and paint may dry poorly. Good airflow helps the job finish cleaner and faster.
When It Makes Sense to Hire a Pro
Some ceiling projects are good DIY jobs. Others are better left to a professional. If the ceiling is very large, very high, damaged by mold, or tied to complex electrical or plumbing work, hiring a contractor may save time and reduce risk.
You may also want professional help if:
- The ceiling has extensive water damage
- You suspect asbestos
- The framing is badly damaged
- The room has cathedral or unusually high ceilings
- You want a perfect smooth finish with no visible seams
The best choice depends on your skill, tools, and comfort level. If the job feels too risky, it is better to stop early than to create a bigger repair later.
:max_bytes(150000):strip_icc():format(webp)/SPR-how-to-replace-ceiling-drywall-1821510-hero-4cbc421fd79441b9b0671e796ea6f685.jpg)
Credit: thespruce.com
Final Thoughts
Learning how to replace a drywall ceiling is mostly about doing the basic steps in the right order. Remove the damaged material carefully, inspect and fix the framing, install the new drywall with solid support, and take your time with tape, mud, sanding, and paint. That is how you get a ceiling that looks smooth instead of patched.
The biggest success factor is patience. A professional-looking ceiling is rarely the result of one big skill. It usually comes from many small good decisions: careful measuring, proper fastening, thin compound coats, and honest inspection before paint. Follow those habits, and your finished ceiling will look clean, strong, and well built.
FAQs
1. Can I replace a drywall ceiling by myself?
Yes, you can replace a drywall ceiling by yourself in a small room if you have the right tools, a drywall lift, and enough time. It is still easier and safer with a helper, especially when lifting full sheets overhead.
2. What thickness drywall is best for a ceiling?
Most ceilings use 1/2-inch drywall, but some situations may call for 5/8-inch board, especially for added fire resistance or if the framing spacing is wider. Always match the board to the room’s needs and local code.
3. Do I need to remove insulation before replacing the ceiling?
Not always. If the insulation is dry, clean, and not in the way, it may stay in place. But if it is wet, moldy, damaged, or blocking access to repairs, remove it and replace it as needed.
4. Why does a new drywall ceiling sometimes crack?
Cracks often happen because of movement in the framing, poor fastener placement, thick compound, or unfinished joint work. A stable frame and careful taping help prevent most of these problems.
5. Should I texture or leave the ceiling smooth?
That depends on the room and the look you want. A smooth ceiling looks modern and clean, but it shows flaws more easily. A light texture can hide small imperfections better, especially in older homes.
