A broken bolt or screw can stop a project fast. It can also turn a simple repair into a long, frustrating job. The good news is that most stuck fasteners can be removed with the right method, a little patience, and the correct tool for the damage you have in front of you.
If you are searching for how to remove a broken bolt or screw, the first thing to know is this: there is no single best fix for every case. A small screw with a damaged head needs a different approach than a rusted bolt snapped off inside metal. The trick is to match the method to the problem, not force one tool to do everything.
In this guide, you will learn 10 practical fixes that work in real life. You will also see when to stop, what mistakes make the problem worse, and how to protect the part around the broken fastener. That matters, because the goal is not only to remove the bolt or screw. The goal is to do it without destroying the material around it.
Start by identifying the type of damage
Before you grab a drill or extractor, look closely at what you are dealing with. This one step saves time and reduces damage. A broken fastener can fail in several ways:
- The head is stripped, but the shaft is still intact.
- The bolt or screw is snapped off flush with the surface.
- The fastener is broken below the surface.
- Rust, paint, heat, or thread-locker is holding it in place.
- The material around it is soft, like aluminum or plastic.
Each problem needs a different level of force. For example, a stripped screw head may come out with gripping pliers. A broken bolt deep in an engine block may need heat, a left-hand drill bit, or an extractor. If you rush this part, you can turn a small repair into a much larger one.
Helpful tools to gather first
It helps to have a small removal kit ready before you start. You do not need every tool for every job, but the right tools make the work much easier.
- Penetrating oil
- Needle-nose pliers or locking pliers
- Flathead and Phillips screwdrivers
- Center punch and hammer
- Left-hand drill bits
- Screw extractor set
- Vice grips or small locking pliers
- Heat source, such as a heat gun or torch
- Cutoff wheel or rotary tool
- Thread repair kit or tap set
1. Use penetrating oil and give it time
For rusted or stuck bolts, penetrating oil is often the best first move. It works by getting into tiny gaps in the threads and breaking down rust and corrosion. It will not fix every problem, but it often makes the next step much easier.
Spray the area around the bolt or screw head and the exposed threads, if any are visible. Then wait. Ten minutes is sometimes enough for light rust, but badly corroded fasteners may need several hours or even overnight. Reapply if needed.
Non-obvious tip: penetrating oil works better when the fastener is clean enough for the oil to reach the threads. If thick dirt, paint, or grease covers the area, wipe or brush it away first.
Best use case
This method works best when the bolt or screw is rusted, but the head is still usable or partly usable. It is a smart first step before using more aggressive tools.
2. Try the correct driver with strong downward pressure
Many broken screw problems start as stripped heads, not snapped shafts. If the screw head is only partly damaged, the correct driver can still work. Use the exact bit size and shape that fits the head. Do not use a loose bit. That usually rounds it out further.
Press straight down while turning slowly. If the screw is in wood, drywall, or plastic, this may be enough. If it is in metal, you may need to combine this with penetrating oil or a small shock from a hammer.
Non-obvious tip: a worn screwdriver or bit can look “close enough” but still fail. Even a small mismatch reduces grip, especially on Phillips or Torx heads.
3. Switch to locking pliers if any part sticks out
If the broken bolt or screw head sticks out even a little, locking pliers can be very effective. Clamp the pliers tightly around the exposed part. Lock them in place, then turn slowly and steadily.
The key is grip. If the pliers slip, stop and reset them. Do not keep forcing them, because that rounds the metal more and makes later methods harder.
This is one of the simplest answers to how to remove a broken bolt or screw when there is still something to grab. It is quick, cheap, and often safer than drilling right away.
Best use case
Use this method on broken bolts with some exposed shaft, or on screw heads that are damaged but still reachable.
4. Tap the fastener with a hammer first
Light hammer taps can help in two ways. First, they can break rust bonds. Second, they can shock the threads just enough to loosen them. This is especially useful on old automotive fasteners and outdoor hardware.
Use a small hammer, not a heavy one. Tap the head or the area around the fastener a few times, then try removal again. If you are using a screwdriver or bit, the tapping can also help seat it better in the damaged head.
Be careful on fragile materials. Soft aluminum, thin sheet metal, or brittle plastic can crack if hit too hard.

Credit: reddit.com
5. Apply controlled heat
Heat expands metal. That expansion can help break the grip of rust, thread-locker, or corrosion. It is one of the best methods for stubborn bolts in metal parts. But it must be used carefully.
A heat gun is safer for many jobs. A torch gives more heat, but it can damage paint, plastic, rubber seals, and nearby wires. Heat the area around the fastener, not just the fastener itself, if you are trying to expand the surrounding metal.
After heating, try removing the bolt or screw while it is still warm. Sometimes a hot-cold cycle works even better. Heat the area, then let it cool slightly, then apply penetrating oil.
Non-obvious tip: heat can help loosen thread-locker, but if the fastener is inside aluminum, too much heat can soften the part around it. That creates a new problem. Use the least heat that gets results.
6. Cut a new slot in the head
If the screw head is stripped, a rotary tool with a cutoff wheel can create a fresh flat slot. This gives you a new place to use a flathead screwdriver or impact driver.
Cut carefully across the center of the head. Make the slot wide enough for a solid driver blade. Then press down firmly and turn slowly. This method often works well on small screws where the original head was damaged.
It is not ideal for deeply rusted fasteners, because a cut slot does not solve corrosion in the threads. But for a stripped head, it can be a fast and effective fix.
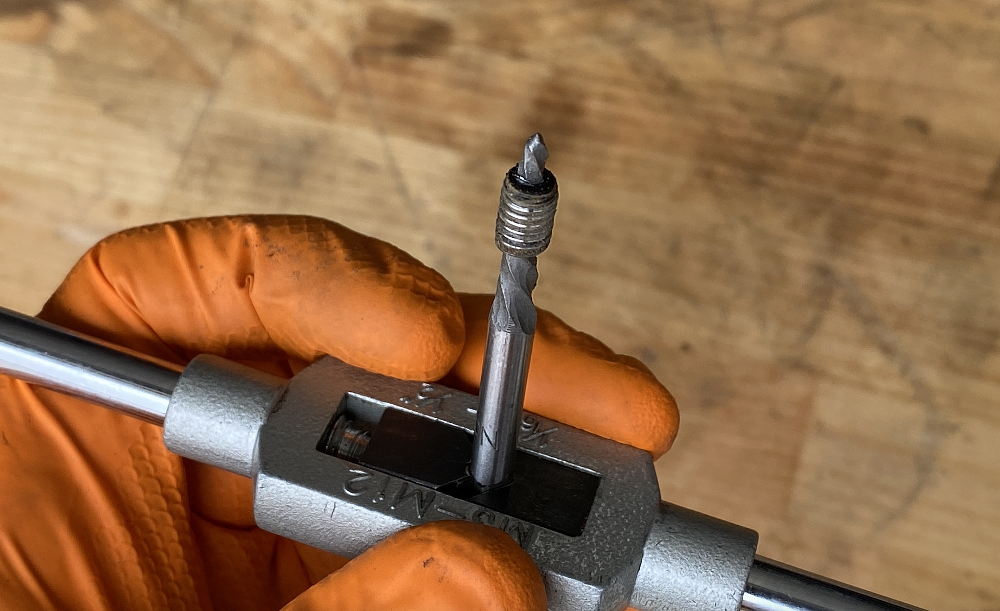
7. Use a screw extractor the right way
Screw extractors are one of the most common tools people buy for this job. They can work well, but only if you use them correctly. The process usually starts with drilling a small pilot hole into the center of the broken bolt or screw. Then you insert the extractor and turn it counterclockwise.
The center hole matters. If it is off-center, the extractor can break or push the fastener sideways. That makes removal harder. Use a center punch first if possible, so the drill starts in the middle.
Turn the extractor slowly. Do not yank it. Some extractors are brittle, and a broken extractor inside the fastener can be very hard to drill out.
| Extractor type | Best for | Main caution |
|---|---|---|
| Spiral flute extractor | Most stripped screws and bolts | Can break if forced |
| Straight flute extractor | Heavier, more stubborn fasteners | Needs a precise pilot hole |
| Extractor socket | Rounded bolt heads | Only works if some head remains |
For a reliable reference on safe drilling practice and tool handling, you can also review the guidance from NIST on precision and measurement standards, especially if you work on delicate parts where accuracy matters.
8. Drill with left-hand bits
Left-hand drill bits are one of the most underused tools for broken fasteners. They cut in the opposite direction of normal drill bits. As they drill, they may actually spin the broken bolt or screw out on their own.
This method is especially useful when the fastener is already loose but stuck by rust or thread damage. Start with a small bit and drill slowly into the center. Use cutting oil if you are working on metal.
Even if the fastener does not back out while drilling, the hole you create can make the next method easier. In many cases, left-hand bits work better than extractors because they create removal force while cutting.
Non-obvious tip: many people rush to the extractor first. A left-hand bit often gives you a safer chance to remove the fastener before using a tool that can snap inside the hole.
Credit: tfasteners.com
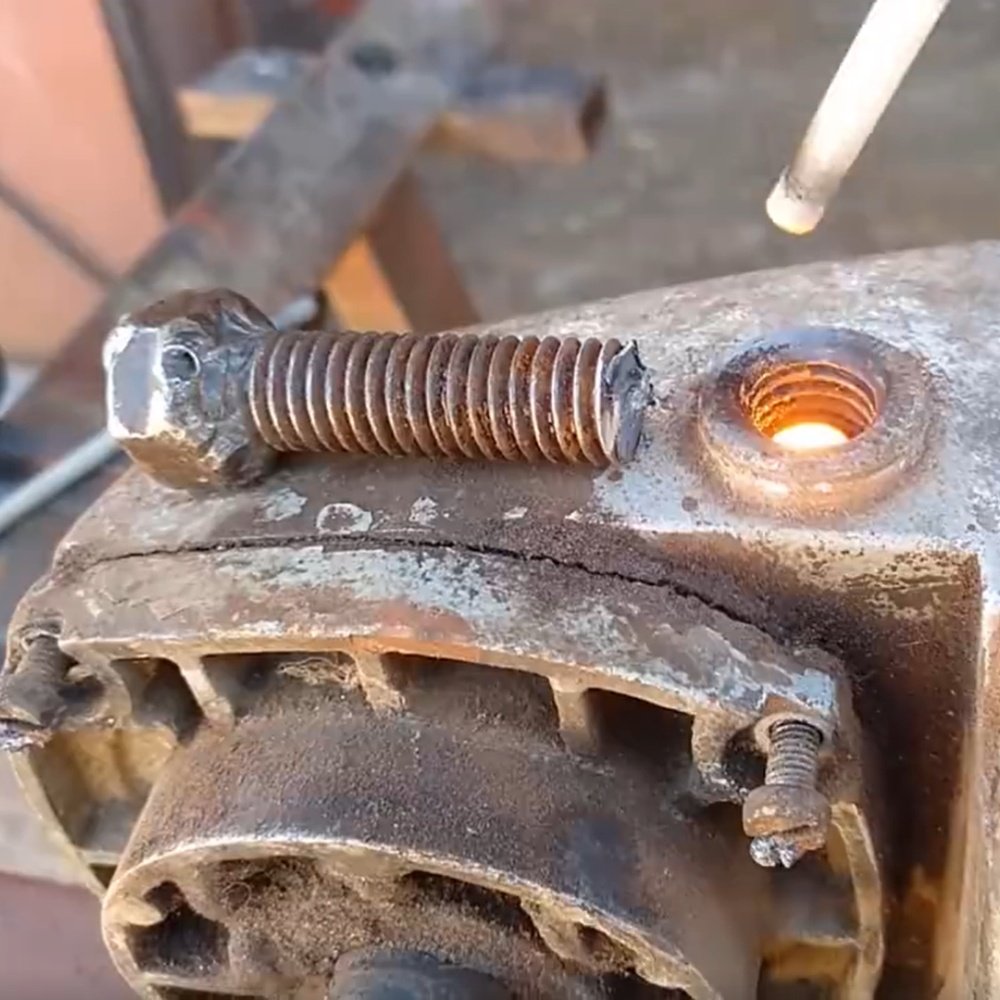
9. Weld a nut onto the broken bolt
If you have access to welding equipment and enough room around the fastener, welding a nut onto the broken bolt can be a very strong fix. The weld gives you a new head to turn, and the heat from welding also helps loosen rust.
Place the nut over the broken bolt, weld through the center, and let it cool just enough to handle safely. Then use a wrench to back the bolt out. This method often works on broken bolts that sit flush with a metal surface.
It is not the right choice for every job. It requires skill, proper safety gear, and enough clearance to weld without harming nearby parts. But when it is possible, it can save a lot of time.
10. Drill it out and repair the threads
Drilling out the broken bolt or screw is the last major option when the fastener will not move any other way. The goal is to remove the metal without damaging the original threads in the part. That takes patience and care.
Start with a center punch, then drill a small pilot hole. Increase bit size slowly. Check your alignment often. If the remaining bolt wall becomes thin enough, you may be able to pick out the leftovers with a pick or tap them loose with a punch.
If the threads are damaged during the process, you can repair them with a tap or thread insert kit. This is common in engine parts, machinery, and metal furniture. For soft metals, this step is often the difference between a temporary repair and a proper fix.
When drilling out is the right choice
Choose drilling when the fastener is deeply seized, the head is gone, or previous methods have failed. It is also the best option when the part will be re-tapped or fitted with an insert anyway.
Common mistakes that make removal harder
Many broken bolt and screw problems get worse because of a few simple mistakes. Avoid these if you want a better chance of success:
- Using the wrong bit size or driver shape
- Applying too much force too early
- Skipping penetrating oil on rusted fasteners
- Drilling off-center
- Using a brittle extractor too aggressively
- Overheating nearby plastic, paint, or wiring
- Not cleaning dirt and rust before starting
One of the biggest beginner mistakes is jumping straight to drilling. Drilling can work, but it also removes your margin for error. If a simpler method can still work, try that first.
How to choose the best fix for your situation
The best method depends on how much of the fastener you can still reach, how badly it is stuck, and what material surrounds it. Here is a simple way to think about it:
- If the head is only slightly damaged, try the correct driver and pressure first.
- If part of the fastener sticks out, use locking pliers.
- If rust is the main issue, start with penetrating oil and heat.
- If the head is stripped, try cutting a new slot or using an extractor.
- If the bolt is flush or broken below the surface, left-hand bits, extractors, or drilling may be needed.
Non-obvious tip: the surrounding material matters as much as the broken fastener itself. A method that is fine on steel can damage aluminum, wood, or plastic very quickly.
How to prevent this problem next time
Once you finish the repair, it is worth taking a few small steps to avoid another broken fastener later. Prevention is easier than removal.
- Use anti-seize on bolts in high-rust areas, if the application allows it.
- Do not overtighten screws, especially in soft materials.
- Use the right tool size every time.
- Replace badly corroded fasteners instead of reusing them.
- Keep threads clean before assembly.
Also remember that thread-locking products are not the same as rust. A bolt that is glued in by thread locker may need heat, while a rusty bolt may need oil and patience. Knowing the difference helps you choose the right first move.
Credit: revzilla.com
Final advice before you start
If you want the shortest path to success, begin gently and move up step by step. Penetrating oil, proper grip, tapping, and heat solve many cases without drilling. Save extractors and full drilling for the harder jobs. That approach protects the part and gives you more control.
When people ask how to remove a broken bolt or screw, the real answer is not one trick. It is choosing the right trick at the right time. That is what saves parts, time, and frustration.
FAQs
1. What is the easiest way to remove a broken bolt or screw?
The easiest way is usually to try penetrating oil first, then use the correct driver or locking pliers if any part is exposed. If the head is stripped, a screw extractor or left-hand drill bit may be the next step.
2. Can WD-40 remove a stuck bolt?
WD-40 can help in some light cases, but true penetrating oil usually works better on rusted or seized fasteners. If the bolt is badly corroded, use a product made for penetration rather than a general spray.
3. Is heat safe for removing broken screws?
Heat can be very effective, but it must be used carefully. It is safer on metal parts than on plastic, paint, or rubber. A heat gun is often safer than an open flame when nearby parts can be damaged.
4. What if the screw extractor breaks inside the bolt?
This is a difficult problem because extractor steel is hard. The usual fix is careful drilling with carbide bits or taking the part to a machine shop. That is why it is important to use extractors slowly and avoid forcing them.
5. When should I stop and ask a professional for help?
Ask for help when the fastener is inside a valuable part, like an engine block, precision machine, or fragile casting, and you are not confident about drilling straight. Professional help is also wise if you already broke an extractor inside the hole.
