A broken bolt stud can stop a simple repair fast. It may happen on a car engine, a machine part, a fence bracket, or a home project. The part is still there, but the head is gone, and now you must remove the stuck piece without damaging the threads around it.
If you are trying to figure out how to drill out broken bolt stud, the good news is this: with the right tools, careful drilling, and a little patience, most broken studs can be removed cleanly. The key is not power. The key is control.
This guide shows you a safe, step-by-step method that works for many common jobs. You will learn how to prepare the surface, choose the right drill bit, stay centered, and remove the remaining metal without making the hole worse. You will also learn when drilling is the right choice and when another method may be better.
What to do before you start drilling
Before you touch the drill, take a few minutes to inspect the broken stud. This first check can save the threads, the part, and a lot of time.
Check how much stud is exposed
If a small part of the stud sticks out, you may not need to drill it right away. A grip tool, locking pliers, or a stud extractor may work first. Drilling is often the better choice when the stud is broken flush with the surface or below it.
Look at the material around it
Soft metal, like aluminum, is easier to damage than steel. Cast iron can also crack if you use too much force. This matters because the drill must cut only the broken stud, not the surrounding part.
Use penetrating oil early
Spray penetrating oil around the stud and let it sit for at least 10 to 15 minutes. For badly rusted parts, give it more time. A few light taps with a small hammer can help the oil move into the rust bond. This does not fix everything, but it often makes removal easier.
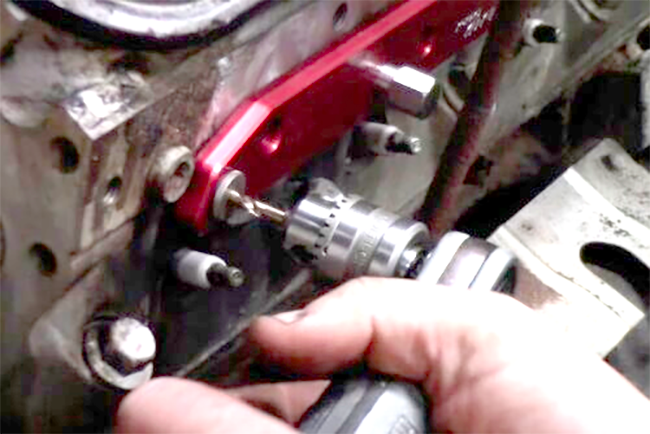
Gather the right tools
You do not need a large workshop. A careful setup is more important than a big toolbox. Here is a simple set of useful tools:
- Center punch
- Hammer
- Drill with variable speed
- Sharp drill bits, preferably cobalt or high-speed steel
- Left-hand drill bits if you have them
- Penetrating oil
- Eye protection
- Cutting fluid or light oil
- Vacuum or compressed air for cleaning chips
- Thread chaser or tap for cleanup
If you want a general reference for safe tool use and drilling basics, the OSHA website is a reliable place to review safety guidance.
How to drill out broken bolt stud without damaging the threads
The main goal is to remove the metal in the center of the stud while leaving the original threaded hole intact. That means you must stay centered and drill in stages, not all at once.
1. Mark the exact center
This is the most important step. If the hole starts off-center, the drill will drift, and you may cut into the threads. Use a center punch to make a small dent in the exact middle of the broken stud. If the surface is uneven, clean it first with a file or a small grinder so the punch has a flat spot to bite into.
A deep, accurate punch mark helps the drill start straight. Beginners often skip this and try to “eyeball” the center. That usually causes problems later.
2. Start with a small pilot hole
Choose a small drill bit, usually around 1/8 inch or smaller if the stud is very small. Drill slowly and keep the bit straight. Use light pressure and let the bit cut. If you push too hard, the bit can wander or break.
One smart trick is to begin with a left-hand drill bit if you have one. Sometimes the reverse cutting action grabs the broken stud and backs it out before you need the next step. Even if it does not remove the stud, it still creates the pilot hole you need.
3. Use low speed and cutting fluid
Drilling steel needs patience. High speed makes heat, and heat can harden the metal or damage the surrounding part. Use a slow drill speed and add a little cutting fluid or light oil to help the bit cut smoothly. Reapply oil as needed.
This matters even more on hardened studs. A dull bit or dry drilling can ruin the job quickly. Sharp bits make a big difference.
4. Enlarge the hole in small steps
Once the pilot hole is centered, move to the next bit size. Increase the hole little by little. Do not jump to a large bit right away. Small steps help keep the hole centered and reduce the chance of touching the threads.
Stop often and check your progress. If the hole starts drifting, slow down and correct your angle before it gets worse.
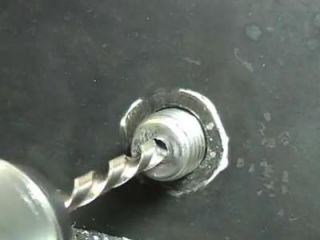
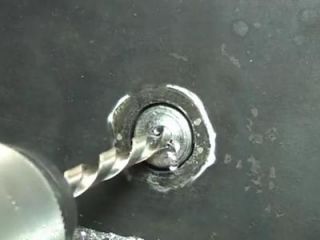
5. Watch for the thread wall
The broken stud is hollowing out from the middle. As you get close to the outer edge, the remaining metal becomes thin. At that point, the stud may begin to peel inward or spin out in pieces. This is a good sign. It means you are near the original threads, not through them.
A helpful clue is the color and feel of the chips. When the shavings become thin and curved, you are close to the outer shell of the stud.
6. Remove the thin shell
After drilling almost to the thread size, you may be able to collapse the remaining wall of the stud with a small pick, an awl, or a screw extractor. Often the thin outer ring will release and unscrew with little effort.
If the stud does not come out easily, do not force it. Add more penetrating oil, wait, and try again. If you use too much force now, you may damage the threads you worked to protect.
7. Clean the threads carefully
Once the broken piece is out, inspect the hole. There may be steel chips, rust, or thread damage. Use a thread chaser or the correct tap to clean the threads gently. A tap is not for cutting new threads here. It is for cleaning and restoring the original path.
Blow out the hole, remove every chip, and test the bolt by hand before final assembly. If the bolt starts by hand and turns smoothly, the threads are likely still good.
Choosing the right drill bit for the job
The bit you choose can decide whether this repair is smooth or painful. Not all bits are the same, and using the wrong one is a common mistake.
| Bit type | Best use | Main advantage | Main drawback |
|---|---|---|---|
| High-speed steel | General drilling | Easy to find and affordable | May wear faster on hard studs |
| Cobalt | Hard or rusted studs | Handles heat better | More expensive |
| Left-hand bit | Studs that may back out | Can remove the stud while drilling | Not always available in all sizes |
| Carbide | Very hard metal | Strong cutting power | Can be brittle and less forgiving |
For most common repairs, a sharp cobalt bit is a strong choice. If you are working on a softer material, such as aluminum, the surrounding material matters even more than the stud itself. In that case, drilling too aggressively can damage the base part even if the bit is good.
Credit: ultimatehandyman.co.uk
Common mistakes that make the job harder
Many broken stud removal jobs fail for simple reasons. These mistakes are easy to avoid once you know them.
Drilling too fast
Fast drilling creates heat, and heat works against you. It can dull bits, harden the stud surface, and make the hole wander. Slow and steady is better.
Skipping the center punch
Without a punch mark, the bit often slips off center at the start. Once the hole drifts, it becomes much harder to keep the drill inside the stud.
Using a dull bit
A dull drill bit does not cut cleanly. It rubs, heats up, and may break. If the bit is not making clean chips, replace it or sharpen it.
Forcing a screw extractor too early
Extractors can be useful, but they can also snap inside the hole. A broken extractor is very hard to drill out because the tool is often harder than the stud. Use extractors carefully and only after the drilled hole is sized correctly.
Ignoring nearby damage
Sometimes the stud is not the only problem. If the surrounding threads are already corroded or cracked, drilling may not solve the full issue. Check the part closely before reassembly.
When to use a left-hand drill bit
Left-hand drill bits are one of the best tools for this kind of work. They cut while turning in reverse. That reverse motion can catch the stud and spin it out as the hole deepens.
This is one of the most useful beginner-friendly tricks in stud removal. People often think they need an extractor first, but a left-hand bit can do both jobs at once: drilling and backing out the broken piece.
Credit: promaxxtool.com
Why left-hand bits help
- They may loosen the stud while cutting
- They reduce the need for extra tools
- They work well on rusted fasteners
- They help keep the repair simple
Still, they are not magic. If the stud is badly seized, you may still need the full drilling method. But it is smart to try a left-hand bit early in the process.
What to do if the stud is broken below the surface
A flush stud is difficult, but a recessed stud can be even trickier. The drill must start inside a hole, which gives less room for error. If the broken piece sits below the surface, clean the area first so you can see the edge clearly.
Use a small punch or a guide if needed. Some mechanics make a simple guide block with a centered hole to help keep the drill straight. That extra support can prevent the bit from sliding around in the recessed area.
When the stud is deeply recessed, do not rush to a large drill bit. Start smaller than you think you need. The wall of the hole is already close to the stud, so control matters more than speed.
Useful tip for stubborn recessed studs
Heat can help if the surrounding material can handle it. A little controlled heat on the part around the stud may break the rust bond. Never overheat a part with seals, paint, plastic, or sensitive surfaces nearby. If you use heat, let the area cool slightly before drilling so the bit does not suffer from too much heat buildup.
When drilling is not the best option
Sometimes drilling is the right answer, but not always. If the stud is large, deeply rusted, or in a delicate part, another method may be better first.
For example, welding a nut to the broken stud can work very well when there is enough access. The heat from welding also helps break rust. In some cases, a specialist may prefer this method because it is less risky than drilling near thin threads.
If the part is rare, expensive, or hard to replace, think carefully before drilling. One bad move can turn a repair into a full part replacement.
Ask yourself these questions first
- Can the part be replaced easily if the threads get damaged?
- Is there enough room to drill in a straight line?
- Is the metal soft or thin?
- Would welding or professional repair be safer?
If the answer points to a high risk of damage, pause and choose the least aggressive method.
Cleaning and restoring the hole after removal
Removing the stud is only half the job. The hole must be checked and cleaned before a new bolt goes in. Chips left behind can destroy new threads or make the bolt feel tight when it should not.
Start by vacuuming or blowing out the hole. Then run the correct tap or thread chaser through it gently. Do not use force. If the tap becomes tight immediately, stop and inspect the hole again. Forcing the tool may cut new damage into the threads.
After cleaning, test a matching bolt by hand. It should start smoothly with no cross-threading. If it does not, inspect the hole again before final assembly.
Two details beginners often miss
First, rust does not always stay in the hole. It can travel into the first few threads and make the new bolt feel wrong even after the stud is removed. That is why light cleaning matters.
Second, if the drill touched the threads even a little, the bolt may still fit but not seal properly. On engine parts, brackets, and pressure-related joints, that small damage can create bigger problems later. Always test the fit before finishing.
How to avoid breaking bolts in the future
Once you have gone through this repair, you will want to avoid doing it again. A few habits make a big difference.
- Use the correct torque, not extra force
- Clean rust before tightening fasteners
- Apply anti-seize where it is safe and appropriate
- Replace damaged bolts instead of reusing them
- Do not overtighten small fasteners
Many broken studs begin as small problems: corrosion, poor lubrication, or someone tightening “just a little more.” Good assembly habits prevent most of them.
Credit: ultimatehandyman.co.uk
Final thoughts on drilling out a broken bolt stud
Learning how to drill out broken bolt stud is really about control, not force. If you center the drill carefully, start with a small pilot hole, work in stages, and stay patient, you can remove many broken studs without ruining the part around them.
The best results come from slowing down at the start. A few extra minutes spent on the punch mark, the first bit, and the drill angle can save you from stripping the threads. That is the difference between a clean repair and a much bigger job.
When in doubt, stop and inspect your progress. The safest repair is the one that protects the original threads and gives you a clean hole for the new fastener.
FAQs
1. Can I drill out a broken bolt stud with a regular drill bit?
Yes, you can. A regular sharp bit can work well if you drill slowly and stay centered. A cobalt or left-hand bit is often better for rusted or hard studs, but a standard bit is still usable for many repairs.
2. What size drill bit should I start with?
Start small, usually around 1/8 inch or smaller for many common studs. The exact size depends on the stud diameter. The goal is to make a centered pilot hole first, then enlarge it step by step.
3. Is it better to use heat before drilling?
Sometimes, yes. Light heat can help break rust bonds on metal parts. But do not use heat near plastic, seals, paint, or delicate components. If the part is sensitive, penetrating oil and patience are safer.
4. What if the drill bit keeps wandering off center?
That usually means the punch mark is too shallow or the bit is dull. Re-center the punch mark deeper, use a sharp bit, and drill at a slower speed. A drill guide can also help on recessed studs.
5. Can a broken extractor make the repair worse?
Yes. A snapped extractor is very hard to remove because it is often harder than the stud and many drill bits. That is why you should use an extractor only after the hole is sized correctly and you have tried easier removal methods first.
