If you need to replace a chain, buy a new bar, or check if your saw parts match, you must know how to measure chainsaw bar size the right way. Many people guess the length and end up buying the wrong chain or the wrong bar. That wastes time and money.
The good news is that this job is simple once you know what to look for. You do not need special tools. In most cases, a tape measure and a few minutes are enough. The key is to measure the correct part of the bar, not the full metal body from tip to tip.
In this guide, you will learn the exact steps to measure a chainsaw bar accurately, avoid common mistakes, and understand the numbers that matter when buying a replacement chain or bar.
What the chainsaw bar size really means
Before you measure anything, it helps to understand what “bar size” actually means. Many beginners think the bar size is the total length of the metal bar from the front to the back. That is not always how it is sold or described.
Chainsaw bar size usually refers to the cutting length, not the full physical length. This is the distance from the front of the chainsaw body to the tip of the bar, rounded to the nearest even number in many cases. That means a bar that measures about 16 inches may be sold as a 16-inch bar, even if the metal part is a little longer.
Here is the part many people miss: the bar size and the chain size are related, but not identical. A chain must match the bar length, the groove width, and the chain pitch. If you only measure the bar length and ignore the other details, the new chain may still not fit.
The three numbers that matter most
When you measure chainsaw bar size, you should pay attention to three things:
- Bar length – the usable cutting length, usually stated in inches.
- Gauge – the thickness of the drive links that fit into the bar groove.
- Pitch – the distance between chain rivets, which must match the sprocket and bar setup.
The bar length is the easiest part to measure. But if you want the correct replacement chain, you should also check the gauge and pitch on the bar or the old chain.
Tools you need before you start
You do not need a workshop full of tools. In most cases, these simple items are enough:
- A tape measure or ruler
- A clean cloth
- Work gloves
- Your chainsaw manual, if you have it
A tape measure is best because it can follow the full length easily. A ruler works too, but it is less convenient for longer bars. A clean cloth helps remove dirt, oil, and sawdust so you can see the bar clearly.
If your saw is dirty, clean the bar first. Dust and oil can hide the tip and the rear mounting point. That small detail matters more than people think. A poor reading of even half an inch can lead to the wrong chain size.
How to measure a chainsaw bar accurately
The process is easy if you follow the correct steps. The important thing is to measure the bar the same way manufacturers do. Do not measure random edges or include parts that are not part of the cutting length.
Step 1: Turn off the saw and prepare it safely
Safety comes first. Make sure the chainsaw is off and fully cooled down. If it is a gas saw, disconnect the spark plug wire before you touch the bar and chain. If it is a battery saw, remove the battery.
Wear gloves if the chain is sharp. Even a stopped chain can cut skin if you handle it carelessly. Keep the saw on a flat surface so it does not move while you measure.
Step 2: Find the correct starting point
The starting point is the front of the chainsaw body where the bar exits the saw housing. Do not start at the very end of the bar near the rear bolt. The measurement should begin where the bar enters the saw.
This is one of the biggest beginner mistakes. People often measure only the metal bar itself, from the bolt hole to the tip. That gives the wrong result for bar length as sold in stores.
Step 3: Measure from the body to the bar tip
Place the end of the tape measure at the point where the bar enters the saw body. Stretch the tape all the way to the farthest point of the bar tip. Read the number in inches. That is the approximate bar length.
For example, if the measurement is around 14.5 inches, the bar is usually sold as a 14-inch bar. If it is around 16.5 inches, it is usually sold as a 16-inch bar.
Do not worry if the number is not exact. Chainsaw bars are commonly sold in standard sizes, and the listed size is often rounded down or rounded to the nearest standard size.
Step 4: Check the actual cutting length, not just the full bar
The total metal length may be slightly longer than the listed bar size. That is normal. What matters most is the cutting length. This is why measuring from the saw body to the tip is the right method.
If your saw has a nose sprocket tip, the visible metal may extend a little beyond the chain’s cutting area. Still, the standard size is usually based on the usable cutting length rather than the absolute metal length.
Step 5: Confirm the bar size with the old chain or manual
If possible, check the numbers printed on the bar itself. Many bars have the length, gauge, pitch, and even part number stamped near the mounting area. This is very helpful when the tape measure and the label do not seem to match exactly.
You can also check your chainsaw manual. The manufacturer often lists the recommended bar lengths for that model. If you want a reliable reference, the STIHL official site is a useful example of where brands publish product and maintenance details.
Step 6: Measure the pitch and gauge if you need a new chain
Bar length alone is not enough when buying a replacement chain. You also need the pitch and gauge. If you use the wrong chain, it may not fit the bar groove or sprocket.
You can usually find these numbers stamped on the bar. They may look like this:
- 16" .050 3/8"
- 18" .063 .325"
In these examples, the first number is the bar length. The second is the gauge. The third is the pitch. If you do not see the markings clearly, clean the bar and check again.
How to read the numbers stamped on the bar
Most chainsaw bars have important information engraved or stamped near the base. This is often the fastest way to get the right size. If the markings are still readable, they can save you a lot of guesswork.
Typical markings may include the bar length, gauge, pitch, and chain type. Sometimes they also include a part number or the manufacturer’s logo. The markings are usually small, so a flashlight can help.
| Marking | What it means | Why it matters |
|---|---|---|
| 16" | Bar length | Helps you buy the correct chain and replacement bar |
| .050 | Gauge | Must match the chain drive link thickness |
| 3/8" | Pitch | Must match the chain and sprocket |
| DL count | Drive link count | Needed for exact chain fit |
One smart tip: do not trust only the bar length if the saw has been modified. Some users fit a different bar size than what the original model came with. The stamp on the bar is usually more reliable than the model name alone.
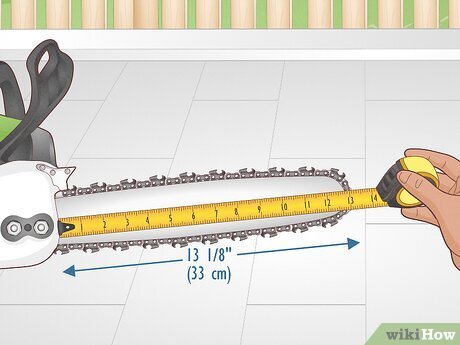
Credit: wikihow.com
Common mistakes when measuring a chainsaw bar
Many measurement problems happen because people rush. They assume all chainsaw bars are measured the same way as a ruler on a piece of wood. They are not. A few small errors can lead to the wrong purchase.
Measuring the wrong section
The most common mistake is measuring the full metal bar from end to end and calling that the bar size. The correct method starts where the bar leaves the saw body. If you skip that detail, your result may be too long.
Ignoring the chain pitch and gauge
A bar may be the right length but still not work with your chain. This happens often when people shop only by inches. The chain must match the bar’s groove width and the drive system. If not, it may bind, wear fast, or not fit at all.
Using a damaged or bent bar
If the bar is bent, worn, or badly damaged, measuring it can be misleading. A bent bar may show a false length or make the chain fit poorly. If the bar is badly worn, compare the markings on the bar with the saw manual before buying a replacement.
Not checking the drive link count
For chain replacement, drive link count is a detail many beginners miss. Even when the pitch and gauge are correct, the chain still needs the right number of drive links. A chain that is too short or too long will not fit properly.
Assuming all 16-inch bars are the same
This is another hidden trap. Two bars may both be called 16-inch bars, but they may have different pitch, gauge, or mount style. The length alone does not tell the full story. That is why checking the stamped markings is so useful.
How to measure the chain if you need both parts
If you are replacing both the bar and the chain, you should measure the chain as well. This gives you a better chance of buying a correct match.
To measure the chain, count the drive links. These are the small links that sit inside the bar groove. Count them one by one, or use the number stamped on the old chain packaging if you still have it.
You should also confirm the pitch and gauge from the chain itself. These usually match the numbers on the bar. If they do not, something is wrong and you should recheck both parts carefully.
Here is a simple way to think about it:
- Bar length tells you how long the bar is.
- Pitch tells you the spacing of the chain system.
- Gauge tells you the thickness of the drive links.
- Drive link count tells you the exact chain length needed.
These four details together give you a proper fit. If you only have one of them, you do not have enough information.
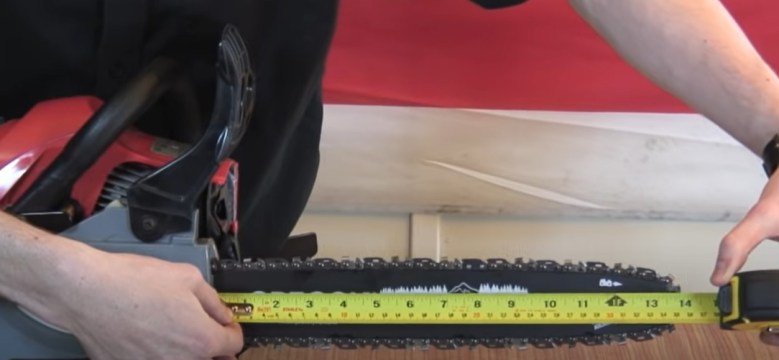
Credit: a1sawing.com
What to do if the bar has no markings
Sometimes the markings are worn off, covered in grease, or missing. This is common on older saws. In that case, you must rely more on measurement and model information.
Start by cleaning the bar carefully. Use a cloth and a little degreaser if needed. Then measure the bar from the body to the tip as explained earlier. Next, check your chainsaw model number and look up the manufacturer’s recommended bar sizes.
If you still cannot confirm the size, compare the chain fit. A correct chain should sit smoothly in the bar groove and move freely when adjusted properly. If it is too tight or too loose, the bar or chain may not match.
One useful trick is to take the bar to a dealer or repair shop. A local expert can often identify the size in minutes by comparing the mount pattern, drive link count, and bar style. That can save time if the saw is old or unusual.
Why the correct measurement matters
Getting the right bar size is not just about convenience. It affects safety, cutting speed, and saw life. A bar that is too long for the saw may put extra load on the engine or motor. A chain that does not match the bar may heat up too much or jump off during use.
A correct fit gives you smoother cutting and less wear. It also helps the saw perform the way the maker intended. That means less strain on the clutch, sprocket, and guide bar.
Another point many beginners miss: a longer bar is not always better. A bar that is longer than needed can reduce control, especially for small saws. If you do not need the extra reach, stick with the size recommended for your saw.
Quick reference for accurate measuring
If you want a fast recap, use this simple order:
- Turn off the saw and make it safe.
- Clean the bar so the markings are visible.
- Measure from the saw body to the tip of the bar.
- Check the stamped length, pitch, and gauge.
- Count drive links if you need a replacement chain.
- Compare everything with your manual or parts listing.
This process takes only a few minutes, but it can prevent a bad purchase. The biggest win is not speed. It is accuracy.
Extra tips that make the job easier
A few small habits can improve your results a lot. First, always measure with the chain tension relaxed, not overly tight. A tight chain can change how the bar sits and make the reading less reliable.
Second, look at both sides of the bar if the markings are hard to read. Some stamps are easier to see from one angle than the other. Use natural light or a flashlight.
Third, do not measure a hot bar right after heavy cutting. Heat can make handling uncomfortable, and dirt may be stuck more firmly to the surface. A cool, clean saw is easier to measure correctly.
Fourth, if your saw has seen a lot of use, inspect the bar rails. Worn rails can make the chain sit differently, which may confuse the measurement process. A bar can still “measure” right while being too worn to use well.

Credit: wikihow.com
Final thoughts
To measure chainsaw bar size accurately, focus on the usable cutting length, not just the metal length. Start at the point where the bar leaves the saw body and measure to the tip. Then check the stamped markings for length, gauge, and pitch. If you need a new chain, count the drive links too.
The process is simple, but small details matter. Once you learn the right method, you can buy the correct parts with confidence and avoid wasted time. A good measurement today can save you from a frustrating mismatch tomorrow.
FAQs
1. How do I measure a chainsaw bar without removing it?
You can measure it while it is still on the saw. Turn the saw off, make it safe, then measure from the point where the bar exits the saw body to the tip of the bar. This gives the standard bar length used for shopping.
2. Is the chainsaw bar length the same as the full metal length?
No, not always. The listed size usually refers to the cutting length, not the complete metal bar. The full bar may be a little longer than the size shown on the package or in the manual.
3. Where can I find the bar size stamped on the chainsaw bar?
Most bars have markings near the base, close to where they attach to the saw. The numbers may be small or hidden by grease, so cleaning the area first helps a lot.
4. What if my bar says 16 inches but measures a little more than 16?
That is normal. Chainsaw bars are often sold by rounded standard sizes. A bar listed as 16 inches may measure a bit longer from end to end, but still be sold as a 16-inch bar.
5. Do I need the pitch and gauge when I buy a new chain?
Yes. Bar length alone is not enough. The chain must match the pitch and gauge too, or it may not fit or run properly. Always check all three details before buying.
