If your workshop feels cramped, slow, or messy, the right saw station can change everything. A good miter saw stand gives you a stable cut area, better support for long boards, and a safer way to work. It also saves time because you stop fighting with makeshift benches and awkward setups.
The good news is that you do not need an expensive store-bought system to get great results. With smart diy miter saw stand plans, you can build a stand that fits your space, your tools, and your budget. You can also make it stronger, lighter, or more portable depending on how you work.
In this guide, you will learn what makes a stand truly useful, how to plan the build, what materials work best, and which simple designs are easiest to make at home. You will also see practical ideas that help beginners avoid common mistakes and build a stand that feels solid from day one.
What a good miter saw stand should do
A miter saw stand is more than a place to put a saw. It should help you cut faster, support long boards, and keep your cuts more accurate. If the stand flexes, wobbles, or sits at the wrong height, every cut becomes harder.
The best stand solves a few key problems at once:
- Stability: It should stay steady when the saw moves.
- Support: It should hold long stock so you do not need extra hands.
- Comfort: The saw height should match your working position.
- Storage: It can include shelves, bins, or space for accessories.
- Mobility: If needed, it should roll or fold without losing strength.
One thing beginners often miss is this: the best stand is not always the biggest one. A giant build can waste space and make your shop harder to use. A smaller, well-planned stand often works better because it matches your real cutting habits.
Another overlooked point is outfeed support. Many people focus only on the saw platform and forget the wings. If your stand does not support the full length of your material, you will still get poor cuts, even if the saw itself is excellent.
Choose the right style before you buy materials
Before you cut a single board, decide what kind of stand fits your shop. This is where smart planning saves money. Many people build the wrong style first, then rebuild later.
Fixed stand
A fixed stand stays in one place. It is a strong choice for a garage or dedicated workshop. Fixed builds are simple, solid, and often cheaper than rolling systems. They work well if you always cut in the same spot.
Rolling stand
A rolling stand uses locking casters so you can move the saw around. This is useful in small shops where one machine must share space with others. The main challenge is keeping it rigid. Good casters and a strong frame matter more than fancy features.
Foldable stand
A foldable stand works well for small spaces or jobsite use. It saves room when not in use, but the folding joints must be accurate and strong. If the hinges are weak, the stand will feel shaky.
Cabinet-style stand
This style combines a work stand with storage. It often looks cleaner and gives you a place for blades, clamps, and measuring tools. It takes more time to build, but it can improve your whole workflow.
If you are searching for easy diy miter saw stand plans, a fixed or simple rolling build is usually the best place to start. Those designs are easier to square, easier to assemble, and easier to repair later.
Materials that make the build easier
The material you choose changes the cost, weight, and strength of the stand. For most home builders, plywood and construction lumber are the easiest choices. They are affordable, easy to find, and simple to cut with basic tools.
| Material | Best use | Main benefit | Main drawback |
|---|---|---|---|
| 3/4-inch plywood | Cabinet sides, tops, shelves | Strong and stable | Heavier and costs more |
| 2×4 lumber | Simple frames and legs | Cheap and easy to build with | Can move or twist if not well braced |
| 1×4 or 1×6 boards | Stretchers, supports, trim | Light and easy to handle | Not ideal for main load areas |
| Locking casters | Rolling stands | Easy movement | Add height and slight flex if low quality |
| Wood screws and pocket screws | General assembly | Fast and beginner-friendly | Need proper pilot holes and alignment |
Plywood is often the smartest choice for the top and cabinet parts because it stays flatter than solid wood. That matters more than many people think. A saw stand with a bowed top can throw off your cut support and make clamping harder.
For budget builds, construction lumber works fine if you add enough bracing. For cleaner and more precise builds, plywood usually gives better results. If you want a stand that lasts for years, use thicker stock in load-bearing areas and keep thinner material for panels only.
Simple measurements that improve the whole build
Many first-time builders focus on the frame and ignore dimensions. That leads to stands that feel awkward to use. Good measurements make the difference between a stand that looks nice and one that actually helps you work.
Credit: wilkerdos.com
Height matters more than style
The saw should sit at a height where your arms feel relaxed. For many users, that means the table surface is close to waist height. A stand that is too low makes you bend over. A stand that is too high creates shoulder strain.
A simple method is to stand naturally and measure from the floor to just below your elbow. That is a good starting point. You can adjust from there based on your saw base and your own comfort.
Wing length should match your longest common cuts
Do not guess here. Measure the longest boards you cut most often. If you work with trim, a smaller support wing may be enough. If you cut shelving or framing lumber, longer wings help a lot.
A useful non-obvious insight: wings should not just be long. They should also be level with the saw table. Even a small height difference can drag the wood as it moves through the cut.
Depth should fit your shop, not your dreams
A deep stand can provide storage, but it can also take over your workspace. If your shop is narrow, a shallow cabinet with smart storage is often better than a bulky base. Measure the path you walk around the stand, not just the wall space it occupies.
Easy build ideas that work well for most workshops
There are many ways to build a miter saw station, but some designs are much easier than others. These options are popular because they balance cost, strength, and simple construction.
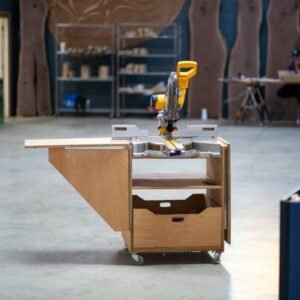
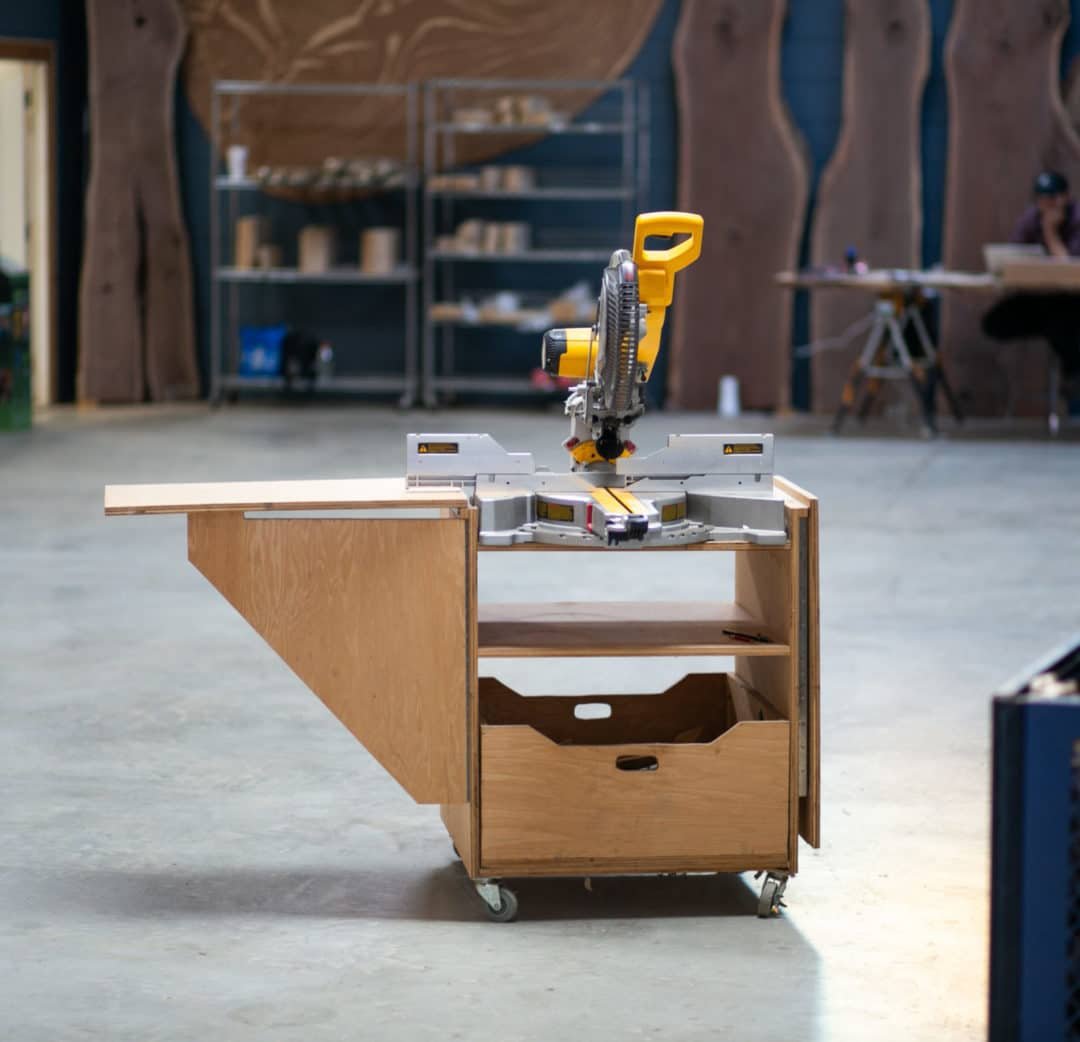
Basic plywood cabinet stand
This is one of the cleanest and most practical builds. The saw sits on a solid plywood cabinet. Side wings support long pieces. The cabinet can include shelves for blades, clamps, and measuring tools.
Why this build works:
- It stays stable.
- It gives you storage.
- It is easy to modify later.
- It looks neat in a garage shop.
This is a strong choice if you want one of the most reliable diy miter saw stand plans for a permanent workshop setup.
2×4 frame with plywood top
This is the simplest budget option. A 2×4 frame carries the weight, while a plywood top gives a flat saw surface. You can add side extensions later or build drawers underneath.
This design is good if you want fast results and low cost. It is also easy to fix if something gets damaged. The main risk is flex, so add cross braces and do not skip the center support.
Mobile stand with locking casters
If your shop does many jobs, mobility matters. A caster-based stand lets you move the saw out of the way when needed. It is best to use heavy-duty locking casters and add a way to level the stand once it is in place.
One detail many builders miss is caster height. Casters raise the stand, which can make the saw too tall. Plan for that before you cut the legs.
Fold-down wall-mounted setup
This is a smart option for a very small space. The saw platform folds up when not in use. It saves floor space, but it takes careful planning. Wall strength is important, and the hinge system must hold the weight without sagging.
This style is best for light to medium use, not heavy daily production. It is great if you need your workshop area to stay open for other work.
Tools that make the project easier
You do not need a huge shop to build a solid stand, but a few tools make the job much smoother.
- Measuring tape
- Speed square or combination square
- Circular saw or table saw
- Drill and driver
- Clamps
- Level
- Sander or sanding block
- Optional pocket-hole jig
If you do not have a table saw, you can still complete the project with a circular saw and a straight edge. Accuracy matters, but the tool does not need to be fancy. Careful measuring and square cuts are more important than expensive equipment.
How to build a simple and strong stand
The exact steps depend on your design, but the process below works for many beginner-friendly stands. It keeps the build simple without making the final result weak.
- Measure your saw base. Write down the full width, depth, and mounting points.
- Set your working height. Decide how tall the final stand should be, including the saw.
- Cut the frame parts. Make sure all main pieces are the same length where needed.
- Build the base first. Assemble the bottom frame and check for square.
- Add legs or side panels. Keep the structure plumb and level.
- Install braces. Do not skip diagonal or horizontal support.
- Build the saw platform. Use flat material and fasten it securely.
- Add wings or extensions. Make them level with the saw table.
- Mount the saw. Secure it according to the manufacturer’s instructions.
- Test with scrap wood. Check support, height, and cutting comfort.
As you build, dry-fit parts before final fastening. This is one of the simplest ways to avoid mistakes. A piece that seems correct on the bench may sit differently once you screw it in place.
Also, test the stand before adding storage or trim. Some builders decorate first and fix structure later. That usually leads to frustration. Structure comes first. Finish work comes second.
Credit: wilkerdos.com
Small details that make a big difference
These details do not sound exciting, but they matter a lot in daily use. They are often the difference between a decent stand and a great one.
Use adjustable support stops
If you cut different material sizes, adjustable stops save time. You can repeat cuts without measuring each piece again. Even a simple stop block system can make your workflow much faster.
Add dust control early
Miter saws create a lot of dust. If possible, leave room for a vacuum hose or dust port connection. It is much easier to plan this during the build than to add it later.
For safe dust and tool guidance, one useful reference is the WOOD Magazine workshop resource, which offers practical shop tips and tool setup ideas.
Think about clamp space
Some stands look strong but leave no room to clamp workpieces. That causes problems when you need extra support. Make sure the wings and side areas give you room to hold material safely.
Do not ignore access to the saw
You still need to remove blades, clean dust, and check adjustments. If the saw is boxed in too tightly, maintenance becomes annoying. Leave enough space for normal service work.
Common mistakes to avoid
Most stand problems are easy to prevent. The biggest mistakes usually happen before the first screw goes in.
- Building too tall or too short. Bad height causes fatigue fast.
- Skipping bracing. A frame that feels fine at first may shift under load.
- Using thin tops. Thin material can sag and throw off alignment.
- Forgetting wing alignment. Uneven wings make long cuts harder.
- Choosing weak casters. Cheap wheels can wobble and reduce stability.
- Not checking saw clearance. The blade and sliding parts need room to move safely.
One less obvious mistake is building around the stand instead of around your cutting habits. A beautiful station is not useful if it does not match the type of work you do most often. Start with your real projects, not your dream shop photo.
How to keep the build affordable without making it weak
Cheap does not have to mean flimsy. The key is spending money where it matters and saving money where it does not.
- Use plywood only where flatness and strength matter most.
- Use 2x4s for hidden frame parts if the design allows it.
- Buy quality fasteners instead of decorative extras.
- Skip complex drawer slides unless you truly need them.
- Reuse hardware from old furniture or shop projects when possible.
A smart budget build often looks simple on the outside but performs very well. You do not need premium finishes to get a strong, accurate saw station. You need careful layout, decent materials, and solid assembly.

Credit: shop.pineandpoplar.com
Why custom plans often beat store-bought stands
Store-bought stands can be useful, but they are built for general use. That means they may not fit your saw, your room, or your workflow very well. Custom plans let you solve your own problems.
With your own build, you can:
- Match the height to your body.
- Set the exact length of the wings.
- Add storage where you actually want it.
- Build around the floor space you already have.
- Choose materials that fit your budget.
This is why diy miter saw stand plans are so popular. They let you create a better fit instead of paying for features you may never use.
Final thoughts before you start cutting
A good miter saw stand does not need to be complex. It needs to be stable, level, comfortable, and matched to your work. If you plan well before building, even a simple design can feel professional and make your shop much easier to use.
Start with your space, your saw, and the type of projects you cut most often. Then choose the simplest design that solves those needs. That approach usually gives the best result, especially for beginners. Good diy miter saw stand plans are not about adding more parts. They are about building the right stand for the way you work.
FAQs
1. What is the best material for a DIY miter saw stand?
For most people, 3/4-inch plywood is the best choice for the main platform and cabinet parts. It stays flat and feels strong. For the frame, 2×4 lumber is also a good low-cost option if you add enough bracing.
2. How tall should a miter saw stand be?
A good starting point is a height close to your waist or just below your elbow when you stand naturally. The best height depends on your body, your saw model, and how often you cut large boards.
3. Do I need wings on both sides of the saw?
Yes, in most cases. Wings on both sides help support long boards and keep cuts level. If you only build one side extension, you may still struggle with long material.
4. Can I make a miter saw stand without advanced woodworking tools?
Yes. Many simple stands can be built with a circular saw, drill, square, clamps, and a tape measure. Careful measuring matters more than having expensive tools.
5. Should I bolt my saw to the stand?
Yes, if possible. Bolting the saw keeps it from moving during use and improves safety. Always follow the saw maker’s mounting guidance and make sure the base is secure before cutting.
