A clean pegboard can change how you work. You spend less time looking for tools, make fewer mistakes, and finish jobs faster. That is why learning how to organize tools on pegboard is one of the simplest ways to improve any garage, workshop, or repair space.
The best pegboard setup is not just about hanging tools on empty hooks. It is about arranging items in a way that matches how you actually work. The right layout saves steps, protects tools, and makes missing items easy to spot. It also helps you keep the space neat without much effort.
If your board feels crowded, random, or hard to use, do not worry. With a few smart choices, you can turn it into a fast, efficient tool station that feels natural every day.
Start with a clear plan for your work zone
Before hanging anything, look at the full space around the pegboard. A good layout starts with understanding how you move in the room. Ask yourself which tools you use most often, where you stand while working, and what tasks happen near the board.
Place the most-used tools within easy arm reach. Less common tools can go higher, lower, or farther to the side. This simple rule saves time right away. It also prevents the board from becoming a wall of random objects.
Think in terms of work zones, not just storage. For example, if you often do repair work, keep screwdrivers, pliers, tape, and a utility knife together. If you do woodworking, group measuring tools, clamps, pencils, and square tools nearby. When tools are stored by task, your hands move less and your work gets smoother.
Choose the right pegboard size and style
Not all pegboards work the same way. Some are metal, some are hardboard, and some are plastic. The best choice depends on weight, budget, and how long you want it to last.
For heavier tools, metal pegboard is usually stronger and more durable. For lighter hand tools, hardboard can work well if it is mounted properly. Plastic panels are useful in some spaces, but always check load limits before hanging heavy items.
Size matters too. A board that is too small will fill up fast and become messy. A board that is too large may leave too much unused space. Choose enough space for your current tools and some future growth. That gives you room to stay organized over time.
Use the right hooks and holders
Good organization depends on more than the board itself. Hooks, bins, brackets, and holders make a huge difference. The wrong hardware can cause tools to fall, tilt, or get trapped behind each other.
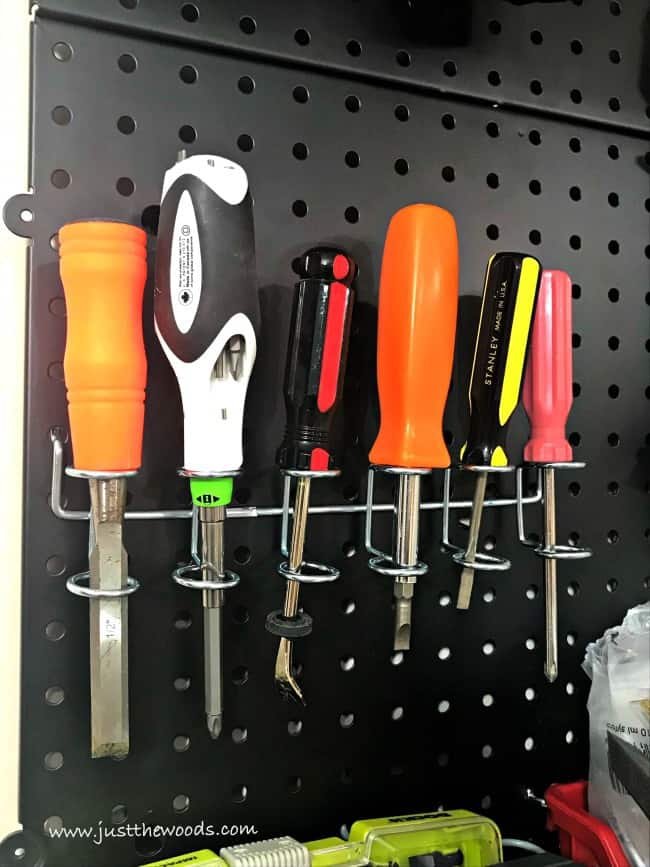
Use short hooks for small and light items. Use longer hooks for larger tools or items with handles. For pliers, wrenches, and screwdrivers, shape-specific holders often work better than basic hooks. Bins are useful for small parts like screws, bits, and nails.
One mistake many beginners make is using only one type of hook for everything. That often creates clutter and wasted space. A mix of holders gives each tool a proper home and keeps the board easier to scan.
Sort tools by type and frequency of use
The fastest way to improve a pegboard is to group tools in a smart order. Start with the tools you use daily. These should be in the most visible and easiest-to-reach spots. Then place weekly-use tools around them. Rarely used tools can go to the edges or a separate board.
This method makes your setup more practical than a simple “same tool with same tool” system. A board organized by use helps you work faster because the tools you need most are always close.
Here is a simple way to think about it:
- Daily tools: screwdriver set, pliers, utility knife, measuring tape, hammer
- Weekly tools: adjustable wrench, wire cutters, level, Allen keys
- Occasional tools: specialty bits, clamp tools, spare blades, larger hand tools
That said, frequency is not the only factor. Grouping by task often works even better. For example, a small electrical repair area might include wire strippers, a tester, cutters, and tape all together. That setup is more useful than placing them alphabetically or by size.
Keep similar shapes together, but not too tightly packed
Tools with similar shapes can look neat when grouped together. Wrenches together. Screwdrivers together. Pliers together. But do not pack them so tightly that one tool hides another.
Leave enough space between tools so you can remove one without disturbing the others. This small detail helps prevent the board from becoming messy again. It also makes missing tools easier to notice.
A crowded pegboard may look full and efficient at first, but it often slows you down. If you need to move three things to get one tool, the layout is not efficient enough.
Build the layout around your most common tasks
The smartest answer to how to organize tools on pegboard is to organize around workflow. Think about the jobs you do most often. Then build the board to support those jobs.
For example, if you often hang items, keep measuring tools, a level, pencil, tape, and fasteners together. If you often do repairs, group screwdrivers, pliers, a flashlight, and small parts nearby. If you work with wood, place rulers, squares, clamps, and marking tools close together.
This is one of the most useful ideas beginners miss: a pegboard is not just a storage wall. It is a work system. When the board matches your workflow, every job becomes easier.
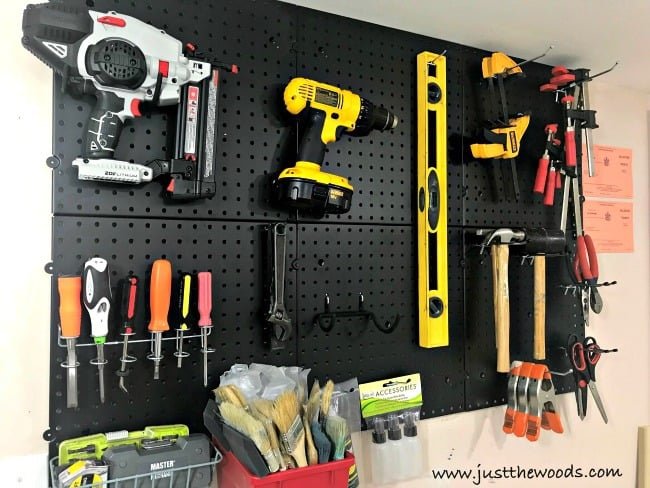
Credit: justthewoods.com
Put the most useful tools at eye level
Eye level is prime space. Put the tools you use most often there, because they are easiest to see and reach. This also helps you spot missing tools quickly.
Heavy items should not sit too high if they are awkward to remove. A hand tool that feels easy on the way up may feel annoying on the way down. Keep weight and comfort in mind when placing items.
Try to reserve the top rows for lighter items, occasional-use tools, or small bins. Keep the lower rows for slightly larger tools or items that are safe to handle from below.
Use outlines for visual control
One of the best methods for a clean pegboard is to trace tool outlines on the board. You can use paint markers, labels, or cut shapes from adhesive material. This makes it very easy to see where each tool belongs.
Outlines are especially helpful in shared spaces. Anyone can return tools to the right place without guessing. They also make it obvious when something is missing.
This is a simple trick, but it adds a lot of control. It reduces wasted time and helps the board stay organized for longer.
Make the board easy to scan in seconds
A good pegboard should be easy to read from a few steps away. If your eyes have to search too much, the layout needs work. Use spacing, grouping, and labels to create a board that looks clean at a glance.
One helpful habit is to keep each group inside a clear visual section. For example, set one area for cutting tools, another for fastening tools, and another for measuring tools. This keeps the board from feeling random.
Color can also help. Some people use color-coded bins or hooks to separate task groups. Others use labels with large, simple words. Either method can work if it helps you find and return tools fast.
| Tool group | Best placement | Why it works |
|---|---|---|
| Daily hand tools | Center, eye level | Fast access and easy visibility |
| Small parts | Side bins or small shelves | Keeps loose items from scattering |
| Heavy tools | Lower section | Safer and easier to lift |
| Rarely used items | Outer edges or upper rows | Frees prime space for daily tools |
Avoid the hidden clutter problem
Many pegboards look neat on the outside but hide clutter in the details. A hook may be holding too many items. A bin may be overloaded. A tool may be hanging behind another tool and getting forgotten.
To avoid this, check the board from time to time and remove anything that is not earning its place. If a tool has not been used in months, move it. If a bin keeps overflowing, empty or divide it. A pegboard works best when each spot has a clear job.
This is another important point many people miss: organization is not a one-time project. It is a small system you keep improving.
Use labels, shadows, and simple categories
Labels are useful even in a small workshop. They remove guesswork and help other people return tools correctly. You do not need fancy labels. Simple printed words or handwritten tags are enough if they are clear.
Shadow markings are even better for certain tools. A basic outline tells you exactly where each item belongs. This works very well for kits or shared walls. It also helps you notice when a tool is missing at a glance.
If you want a system that stays neat over time, keep categories simple. Too many categories make the board confusing. A few broad groups are easier to maintain.
- Measuring: tape, ruler, level, square
- Cutting: knife, snips, cutters, saw-related hand tools
- Fastening: screwdrivers, drivers, bits, small wrench tools
- Gripping: pliers, clamps, vise-grip style tools
- Storage: screws, nails, washers, bits, small parts
Keep small parts under control
Small parts are often the biggest source of mess. Screws, anchors, blades, and washers can spill or disappear easily. Use small bins, cups, or shallow shelves so these items stay contained.
If possible, keep small parts near the tools that use them. For example, keep drill bits near the drill area. Keep fasteners near the measuring and hanging tools. This saves steps and reduces mistakes.
A very useful habit is to store only what you need right now on the pegboard. Bulk stock can stay elsewhere. That keeps the board lighter and cleaner.
Think about safety and weight
It is easy to focus only on convenience, but safety matters too. Heavy tools should be hung with strong hardware and proper spacing. Weak hooks or poor mounting can lead to falling tools and damage.
Make sure the pegboard is mounted securely into studs or with proper anchors, especially if you store heavier items. Also check the hook fit. Loose hooks can slip more easily than most people expect.
Do not place sharp tools where they can poke hands or catch sleeves. If you store blades or pointed tools on the board, use covers or separate holders. This makes the space safer for everyone.
For more guidance on safe workshop storage and organization, the OSHA website is a helpful authority on workplace safety practices.
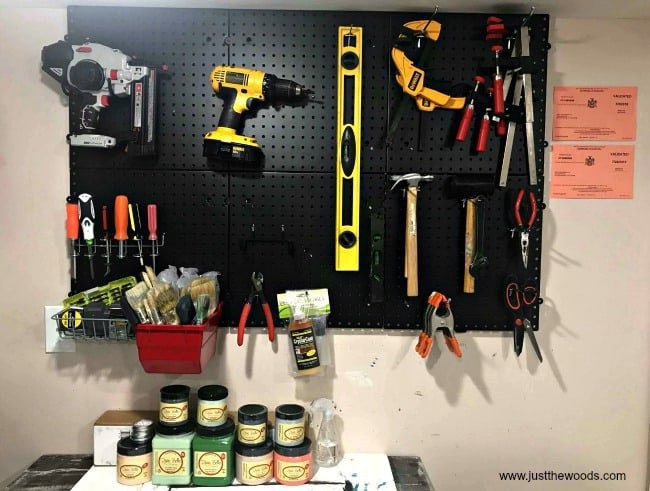
Credit: justthewoods.com
Balance access with security
Some tools should be easy to grab. Others should be harder to remove. That may sound unusual, but it helps with control. For example, valuable or dangerous tools may be better placed higher up or stored in a locked cabinet when not in use.
This balance is especially important in shared spaces, family garages, or busy shops. Easy access should not mean careless storage.
Design for real daily habits, not perfect ideas
Many pegboards fail because they are built for how people think they should work, not how they really work. A board may look perfect on day one, but if the layout does not match daily habits, it will slowly become messy.
Watch your own behavior for a few days. Notice which tools you grab in sequence. Notice which items you keep setting down in the same places. Then adjust the board to support those patterns.
This is one of the biggest hidden advantages of a pegboard. It can adapt as your habits change. You are not stuck with a fixed cabinet layout. You can move hooks, test new zones, and improve over time.
Leave room for change
Do not fill every inch of the board on day one. Leave some open space. That extra room is useful for new tools, temporary projects, or seasonal items.
If every peg hole is already used, the board becomes hard to update. A little free space makes the system flexible and much easier to maintain.
That flexibility is important because tool collections grow. Your pegboard should be ready for that growth, not overwhelmed by it.
A simple way to set up the board from scratch
If you want a quick method, use this approach. It works well for most garages and workshops and keeps the process simple.
- Remove everything from the pegboard.
- Sort tools into groups by task or type.
- Place daily-use tools in the center at eye level.
- Add hooks, holders, and bins for each group.
- Leave space between tools so each one is easy to remove.
- Label bins and sections if needed.
- Test the layout for a few days and move items that feel awkward.
This process may look basic, but it works because it forces you to think before hanging tools. That small pause usually creates a much better setup than simply filling the board at random.
Common mistakes to avoid
Even a good pegboard can fail if a few common mistakes are made. The biggest one is overcrowding. If the board is packed too tightly, it becomes slow and frustrating to use.
Another mistake is storing tools only by size. Size alone does not tell you how often a tool is used or what job it supports. A better system considers both use and function.
People also forget to update the board. Tool needs change. New projects bring new tools. If the pegboard stays frozen, it slowly loses value.
- Do not hang too many tools on one hook
- Do not place heavy items on weak mounting points
- Do not mix small parts with large tools in the same area
- Do not leave broken or unused items on the board
Keep the system working over time
A pegboard is most useful when it stays easy to use. That means a little maintenance matters. Once a week or once a month, take a quick look at the layout. Return misplaced tools, empty overloaded bins, and move items that no longer fit your workflow.
If several people use the same space, make the system even simpler. Use clear groupings, obvious labels, and strong visual cues. The less people have to think, the more likely they are to keep the board tidy.
When you know how to organize tools on pegboard the right way, the board stops being just storage. It becomes a daily helper. It saves time, reduces stress, and makes your space feel more professional.
The best setups are not the fanciest ones. They are the ones that match the work, stay easy to read, and can change as your needs change.
Credit: justthewoods.com
FAQs
1. What tools should go on a pegboard first?
Start with the tools you use most often, such as screwdrivers, pliers, a hammer, measuring tape, and a utility knife. These should go in the easiest-to-reach spot, usually around eye level.
2. How do I keep tools from falling off the pegboard?
Use the right hook size for each tool, avoid overloading one hook, and choose strong mounting hardware. For heavier items, use holders made for that tool instead of basic hooks.
3. Should I organize tools by size or by type?
Type is usually better than size. Grouping by function or task makes tools faster to find and use. Size can help inside each group, but it should not be the main rule.
4. Is a pegboard good for heavy tools?
Yes, but only if the board and mounting system are strong enough. Metal pegboards and secure wall anchors are better for heavier tools. Always check the load limit before hanging anything heavy.
5. How often should I reorganize my pegboard?
Check it often enough to keep it useful. A quick review once a month is a good start. Reorganize sooner if your tools change, your work changes, or the board starts feeling crowded.
