A messy tool cabinet wastes more time than most people realize. You open one drawer, move three tools, and still cannot find the wrench you need. Then the job slows down, stress goes up, and small tasks take far longer than they should. That is why learning how to organize a tool cabinet is not just about neatness. It is about speed, safety, and working with less frustration.
A good system helps you find tools fast, keep them in good condition, and notice missing items at once. It also saves money because you stop buying duplicates. The best part is that you do not need a large workshop or expensive storage products to make this work. You only need a clear plan and a simple method that fits the way you actually use your tools.
In this guide, you will learn a practical way to sort, store, and maintain your tools so your cabinet works for you every day. You will also see common mistakes people make, smart setup ideas, and a few small details that can make a big difference.
Start by understanding how you use your tools
Before you move anything, look at your habits. This is the step many people skip, and it is one of the biggest reasons tool cabinets stay disorganized. A cabinet should match your workflow, not someone else’s idea of a perfect setup.
Ask yourself a few simple questions:
- Which tools do you use every week?
- Which tools stay untouched for months?
- Do you work on one type of project, or many different ones?
- Do you usually grab tools quickly, or do you plan jobs in advance?
If you use certain tools often, they should sit in the easiest-to-reach space. Less-used tools can go lower, higher, or deeper in the cabinet. This sounds basic, but it creates a system that saves time every single day.
Non-obvious insight: many people organize tools by type only, such as keeping all pliers together and all screwdrivers together. That can work, but it is not always the fastest method. If you often do specific jobs, it may be better to group tools by task. For example, a drawer for electrical work, a drawer for plumbing, or a drawer for fast repairs can be more useful than a strict tool-type layout.
Empty the cabinet and sort every tool
The best way to begin is to take everything out. Yes, everything. A half-clean cabinet usually becomes messy again because hidden clutter stays in the back. When the cabinet is empty, you can make better choices.
Place your tools into simple groups:
- Hand tools
- Measuring tools
- Cutting tools
- Fasteners and small parts
- Power tool accessories
- Repair or specialty tools
Now check each item. Keep tools that still work well. Set aside broken tools, duplicated tools, and items you never use. This is a good time to be honest. If you own three tape measures and only trust one, keep the best one in the cabinet and store the others elsewhere or give them away.
Non-obvious insight: do not keep a tool just because it was expensive. A costly tool that sits unused is still taking up valuable space. In a tool cabinet, space is a real resource. Treat it that way.
Choose a layout based on access, not just category
Once your tools are sorted, think about placement. A tool cabinet becomes efficient when the most useful items are easiest to grab.
A simple rule works well:
- Top drawer: daily-use tools and small items you need fast
- Middle drawers: tools used often but not every day
- Lower drawers: heavier tools and less-used items
- Side spaces or deep sections: specialty tools and backup items
This setup is practical because your body naturally prefers easy reach for fast tasks and stable storage for heavy items. Heavy tools should not sit high where they can fall. Small parts should not hide in a deep drawer where they disappear.
You should also think about how often you work standing in front of the cabinet. If you usually open the same drawer several times during a job, place that drawer between waist and chest height if possible. That is the zone that feels most comfortable for repeated access.
Use the “grab in five seconds” test
Here is a helpful way to judge your layout. Pick any tool you use often and ask whether you can find and grab it in five seconds or less. If not, the drawer needs adjustment. This test forces you to organize for real work instead of for appearance.
If a tool fails the test, move it closer to the front, place it in a better drawer, or reduce clutter around it. Small changes can make the whole cabinet faster to use.
Use drawer space wisely
Tool drawers are often wasted because people pile tools on top of each other. That looks neat for a short time, but it becomes frustrating later. Good drawer use is about visibility and separation.
There are several simple ways to improve drawer storage:
- Use foam inserts or drawer liners to keep tools from sliding
- Place tools in shallow trays so they stay visible
- Use small containers for screws, bits, and connectors
- Keep tool sets together so pieces do not get separated
Shallow storage is better than deep stacking for most hand tools. When tools lie flat and visible, you can spot what you need faster. Deep piles may hold more items, but they slow you down every time you search.
A useful idea is to create “zones” inside each drawer. For example, one side can hold drivers, the middle can hold pliers, and the other side can hold cutters. This prevents tools from drifting over time.
If you want a strong setup for long-term use, one reliable reference for hand tool care and storage is the American Society of Health and Safety Professionals tool safety guidance. Good storage is not just about order; it also helps reduce damage and accidents.
Credit: toolguyd.com
Make labels do the hard work
Labels may seem simple, but they can transform a cabinet. A label tells you where things belong, which is useful not only for you but also for anyone else who uses the cabinet.
Good labels should be clear, short, and easy to read. For example:
- Socket sets
- Allen keys
- Measuring tools
- Electrical tools
- Pipe repair
You can label drawers, trays, bins, and even shelf edges. If your cabinet has many small items, labels stop everything from becoming one mixed pile. They also make cleanup faster after a project because every tool has a home.
Non-obvious insight: labels work best when they match the way you think, not only the technical name of the tool. If you always call a tool “driver bits” instead of “screw bits,” use the term you naturally say. The easier a label feels, the more likely you are to use it correctly.
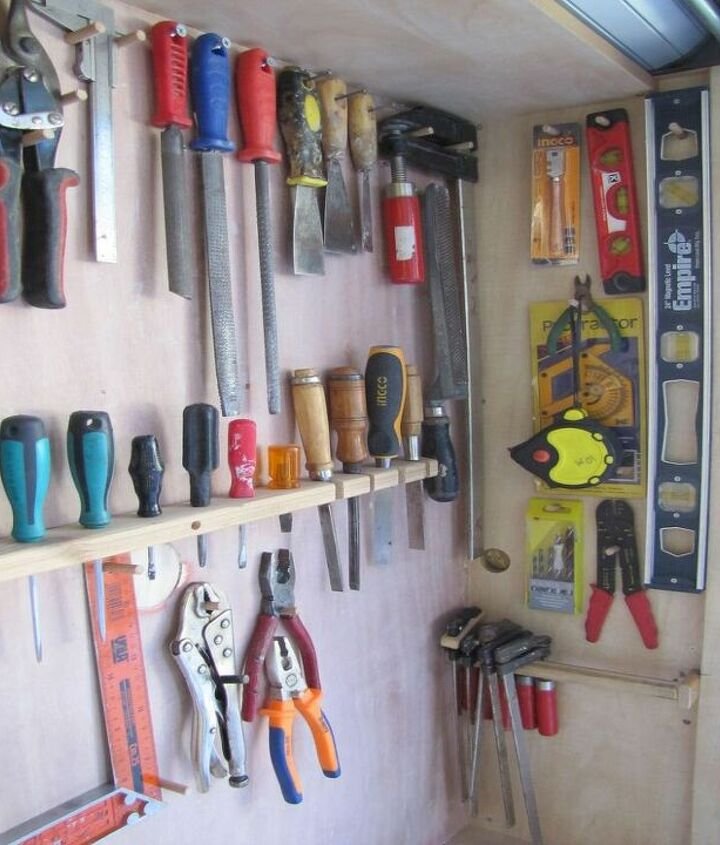
Keep frequently used tools in the best position
Some tools should be almost impossible to miss. These are the items you reach for all the time, such as screwdrivers, pliers, tape measures, utility knives, and a few key sockets or wrenches.
Keep these items:
- Near the front of the drawer
- In the easiest open space
- Grouped in a way that matches your hand movement
- Away from heavy or awkward items that block access
When a tool is used every day, even a small delay adds up. Moving the tool closer to where your hand naturally goes can save time over the course of a week, month, or year.
You can also place frequently used tools in the same physical order you use them in a job. For example, if you usually measure, mark, cut, and fasten, place those tools in that order. This reduces back-and-forth movement and makes the cabinet feel more natural.
Store rare or specialty tools without letting them take over
Not every tool deserves prime space. Specialty tools are important, but they should not crowd out your daily items. The goal is simple: keep them safe, visible enough to find, and out of the way until needed.
Good places for less-used tools include:
- Lower drawers
- Back sections of deeper drawers
- Small bins with labels
- Dedicated storage cases inside the cabinet
It helps to review these items from time to time. If a specialty tool has not been used in over a year, consider whether it still belongs in the cabinet. Some tools are worth keeping, but others are better stored elsewhere until needed.
Protect delicate tools from damage
Precision tools, measuring tools, and sharp tools need extra care. Do not let them rattle around with heavy gear. Use inserts, pouches, or separate compartments so they stay in good shape.
This matters more than many people think. A bent ruler, dull blade, or damaged caliper can cause bad measurements or unsafe work. Good organization helps protect the tool and the work that depends on it.
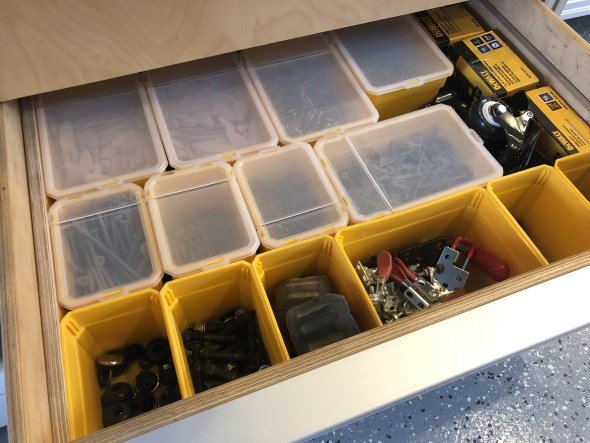
Control small parts before they control you
Nuts, bolts, screws, washers, anchors, and bits can make a cabinet feel messy very fast. These small items are easy to lose and hard to track if they are mixed together.
The best approach is to store them in small, clear containers or divided boxes. Keep like items together, and label them clearly. If you use many fasteners, separate them by size and type.
A simple structure could look like this:
- Screws by length
- Bolts by diameter
- Washers in one compartment
- Nails in another container
- Electrical connectors in a separate box
Clear containers help you see what you have at a glance. That saves time and reduces duplicate buying. It also helps when you are working on a job and need the right part quickly.
Non-obvious insight: keep a “restock” container for small parts that run low often. When you open the last pack of screws or bits, place it in a restock area so you remember to buy more before it becomes a problem.
Build a system that stays organized after busy days
A cabinet is easy to organize once. The real challenge is keeping it organized after use. This is where many good setups fail. The answer is not perfection. It is a simple return habit.
Every tool should have a home. If you borrow one for a task, bring it back before you move on. That one habit does more for long-term order than any storage product.
To make this easier:
- Leave space beside each tool so it is easy to return
- Avoid overfilling drawers
- Use clear visual outlines if helpful
- Make cleanup part of the job finish
If you work under time pressure, use a quick reset at the end of the day. Put tools back in the correct drawer, close containers, and remove junk like broken bits, wrappers, and loose debris. A five-minute reset can prevent a one-hour mess later.
Credit: hometalk.com
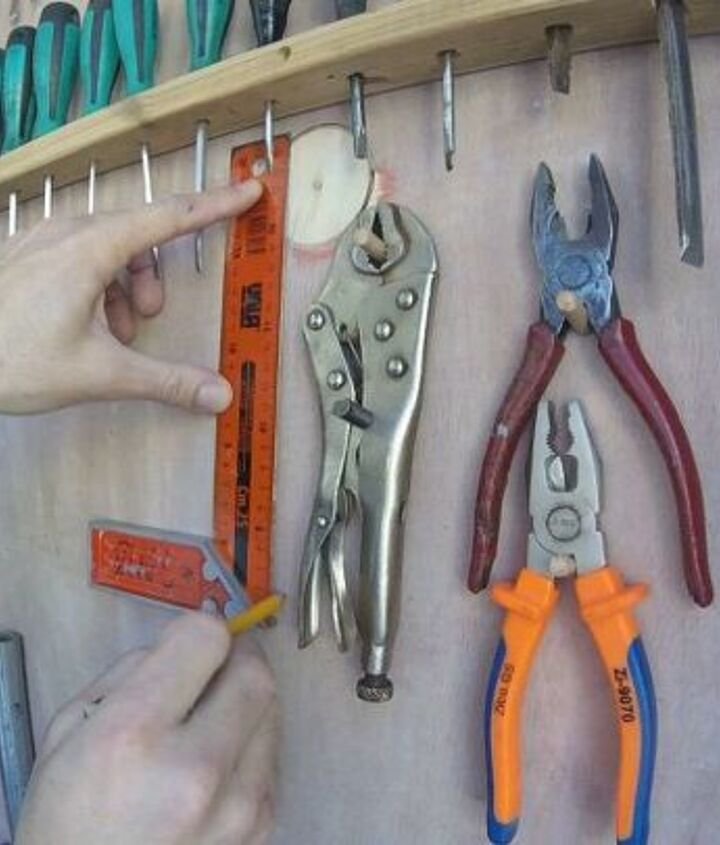
Use a simple visual system for faster access
Visual organization is one of the smartest ways to improve a tool cabinet. If you can see where a tool belongs, you do not need to think as much. That matters when you are busy or tired.
You can create visual order with:
- Foam cutouts
- Shadow outlines
- Color-coded bins
- Clear drawer dividers
Foam cutouts are especially useful if you want fast checks. When a tool is removed, the empty space shows it is missing. This is helpful in shared garages or work areas where tools can get misplaced.
Color coding also helps. For example, blue bins for electrical items and red bins for cutting tools can make the cabinet easier to read. This is especially useful if more than one person uses the same storage space.
Think about weight and safety as part of organization
Efficiency is important, but safety should never be ignored. Heavy tools should not sit in unstable places. Sharp tools should be stored so they cannot cut hands when you reach inside. Chemical products should stay separate from hand tools if they are kept in the same cabinet.
A few safety rules are worth following:
- Keep heavy items low
- Store sharp tools with covers when possible
- Do not overload drawers
- Keep oily or dirty tools from touching clean items
Drawer slides and hinges also matter. If a drawer is hard to open or too heavy, the cabinet is not efficient. A well-organized cabinet should feel smooth, balanced, and safe to use.
Review the cabinet regularly
Even a good system needs small updates. Tools change, projects change, and habits change. What worked last year may not fit your current needs.
Set a regular review time, such as once a month or once every few months. During the review, check for:
- Tools that belong in a different drawer
- Broken items that should be removed
- Empty containers that need refilling
- Tools that were borrowed and not returned
- Spaces that are too crowded
This review does not need to take long. Ten to fifteen minutes can be enough if you stay consistent. The goal is to stop small problems before they grow into a full mess.
A simple cabinet layout example
If you want a practical starting point, use this kind of setup and adjust it to your tools:
| Area | Best use | Why it works |
|---|---|---|
| Top drawer | Daily-use hand tools | Fast access for common tasks |
| Second drawer | Screwdrivers, pliers, cutters | Easy to see and reach |
| Middle drawer | Measuring and marking tools | Kept safe but still close |
| Lower drawer | Heavy tools and power tool accessories | Better support for weight |
| Side bin or small box | Fasteners and small parts | Prevents loose clutter |
This is only a starting point. The best cabinet layout is the one that fits your real work, your cabinet size, and your tool set. Still, a simple layout like this helps most people get organized quickly.
Common mistakes to avoid
When people try to figure out how to organize a tool cabinet, they often make the same few mistakes. Avoiding them can save a lot of time.
- Overstuffing drawers: crowded drawers make tools hard to find and hard to return
- Mixing small parts: loose screws and bits quickly create chaos
- Placing heavy tools too high: this can be unsafe and awkward
- Organizing only once: without upkeep, any system breaks down
- Making the system too complex: if it takes too much effort, you will not keep it up
The smartest system is not the most detailed one. It is the one you can keep using when you are tired, in a hurry, or doing messy work.
Credit: hometalk.com
Final habits that keep your cabinet efficient
Once your cabinet is in good shape, a few habits will keep it that way. Return tools to their place after each job. Do a fast check for missing items before closing the cabinet. Keep only the tools you actually use. And make small updates when your work changes.
That is the real answer to how to organize a tool cabinet. It is not about making it look perfect for one day. It is about creating a system that saves time, lowers stress, and makes every job easier to start and finish.
When your cabinet is organized well, you spend less time searching and more time working. You protect your tools, reduce clutter, and make your workspace feel more controlled. That is a small change with a big payoff.
FAQs
1. What is the best way to start organizing a tool cabinet?
Start by emptying the cabinet completely. Sort every tool into groups, remove broken or unused items, and then build a layout based on how often you use each tool.
2. Should I organize tools by type or by project?
Both can work, but project-based storage is often faster for daily use. If you do the same tasks often, group tools by job. If your work is more general, tool type may be simpler.
3. How do I keep small parts from making the cabinet messy?
Use clear containers, divided boxes, or small bins. Keep screws, bolts, washers, and bits separated so they do not mix together.
4. What tools should go in the easiest-to-reach drawer?
Put the tools you use most often in the easiest drawer to reach. This usually includes screwdrivers, pliers, tape measures, utility knives, and common sockets or wrenches.
5. How often should I clean and reset my tool cabinet?
A quick reset after each job is best. Then do a deeper review every few weeks or once a month, depending on how often you use the cabinet.
