If your drain is slow, clogged, or completely blocked, a sewer jetter can do a job that a normal snake often cannot. The good news is that you do not always need to buy a full professional jetter machine. In many cases, you can turn an existing pressure washer into a useful sewer jetter with the right hose, nozzle, and safety setup.
This guide explains how to convert pressure washer into sewer jetter the right way. You will learn what parts you need, how to connect them, what pressure levels are safe, and how to use the setup without damaging pipes. I will also point out common mistakes people make when they try this for the first time.
Done correctly, this conversion can save money and give you a strong drain-cleaning tool for home lines, floor drains, and other stubborn blockages. Done badly, it can create leaks, poor cleaning power, or even pipe damage. So let’s keep it simple, practical, and safe.
What a sewer jetter actually does
A sewer jetter uses high-pressure water to clean the inside of pipes. Instead of pushing a clog forward like a drain snake, it sprays water backward and forward to break up grease, sludge, hair, and soft buildup. The hose is pushed through the pipe by the force of the water jets.
This is useful because many clogs are not hard objects. They are layers of soap, grease, food waste, mud, or scale stuck to the pipe wall. A jetter clears the pipe more completely than many other tools. That is why people often want to know how to convert pressure washer into sewer jetter instead of buying a separate machine.
Still, a jetter is not magic. It works best on buildup, soft blockages, and routine maintenance. If the pipe is collapsed, badly damaged, or blocked by a solid object, the right fix may be a repair, not more water pressure.
What you need before you start
The pressure washer itself is only one part of the setup. A sewer jetter conversion depends on matching the hose, nozzle, fittings, and pressure range correctly. Cheap parts can work for light use, but they should still be rated for the pressure and flow of your machine.
Here are the main items you need:
- Pressure washer with enough PSI and GPM for drain cleaning
- Sewer jetter hose rated for your washer’s pressure
- Jetting nozzle designed for pipe cleaning
- Correct adapter fittings for your pressure washer outlet
- Trigger gun or valve for control
- Safety gear like gloves, eye protection, and waterproof boots
- Drain access point such as a cleanout or accessible pipe opening
For a reliable reference on drain cleaning safety and sewer maintenance, this EPA resource can be helpful when you are dealing with wastewater and household drainage systems.
Pressure washer power: what matters most
Many beginners focus only on PSI, but flow rate matters just as much. PSI gives the cleaning force. GPM gives the volume of water that moves debris out of the pipe. A machine with high pressure but very low flow may cut through a little buildup, but it may not flush the line well.
As a practical rule, smaller machines can handle light drain cleaning, but they are not ideal for long sewer runs. A typical homeowner pressure washer may work for short lines, floor drains, or smaller household pipes if the hose and nozzle are correct. Larger blockages usually need more water volume.
Non-obvious insight: Many people assume higher PSI is always better. It is not. Too much pressure can damage old clay, weak PVC joints, or fragile fittings. Good jetting is about balanced pressure, flow, and the right nozzle pattern.
Choose the right pressure washer setup
Before you convert anything, check whether your pressure washer is a good candidate. Not every machine should be used for sewer jetting. Some electric units have enough pressure for small jobs, but they may lack the flow and durability for repeated drain work. Gas units usually offer more power and are often better suited for this task.
Look at your machine’s rating plate or manual. You want to know three things:
- PSI – how much pressure it produces
- GPM – how much water it delivers each minute
- Outlet connection type – what fittings you need
If you are working with older plumbing, be careful. A jetter can find weak spots fast. If water starts backing up in a strange way, or if the hose stops moving smoothly, stop and inspect the pipe. That is often a sign of a deeper problem.
Good use cases for a converted jetter
A converted pressure washer sewer jetter is best for:
- Kitchen drain grease buildup
- Bathroom drain sludge
- Outdoor drain lines with dirt and mud
- Short sewer laterals
- Preventive cleaning before a clog gets severe
It is less suitable for lines with tree roots, broken pipe sections, or long commercial sewer runs. In those cases, the tool may clear part of the blockage but not solve the root cause.
Parts you need for the conversion
The conversion is mainly about connecting the pressure washer to a jetter hose and nozzle that can survive the pressure. This is where many people make mistakes. They buy a hose that looks strong but is not actually rated for their machine, or they use random fittings that leak under load.
A simple and safe setup usually includes the following parts:
| Part | Why it matters | What to check |
|---|---|---|
| Jetter hose | Delivers water into the pipe | Pressure rating, length, flexibility |
| Rear-jet nozzle | Pushes the hose forward | Hole size, spray pattern, material |
| Front-jet nozzle | Breaks up debris ahead of the hose | Suitability for pipe size |
| Adapter fittings | Connects washer to hose | Thread type and seal quality |
| Inline valve or gun | Gives you control | Pressure rating and grip comfort |
Non-obvious insight: Hose flexibility is more important than many people think. A stiff hose can fight you in bends and trap debris around corners. A more flexible hose is easier to feed through household pipe curves and cleanouts.
Credit: pressurewasherlab.com
Step-by-step: how to convert pressure washer into sewer jetter
Now let’s go through the actual conversion. Keep the power off while connecting parts. Work slowly. Check every joint before turning the machine on.
1. Verify the pressure washer rating
Start by checking the PSI and GPM. Match those numbers to the hose and nozzle ratings. Never use a hose or nozzle with a lower pressure rating than your machine. If the numbers do not match, do not force the connection.
Also confirm the outlet size and thread type. Many washers use different connectors, and even a small mismatch can cause leaks. It is better to spend a few minutes checking than to have a fitting fail under pressure.
2. Attach the correct adapter
Connect the pressure washer outlet to the adapter that matches your hose. Use thread seal tape if the fitting requires it, but do not overwrap. Too much tape can make the fitting harder to seat correctly.
Hand-tighten first, then snug it with the proper tool if needed. Avoid over-tightening. That can crack plastic parts or distort the seal.
3. Connect the sewer jetter hose
Attach the rated sewer jetter hose to the adapter. Check that the connection is secure and aligned straight. A twisted hose near the outlet can wear faster and leak under vibration.
Lay the hose out on the ground before use. This reduces kinks and makes it easier to feed into the drain.
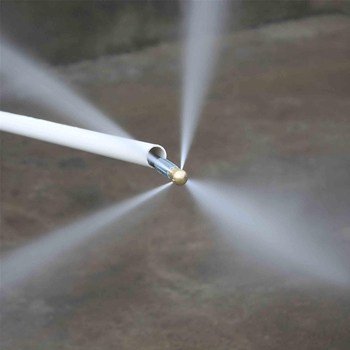
4. Install the jetter nozzle
Thread the nozzle onto the end of the hose. Most sewer jetter nozzles have rear-facing jets that pull the hose forward. Some also have a forward jet to help break through soft buildup in front of the nozzle.
For basic home use, a nozzle with rear jets and one small forward jet is often enough. The rear jets should be strong enough to move the hose, but not so aggressive that they whip around unpredictably in small pipe sections.
5. Test the system outside the drain
Before putting the hose into the pipe, run water briefly in a safe open area. This lets you check for leaks, weak fittings, or nozzle problems. If water sprays from a fitting, stop and fix it before moving on.
Keep your body away from the nozzle tip. Even a short test burst can surprise you if the hose moves suddenly.
6. Insert the hose into the cleanout
Find a cleanout or another suitable access point. Feed the hose in slowly. Do not jam it. Let the hose advance under water pressure as the nozzle starts working.
If you meet resistance right away, pull back and try again. The line may have a tight bend, a partial blockage, or a sharp edge inside the pipe. Forcing the hose can damage the line or the hose.
7. Start the washer at low control
Turn the pressure washer on and release water gradually. Once the nozzle starts moving, guide the hose gently. Do not hold the hose too tightly. It needs room to feed forward.
Use short bursts if needed. This is especially useful in older pipes or if you are not sure what kind of blockage is inside. Short bursts reduce the chance of sudden whip or splash-back.
8. Work the hose through the line
Move the hose forward until you feel it pass the blockage. Then pull it back slowly so the rear jets can wash the pipe walls. This back-and-forth motion helps remove grease and sludge instead of just punching a hole through the clog.
If water begins to flow well, continue cleaning a little farther down the line. Many clogs return because only the center of the pipe was cleared. A full pass gives a better result.
9. Flush the line after jetting
After the blockage is cleared, keep the water running for a short time to flush loosened debris out of the pipe. Then pull the hose back slowly while still spraying. This helps clean the entire run, not just the clogged spot.
When you finish, shut off the washer first and then remove the hose carefully. Drain the hose before storing it. A wet hose rolled up tightly can wear faster and may hold dirty water inside.
How to use the jetter safely
Safety matters more than speed here. A sewer jetter is a powerful water tool, and the spray can cut skin or throw debris back at you. The hose can also move sharply if pressure builds suddenly.
Use these basic safety habits every time:
- Wear eye protection
- Wear waterproof gloves
- Use boots with good grip
- Keep hands away from the nozzle
- Never aim the spray at yourself or another person
- Do not use damaged hoses or cracked fittings
- Stay alert for backflow or sudden pressure changes
Non-obvious insight: A blocked drain can release dirty water fast once the clog opens. That water may contain bacteria and sharp debris. The mess is not the main danger; the splash is. Keep your face and skin protected even if the job seems small.

Credit: craftedgarage.com
Common mistakes people make
Many first-time users blame the pressure washer when the real problem is the setup. These are the mistakes that show up most often.
Using the wrong hose rating
If the hose cannot handle the pressure, it will leak or fail. Always match the hose rating to the washer. Do not guess.
Choosing a nozzle that is too aggressive
A very aggressive nozzle can be too much for older pipes. It may also blast water past the clog without cleaning the wall buildup that caused the clog in the first place.
Skipping the cleanout check
If you do not know what kind of pipe access you have, you can waste time or damage fittings. Make sure you are entering through a proper access point whenever possible.
Pushing too hard
When the hose stops, many people force it. That usually makes things worse. Pull back, run water, and try to let the nozzle do the work.
Ignoring the condition of the pipe
A jetter is not the right tool for every pipe. Old, brittle, or broken lines need caution. If the pipe fails under normal water pressure, the problem was already there.
How to choose the right nozzle
Nozzles are not all the same. The nozzle pattern changes how the hose moves and how well the pipe gets cleaned. The right one depends on the pipe size and the type of blockage.
For home use, a balanced nozzle usually works best. You want enough rear thrust to move the hose through bends, but you also want enough cleaning force to clear the pipe wall. A tiny nozzle may move well but clean poorly. A very large nozzle may clean strongly but move too slowly.
If you only buy one nozzle, choose one made for standard household drain cleaning. Later, if you do more work, you can add specialty nozzles for grease, roots, or tight lines.
When a converted pressure washer is not enough
There are cases where converting a pressure washer into a sewer jetter is not the best answer. If you are dealing with tree roots, a collapsed line, a belly in the pipe, or repeated sewer backups, a simple jetting setup may only give temporary relief.
Signs you need a stronger solution include:
- Water backs up again soon after cleaning
- The hose cannot pass a certain point
- You hear gurgling from multiple drains
- The line drains only for a short time
- The pipe has a history of damage or repairs
In those cases, jetting may still help with diagnosis or partial cleaning, but you may need inspection or professional repair. A clean line is good. A damaged line still needs fixing.
Practical tips for better results
Here are a few tips that make the job easier and improve cleaning performance:
- Run hot water only if your hose and washer are rated for it.
- Pre-flush the line lightly to soften buildup before jetting.
- Use shorter hose lengths first if the clog is near the access point.
- Work slowly around bends instead of forcing the hose.
- Clean the hose after each use so grease does not harden inside it.
One more useful point: if you expect heavy grease, a little warm water before jetting can help loosen the buildup. But do not use very hot water unless every part of your setup is rated for it. Some hoses and seals do not handle heat well.
Credit: pressurewasherlab.com
Maintenance after the job
After you finish, rinse the hose with clean water. Check the nozzle holes for clogging. Remove and inspect fittings for wear. If you store the hose dirty and wet, the next job will be harder and the parts will wear faster.
Keep the setup simple and organized. Label fittings if needed. Store the hose straight or in a loose coil. A crushed hose can develop weak spots that fail later under pressure.
If you plan to use the jetter often, make a small checklist for each use: hose condition, nozzle condition, fitting tightness, and washer output. That small habit saves time and prevents surprises.
Final thoughts
Learning how to convert pressure washer into sewer jetter is really about building the right connection between water pressure and pipe cleaning. The process is not complicated, but it does require the right hose, the right nozzle, and careful use. If you respect the limits of your washer and your plumbing, the setup can be very effective for routine drain cleaning.
Start with a safe, well-rated system. Use the correct access point. Work slowly. And remember that the best jetting is not about brute force. It is about controlled water flow, proper tools, and a clear understanding of what the pipe can handle.
FAQs
1. Can any pressure washer be converted into a sewer jetter?
Not really. The washer must have enough pressure, enough water flow, and the correct outlet connection. Small units may work for light drain cleaning, but they are not ideal for long or heavy sewer lines.
2. What PSI is safe for a homemade sewer jetter setup?
That depends on the hose, nozzle, and pipe condition. Lower to moderate pressure is often safer for home plumbing. Old or fragile pipes need extra care. Always match the hose and nozzle ratings to the washer.
3. Do I need a special nozzle for sewer jetting?
Yes. A regular spray nozzle is not the same as a sewer jetter nozzle. You need a nozzle designed to push the hose forward and clean the pipe wall at the same time.
4. Can a converted pressure washer remove tree roots?
It may help with small root growth, but it is usually not enough for serious root intrusion. Roots often need a stronger jetter, a cutting head, or professional pipe repair.
5. Is it safe to use a sewer jetter on old pipes?
It can be safe if you use the right pressure and work carefully, but old pipes are riskier. Test gently, watch for leaks or backflow, and stop if the pipe shows signs of weakness.
