If your hedge trimmer leaves torn leaves, brown tips, or rough lines, the blades are probably dull. A sharp tool does not just look better. It also cuts faster, puts less stress on the motor, and makes your hedge healthier.
Learning how to sharpen hedge trimmer blades is not hard, but it does need care. The goal is not to make the blade razor sharp. The goal is to restore clean cutting edges so the trimmer can slice through branches smoothly and safely.
In this guide, you will learn when to sharpen, what tools to use, how to do it step by step, and how to avoid common mistakes. You will also see simple care tips that help your blades stay sharp longer.
Know When the Blades Need Attention
Before you start sharpening, make sure sharpening is really the problem. Some trimmers feel weak because of low battery power, a dirty blade bar, or loose parts. But if the trimmer is dragging, chewing leaves, or leaving uneven cuts, dull blades are often the reason.
Here are common signs:
- The hedge looks frayed after trimming.
- The tool has to work harder than before.
- You need to pass over the same spot more than once.
- Small branches get crushed instead of cut.
- The blade heats up faster during use.
One thing beginners often miss is this: dull blades do not always look damaged. They can still look shiny and normal, but the cutting edge may be rounded off. That is why performance matters more than appearance.
Another useful clue is vibration. If the trimmer shakes more than usual, it may not only be dull. It could also have loose screws, bent teeth, or worn drive parts. Sharpening helps, but it should not replace inspection.
What You Need Before You Start
You do not need a big workshop. Most hedge trimmer blade sharpening jobs can be done with a few basic items. The right tools make the job cleaner and safer.
| Tool | Why it helps |
|---|---|
| Flat hand file or sharpening stone | Used to restore the cutting edges |
| Wire brush | Cleans sap and dirt from the blades |
| Rag or cloth | Wipes off debris and oil |
| Gloves | Protects your hands from sharp edges |
| Safety glasses | Protects your eyes from metal dust |
| Lubricating oil | Reduces friction after sharpening |
| Screwdriver or wrench | Helps remove the blade if needed |
If your blades are heavily damaged, a file may not be enough. Deep chips, bent teeth, or cracked metal may need professional repair or replacement. Sharpening works best for normal wear, not serious damage.
For official safety guidance on outdoor power equipment, you can also check the Occupational Safety and Health Administration. Safety matters just as much as sharpness.
Prepare the Trimmer the Right Way
Good sharpening starts before the first stroke. Many mistakes happen because people rush into the job while the tool is still dirty or connected to power.
Disconnect the power source
For electric trimmers, unplug the cord or remove the battery. For gas models, shut the engine off and let it cool completely. Never work on a running or warm blade system.
Clean the blade first
Use a wire brush and rag to remove sap, mud, and plant residue. Dirt hides the edge and makes sharpening uneven. Sticky buildup can also make the file slip.
A clean blade gives you a clear view of the teeth. That means you can see which parts need the most work and avoid removing too much metal.
Inspect for damage
Look closely at the teeth. Check for bent tips, cracks, missing pieces, and loose screws. If the blade bar is loose, tighten it before sharpening. If the blade is warped, sharpening alone will not fix the cut.
This is one of the most overlooked steps in how to sharpen hedge trimmer blades. People often blame dullness when the real issue is mechanical wear or poor alignment.
Understand the Blade Shape Before Filing
Hedge trimmer blades are not sharpened like kitchen knives. Most blades have small, angled cutting edges on each tooth. You only need to restore that edge, not reshape the whole tooth.
The cutting teeth usually move back and forth against a stationary blade. Clean cutting depends on the edge meeting the plant material at the right angle. If you file too much, you can change that angle and reduce performance.
That is why light, controlled strokes are better than heavy pressure. Let the file do the work.

Credit: urbanorganicyield.com
Match the original angle
Look at one tooth and study the bevel. File along that same angle. If you change the angle too much, the trimmer may cut poorly even after sharpening.
A common beginner mistake is filing straight across the tooth. That can round off the edge and make the blade worse, not better.
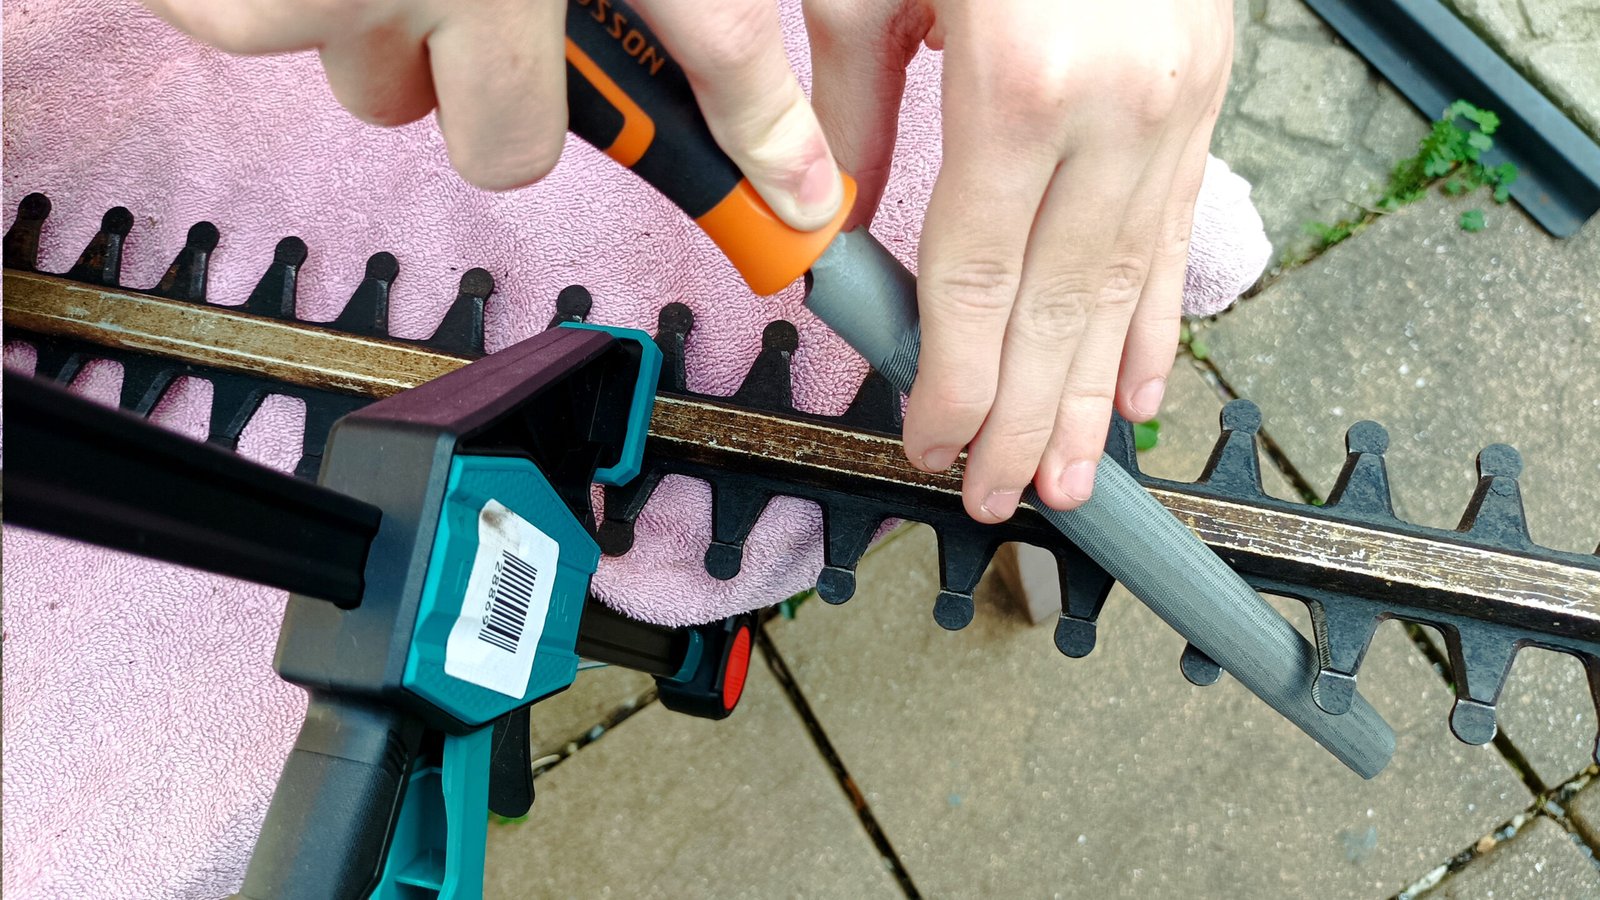
How to Sharpen Hedge Trimmer Blades Step by Step
Once the tool is clean and inspected, you can start sharpening. Work slowly and keep your strokes even. The process is simple, but accuracy matters.
- Secure the blade. Clamp the trimmer in a stable position or rest it on a solid work surface. Make sure it cannot move while you work.
- Choose one tooth at a time. Focus on the visible cutting edge of each tooth. Do not try to sharpen the whole blade in one pass.
- File in the original direction. Use smooth strokes that follow the tooth angle. Move in one direction with steady pressure.
- Use light pressure. Two or three controlled strokes are often enough for each tooth. Heavy filing removes too much metal.
- Work across the full blade. Move from one end to the other so the sharpening stays even.
- Check for uniform edges. The teeth should look similar in shape and sharpness. Uneven sharpening can cause rough cuts.
- Wipe the blade clean. Remove metal dust and check your progress before adding lubricant.
If the blade is very dull, you may need several light passes. Do not force a quick result. A steady hand creates a better edge and extends the life of the blade.
Another detail many people miss is tooth consistency. One overly sharp tooth and one dull tooth can create uneven cutting. The trimmer may pull or chatter. Consistency is more important than making one tooth perfect.
What to do if the blade has nicks
Small nicks can usually be filed away gently. Try to remove only the damaged spot and keep the original shape as much as possible. If a tooth is badly chipped, it may be safer to replace the blade section or the full blade assembly.
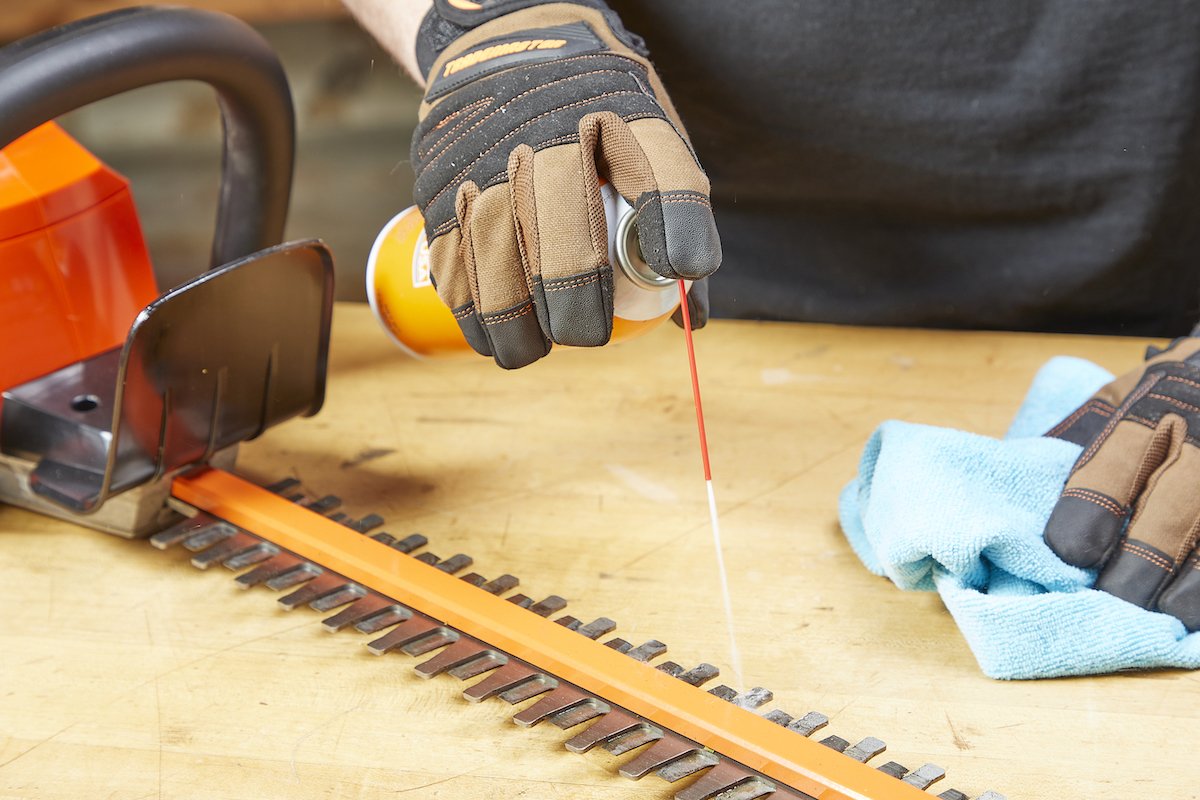
Clean, Lubricate, and Reassemble
Sharpening is only part of the job. If you skip cleaning and lubrication, the blades may wear down fast again.
After filing, wipe all teeth and moving parts with a dry cloth. Remove fine metal dust. Then apply a light coat of lubricating oil or blade spray. This reduces friction, protects against rust, and helps sap slide off more easily during the next use.
Check the screws and fasteners as well. A loose blade assembly can create poor cuts, noise, and extra wear. Tighten only to the manufacturer’s recommendation. Over-tightening can also cause problems.
Test the Blades Before You Trim a Hedge
Never go straight into a large job without a quick test. A few seconds of testing can save you from poor cuts and unnecessary strain on the tool.
Reconnect the power, then run the trimmer for a short moment in open air. Listen for smooth movement. There should be no strange grinding, rattling, or scraping. If the blade vibrates too much, stop and check alignment.
Then try trimming a small branch or a few light stems. The cut should be clean and easy. If the tool still tears or struggles, the problem may be more than dullness.
Credit: bobvila.com
Common Mistakes That Make the Job Worse
Even a simple sharpening job can go wrong if you rush. These errors are very common, especially for first-time users.
- Filing without cleaning first. Dirt hides the edge and scratches the blade.
- Using the wrong angle. This changes how the blade cuts.
- Removing too much metal. The blade wears out faster.
- Ignoring bent teeth. Sharpening cannot fix misalignment.
- Skipping lubrication. Dry blades wear and heat up faster.
- Working without disconnecting power. This is dangerous and unnecessary.
A less obvious mistake is over-sharpening. Some people keep filing because they want a “perfect” edge. But hedge trimmer blades are designed for efficient plant cutting, not fine knife work. Too much filing can shorten the life of the blade.
How Often You Should Sharpen
There is no single number that works for every hedge trimmer. It depends on how often you use it, what kind of hedges you cut, and whether the branches are thick or woody.
As a simple rule, sharpen the blades when you notice poorer cutting performance. For heavy users, this may be every few weeks in the growing season. For light home use, a few times per year may be enough.
Hard or dry branches dull blades faster than soft new growth. Sand, dust, and dirty hedges also speed up wear. If you trim near fences, stones, or wire, check the blades more often. One hidden cause of dullness is accidental contact with tiny foreign objects that you do not even notice.
Care Habits That Keep Blades Sharp Longer
Good blade care is not only about sharpening. Small habits can make a big difference in how long the edge lasts.
Keep the blade clean after each use
Wipe off sap and plant juice before storing the trimmer. Sticky residue hardens over time and makes the next cut harder.
Use the trimmer on the right material
Hedge trimmers are for hedges and light branches. Do not use them like pruners on thick wood, vines with wire, or material mixed with grit. That kind of use damages edges quickly.
Store it dry
Moisture causes rust. Keep the trimmer in a dry place and lightly oil the blades before storage.
Check blade alignment regularly
Even a sharp blade will cut poorly if the teeth do not meet correctly. A quick alignment check can prevent bigger problems later.
When Sharpening Is Not Enough
Sometimes the issue is beyond normal wear. If the trimmer still performs badly after sharpening, consider these problems:
- The blade bar is bent.
- The drive mechanism is worn.
- The motor is weak or failing.
- The teeth are too damaged to restore.
- The blades are not aligned correctly.
If you have done the basic steps and nothing improves, replacement may be the smarter choice. A worn-out blade can waste time and put stress on the whole machine. In many cases, a new blade costs less than repeated repairs and poor results.
Simple Safety Rules You Should Never Skip
Sharpening tools always deserve respect. Hedge trimmer blades are long, thin, and sharp in many places, even when dull.
- Wear gloves and eye protection.
- Disconnect power before touching the blade.
- Keep your hands away from the cutting edge.
- Work in good light.
- Use a stable surface so the trimmer cannot slip.
If you feel unsure, stop and check the manual for your exact model. Different brands may have specific blade designs or maintenance rules. A little caution is better than a damaged tool or injury.
Credit: toptenreviews.com
Better Cuts Start With Better Maintenance
Knowing how to sharpen hedge trimmer blades gives you cleaner cuts, smoother operation, and less effort in the yard. It also helps your hedges recover better, since clean cuts are less likely to tear plant tissue.
The real secret is not only sharpening. It is doing the full job well: clean the blades, inspect them, sharpen with the right angle, lubricate after, and test before trimming. That routine keeps the tool in better shape and saves time later.
If you want the best results, treat sharpening as part of regular care, not a once-in-a-while fix. Small maintenance now prevents bigger problems later, and your hedges will show the difference.
FAQs
1. How do I know if my hedge trimmer blades are dull?
If the trimmer tears leaves, leaves rough edges, or struggles with small branches, the blades are likely dull. More vibration and extra effort are also common signs.
2. Can I sharpen hedge trimmer blades with a regular file?
Yes, a flat hand file usually works well for normal sharpening. The key is to follow the original tooth angle and use light, even strokes.
3. How often should hedge trimmer blades be sharpened?
It depends on how often you use the tool and what you cut. Many home users sharpen a few times a year, while frequent users may need it more often during the season.
4. Should I remove the blade before sharpening it?
Not always. Some people sharpen the blade while it is still attached, but removing it can make cleaning and inspection easier. Follow your model’s manual if blade removal is recommended.
5. When should I replace hedge trimmer blades instead of sharpening them?
Replace the blades if they are cracked, badly bent, heavily chipped, or still cut poorly after proper sharpening. Severe damage usually cannot be fixed by filing alone.
